AUDIO CLIP RIGHT-CLICK MENU
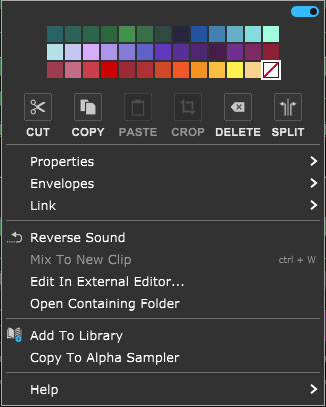
Mixcraft 10's clip right-click menus are pretty awesome if we do say so ourselves. Let's go over them:
• Menu Persist Switch
The blue horizontal slider at the top-right of the menu enables persistent menus. When enabled, the right-click menu stays open while multiple functions and options are selected; to close the right-click window, simply click anywhere outside of it.
If the Menu Persist slider is disabled, the right-click window automatically closes when a single action or option is selected.
• Clip Color Palette
Use this to select a color for the clip.
• Cut, Copy, Paste
Allows cutting, copying, and pasting of the clip.
• Crop
If a portion of a clip is currently selected by clicking and dragging, either on or outside of the clip, Crop removes any part of the clip outside of the selection range. (It's generally easier to start the highlighted part of the clip from outside the clip.)
• Delete
If a portion of a clip is currently selected by clicking and dragging, either on or outside of the clip, Delete removes the selected part of the clip - essentially the opposite of the Crop command. This often results in splitting the clip into two clips.
• Split
Splits the clip into two separate clips at the current Playhead location. Split has no effect if the Playhead isn't atop the clip.
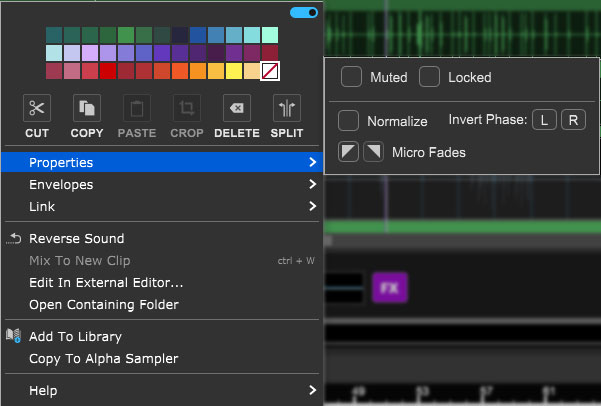
• Properties
Muted- Checking this mutes clip audio output. Muted clips will appear grayed out and [Muted] text will be added to the onscreen clip name.
Locked- Freezes all location and clip size/length parameters. [Locked] text will be added to the onscreen clip name. Clips can be unlocked by unchecking the Locked check box.
Normalize- Raises the overall volume of the clip so that the loudest peak is at zero dB. This it not a destructive process, that is, the audio isn't permanently edited, it's strictly a playback parameter. Normalization differs from compression or limiting in that dynamic relationships of the audio aren't altered; it just increases the overall volume of a clip if there's any unused headroom. [Normalized] text will be added to the onscreen clip name.
Invert Phase L/R- Flips the polarity of the left or right channel of a clip. Typically you'd use this to reduce the phase cancellation that can occur when stereo mics are used to record a source (overhead drum mics, for example). The admittedly non-scientific procedure is generally to flip one channel's phase and see what sounds better. [Invert L] or [Invert R] will be added to the clip name.
Micro Fades- Besides being the hairdo of choice for Boyz II Men in 1991, Micro Fades adds a tiny volume fade at the beginning or end of audio clips. This helps to eliminate clicks if the clip begins or ends at a non-zero crossing in the middle of an audio waveform. A tiny inverted triangle will appear in the upper-left corner of the clip if Micro Fade in is selected, or in the upper-right corner if a Micro Fade out is selected.
Channels- Sets the clip to play back either left, right, or both audio channels for stereo clips. If only L or R is selected, only one side of the audio plays back monophonically - in other words, it will be center-panned in the stereo image. The clip waveform display will show a single waveform and [Left Channel] or [Right Channel] will be added to the clip name.
• Envelopes
These add preset-configured volume adjustments to individual clips in the form of fade-ins, fade-outs, or overall level. Envelopes do not permanently alter the wave data and can easily be removed.
Envelope settings are reflected in the volume curve line that's superimposed on top of the clip waveform display and clips will always default to a volume setting of 100%. Envelopes can adjust clip volume between a range of 0-200%.
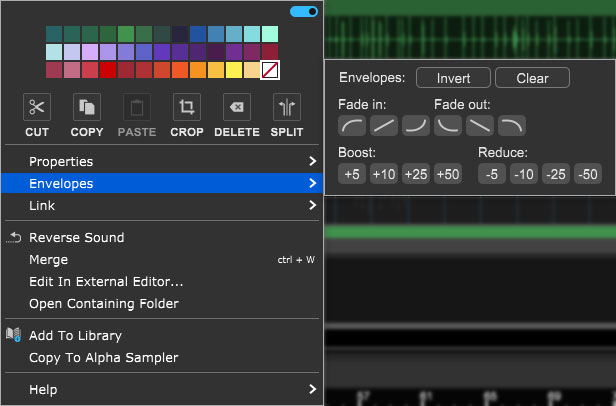
Invert- Vertically "flips" the current Envelope curve. For example, if a clip has a fade that begins at minimum volume and gets louder, Invert will make the clip begin at maximum volume, and get quieter. Invert even works on static volume settings; for example, if the clip is at 80% volume, Invert will change the clip volume 20%. Note that Invert can be undone by simply clicking a second time.
Clear- Initializes the clip volume setting to 100%
Fade In/Fade Out buttons- These six buttons automatically apply logarithmic, linear, or exponential fade-in or fade-out volume curves.
Boost/Reduce: These buttons add or subtract overall clip volume in 5, 10, 25, or 50% increments.
When the blue Menu Persist switch is enabled (at the top of the right-click window), the Envelopes window remains open, making it easy to experiment with various volume curves. You can always hit the Clear button and start over if things get crazy.
• Link
Related clips can be linked together letting them move as a single unit. This is useful when moving video clips with associated audio, multiple-mic drum recordings, or layered background vocals.
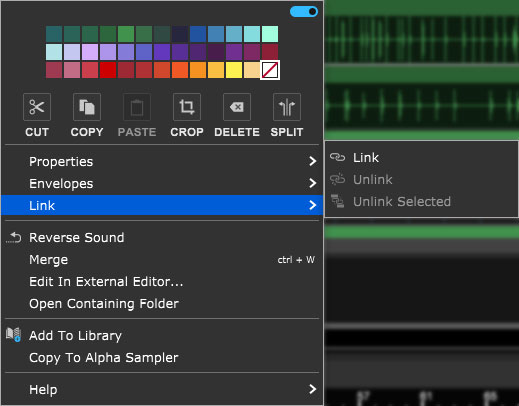
Link- Links clips together. Multiple clips must be selected (otherwise the Link command will be grayed out).
Unlink- Unlinks only the clip that's being right-clicked.
Unlink Selected- Unlinks all linked clips in the group.
Linked clips will add [Linked] to the clip name and display an "interlocked rings" icon.
• Reverse Sound
Audio in the clip plays backwards. Amongst other weirdness, this can be useful for creepy swelling reverse reverb effects.
Hint: Reverse the dry audio before printing the reverb, then reverse the reverb audio and place it before the dry audio clip. This one took me years to uh... reverse engineer.
• Merge
Combines multiple clips into one. Empty space between clips in the Clip Grid becomes silence in the newly created single clip.
• Add To Library
Allows clips to be added to Mixcraft's onboard sound library for future use.
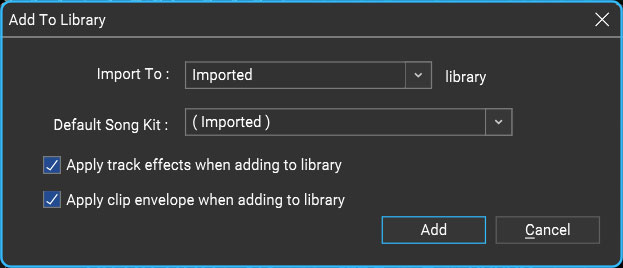
Import To
Choose or type in the library name to import to. To create a new library, type in a name.Default Song Kit
Select or type in a name for a song kit if the imported sounds are to be associated with a specific Song Kit. This can be easily edited later if need be.Apply track effects when adding to the library
Track effects will be applied to the final library sound.Apply clip envelope when adding to library
Clip envelope adjustments will be applied to the final library sound.Add
This starts the import. While an import is happening, you are free to edit sounds or use Mixcraft without interruption.Cancel
Closes the Add To Library window with no import occurring.
• Edit In External Editor...
Allows clips to be edited using dedicated sample editing software for advanced editing of clip audio. To use this function, you'll need to define which audio editing app you'd like to use. This is set in Mixcraft Preferences>General>External Wave Editor.
If no audio editing app has been set and theEdit In External Editor... command is selected, the Mixcraft Preferences>General>External Wave Editor menu is automatically opened.
• Open Containing Folder
Opens the Window Explorer folder where the audio clip is located. This is useful if you need to export or save the raw audio to another drive or computer.
• Separate Into Stems... [MIXCRAFT 10 PRO STUDIO ONLY]
Starting in Mixcraft 10.5, using the power of AI, you can separate a music track into stems for your remixing pleasure. Create interesting remixes or use it to play along and record your performance. (Note: if you do not see this option and you own Mixcraft 10 Pro Studio, you may need to follow the simple download and installation instructions.) Stem Separation
• Copy To Alpha Sampler
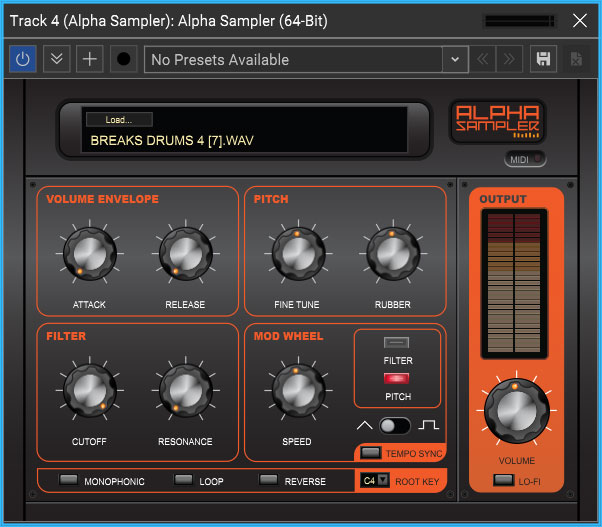
This super fun and easy-to-use feature automatically creates a new instrument track with an Alpha Sampler instrument and loads the clip audio into the Alpha Sampler. This lets you play and record the clip as a sampler instrument with a single mouse click. Hooray for computers!
The existing audio track and clip will be unaffected, and the clip/sound automatically saves with the Alpha Sampler in the project.
For more information on using Alpha Sampler, please check out the Alpha Sampler section.