VOCODER TRACK
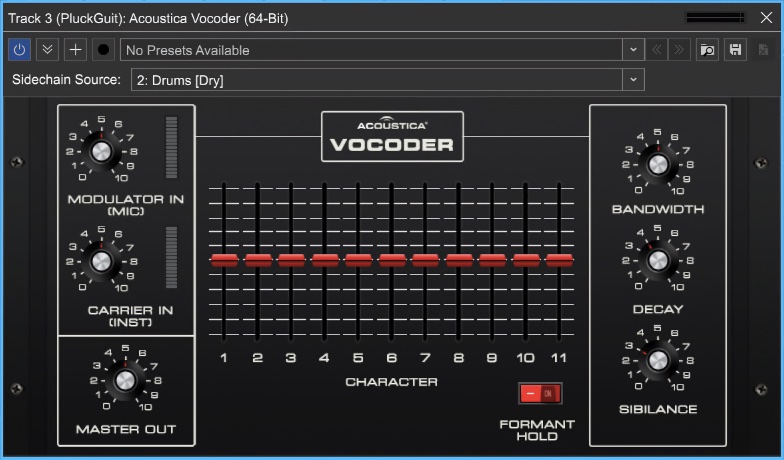
Mixcraft 10 includes an awesome vintage-style vocoder. For full information on how it works and what its controls do, please jump to the Acoustica Vocoder section. We’ll go over just enough vocoder operation to get you up and running with Vocoder Tracks. Basically speaking, a vocoder imparts the character of one sound onto another. The base sound is known as the “carrier,” and the sound altering the character of the base sound is known as the “modulator.” In the case of the classic “talking robot” effect vocoders are known for, a full, brassy, constant sawtooth wave synthesizer sound is the carrier, and a spoken voice talking into a mic is the modulator. A synth sawtooth wave or full string sound is an ideal carrier wave, because it’s constant, and contains a wide frequency spectrum.
We’ll get into more detail in the Acoustica Vocoder section, but for now, the important part to understand is that the carrier and modulator signals must be properly routed to the vocoder for it to work correctly. You could manually set up the same configuration, but Mixcraft’s Vocoder Track makes this really easy by setting up everything in one step.
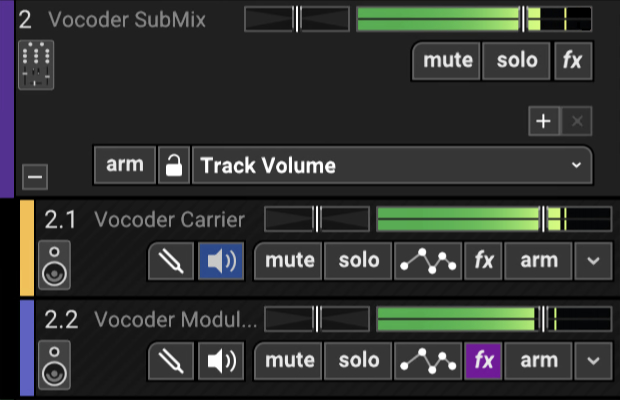
The following four things occur when a Vocoder Track is created:
• A Submix Track containing an audio track (Vocoder Modulator) and an Instrument Track (Vocoder Carrier) is created.
• Software Monitoring is enabled for the audio track - this lets you use a microphone or other input source for real-time modulation.
• The Mixcraft instrument preset Vocoder Saw is opened in the instrument channel, and the Acoustica Vocoder is inserted into the first effects slot.
• The Vocoder Modulator audio track is routed to the Acoustica Vocoder sidechain input. This is the important secret sauce because the microphone audio (aka, the modulator) needs to control the vocoder.
With everything above set up, vocoding is as easy as plugging a microphone in, making sure its audio input is routed to the Vocoder Modulator audio track, selecting the Vocoder Carrier instrument track, and holding down notes on a keyboard controller.