TRACK AUTOMATION
Mixcraft’s track automation allows automation of volume, pan, and send tracks, as well as all parameters of a track’s plug-ins and virtual instruments. You can view or hide as many parameters as you like, with each parameter occupying its own “lane,” until you run out of screen space. It’s also compatible with Mackie Control, TranzPort, and other hardware control surfaces.
AUTOMATION LANES EXPLAINED
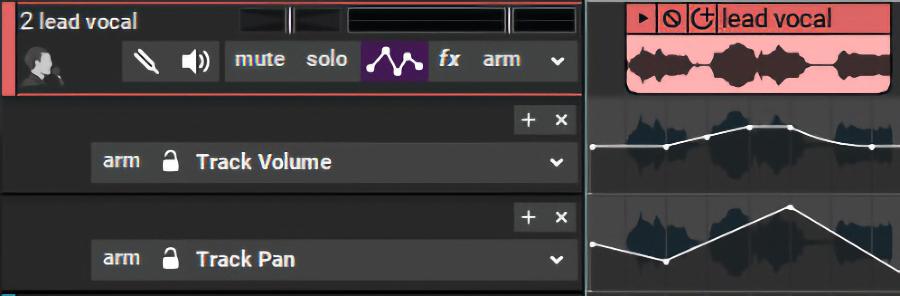
Automation is displayed as a continuous jagged horizontal line (that’s a fabulous title for an Alanis Morissette record). Since Mixcraft allows the automation of multiple simultaneous parameters, it would get confusing if the automation line were superimposed directly atop audio and MIDI clips. Thus we give you... automation lanes! Automation lanes are areas beneath a track’s clips where automation lines for the track are displayed and edited. To make viewing and editing multiple parameters easy, there’s no limit to the number of lanes that can be viewed simultaneously, but lanes may also be hidden to conserve screen real estate.
TRACK LIST AUTOMATION CONTROLS
• Track Automation Button
The Track Automation button displays and hides automation lanes for individual tracks. If a track has no prior automation, a single automation lane opens displaying volume automation when the button is clicked. If a track has existing automation, you’ll see all automation lanes with views currently enabled (using the + and x buttons described below). The track automation button colors change as follows:
Track Automation lanes are hidden, the track contains no automation.
Track Automation lanes are displayed, the track contains no automation.

Track Automation lanes are hidden, the track contains automation.

Track Automation lanes are displayed, and the track contains automation.
The Toggle Automation button only hides and displays the automation lanes, but has no effect on automation playback. In other words, lane automation still happens even if the lanes are hidden with the Toggle Automation button.
You can view as many automation lanes for a single track, or tracks, as you like. This makes it easy to edit numerous parameters simultaneously. To open additional automation lanes for a track, click the + sign, then click the Automation Parameter drop-down menu to select the desired parameter for editing. To hide an automation lane, click the X sign. When an automation lane is hidden, the automation still remains active - it’s simply hidden from view.
To simplify remembering which track parameters contain automation data, the text for parameters containing automation data is displayed in blue in the Automation Parameter drop-down submenu.
• [+] Button

Adds a new automation lane to the track.
• [X] Button

Hides the automation lane.
• Arm

This is the automation Arm button to the left of the lock icon in the automation track header, not the record Arm button above it. Clicking
this allows recording of automation data either via the onscreen control associated with the lane’s automation parameter, or by using a hardware controller assigned to a parameter. (See “Recording Automation Using Hardware Controllers.”)
• Lock Button

Synchronizes the movements of lane automation with onscreen displays of channel volume and pan, as well as submix, send, output bus, and master track volumes. As these parameters are being controlled by lane automation in lock mode, the onscreen controls for these parameters will be disabled when in lock mode - you’ll see them shrink slightly and “go dark.” Automation parameter lock is especially useful when using hardware control surfaces with motorized faders, as it keeps onscreen and hardware controls locked together at all times.
If an automation lane’s Lock button is not engaged, mixer controls will not move, and their control positions act as “master” controls in addition to automation data. In other words, if lane automation contains a volume curve, moving a channel fader will cause the entire volume curve to become louder or quieter, but the automated volume will still occur.
SELECTING PARAMETERS FOR AUTOMATION
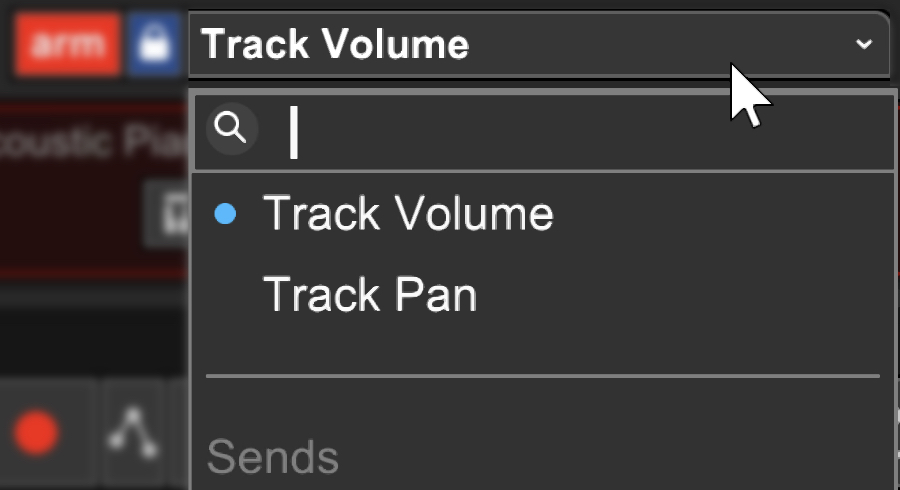
This drop-down selects which parameter the automation lane will control. These can be Mixcraft mixer parameters such as channel volume, pan, or send levels or individual parameters of a plugin or virtual instrument; clicking the name of a plugin or virtual instrument will display a drop-down submenu displaying all automatable parameters for the plug-in or instrument.
To select a parameter for automation, click a track’s Automation Parameter drop-down lane in the track list - by default it will say Track Volume. You can click it or the downward-facing arrow next to it.
ADDING AND EDITING AUTOMATION POINTS
To add automation points, simply click on an automation lane’s automation line and drag the point up and down. The position of newly created automation points conforms to the current snap setting.
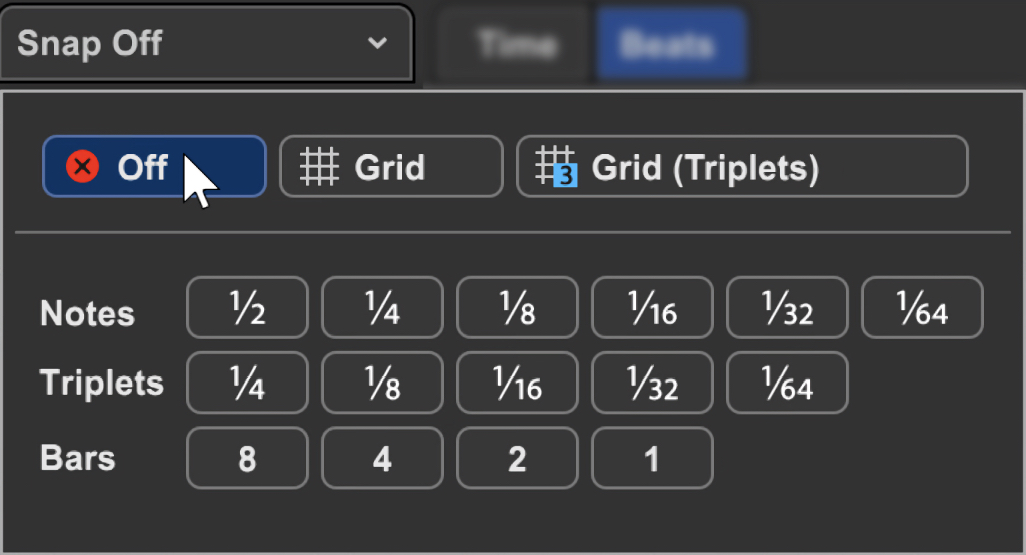
In most situations, you won’t want automation point positions to “quantize” to a note value, so it’s best to set the Snap setting to Snap Off.
To move a horizontal section of the automation line, hold down the [SHIFT] key while dragging. The cursor turns into an up/down arrow and moves the entire line between the two closest points. This is super handy for increasing or decreasing the volume for a word or group of words in a vocal track, a specific musical phrase, etc.
Dragging an automation point over other automation points will cause them to be “overrun” and deleted upon mouse release.
FINE-TUNING AND DELETING AUTOMATION POINTS
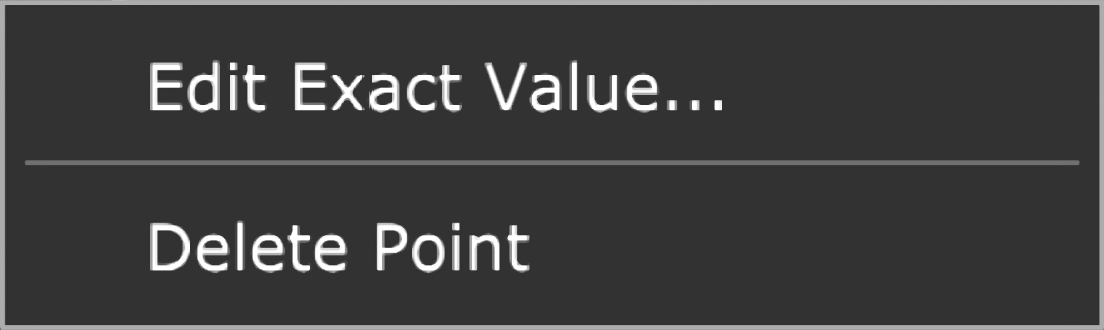
• Edit Exact Value
To precisely set automation point values, right-click it and choose Edit Exact Value.
• Delete Point
To delete an automation point, right-click on it and choose Delete Point.
ADJUSTING MULTIPLE AUTOMATION POINTS WITH THE LINE ADJUSTER TOOL
The Line Adjuster tool lets us do a couple of more convenient tricks.
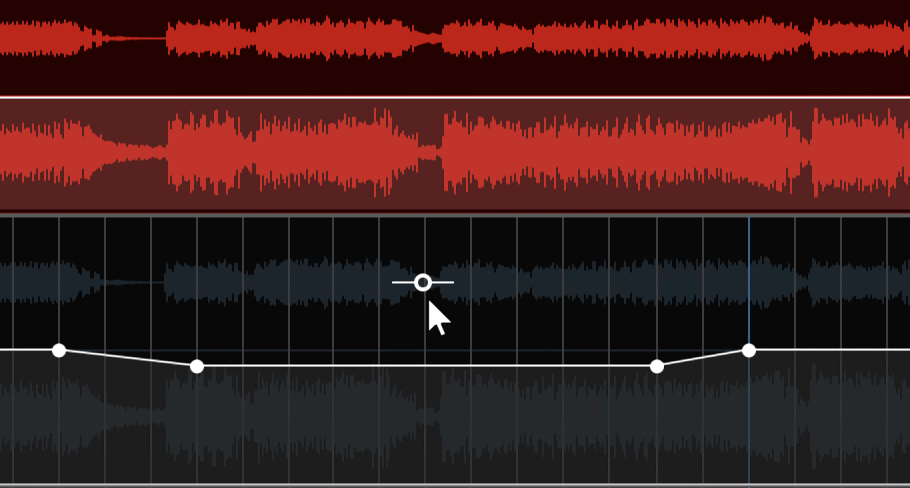
When the cursor hovers between two automation points, you’ll notice that the Line Adjuster appears above or below the automation line. Clicking and dragging it up or down moves the closest automation points to its left and right.

To move more than two automation points simultaneously, click and drag a purple highlight square over multiple automation points.
Highlighted points will show a magenta circle around them. Moving the Line Adjuster tool up and down moves all of the highlighted automation points.
INSTANT BOOST/INCREASE AUTOMATION LINE ADJUSTER
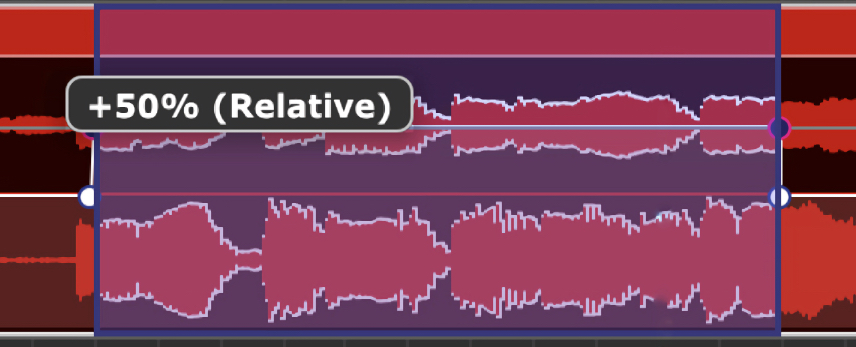
To quickly and easily add boost or decrease automation to clips or track regions with no existing automation nodes, click and drag a purple highlight region over the desired region. You’ll see an orange automation line adjuster when hovering over the selected area. Moving this up or down will instantly create four automation nodes, creating a new horizontal automation line. Once created, this automation line can be manipulated like any other automation line. This feature can save a fair amount of mouse clicking!
CUTTING, COPYING, PASTING, AND MOVING AUTOMATION DATA
To Cut a section of automation, highlight the section of automation to be cut by clicking and dragging over the area to be cut. Now select [CTRL]+X either in Mixcraft’s file menu or by right-clicking the mouse to copy. You can paste the cut automation data to a new location by positioning the Caret marker in the desired new location, then selecting [CTRL]+V either in Mixcraft’s file menu or by right-clicking.
To Copy, highlight the section of automation you’d like copied by clicking and dragging over the area to be copied. Now select [CTRL]+C either in Mixcraft’s file menu or by right-clicking the mouse to copy. Position the Caret marker in the desired copy location, and paste by selecting [CTRL]+V either in Mixcraft’s file menu or by right-clicking.
Track automation curves can also be moved by highlighting the desired automation area (i.e. purple highlight) [OPTION] dragging, or copied by [ALT]+dragging.
Automation data may be freely copied between tracks, and even to different parameter lanes. You can also copy multiple automation lanes or automation lanes and clips simultaneously. The only limitation is that Mixcraft will only copy automation data to visible lanes, e.g., if volume and pan lanes are copied to track with only a volume lane visible, only the volume controller data will be copied. This is done to prevent automation data from copying to an “invisible” location and causing confusion.
AUTOMATION CURVES
In addition to the usual “straight line” automation, curves can also easily be adjusted for logarithmic and exponential response. Amongst other uses, these are especially useful for accurately creating “record-style” fade-ins and fade-outs.
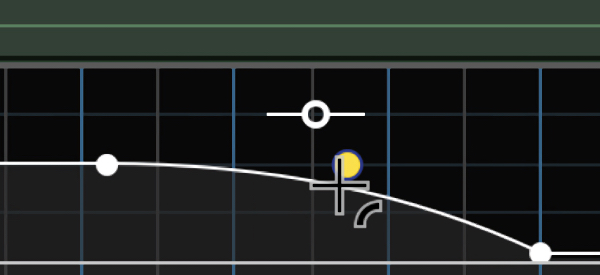
To adjust an automation line’s response curve, hover the mouse pointer over an automation line. A yellow dot will appear toward the middle of the automation line. Click and drag the yellow dot up or down to “bend” the line toward a logarithmic or exponential curve. Curves can also be biased toward the beginning or end of the automation section by dragging the yellow dot left or right.
Fading Out Again
To end a project with an automated fadeout, display the Master Track and select Master Volume in the automation drop-down. Scroll to the end of the project and add volume automation points to lower the volume for the whole project. Learn more in the “Automation and Controller Mapping” section. LINK HERE
TEMPO AUTOMATION
Tempo automation uses standard automation-style curves tp control tempo changes graphically in the Master Track. This makes gradual tempo increases or decreases a cinch. The tempo automation lane is only visible with the Master Track view enabled.
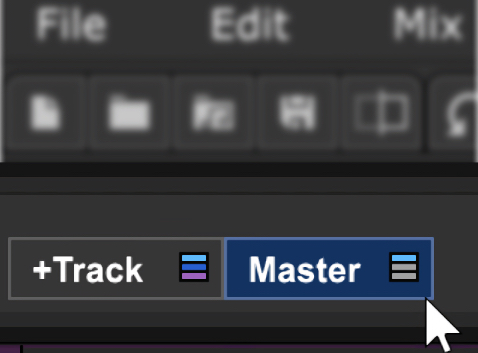
Click the Master button at the top of the Track List to show the Master Track.
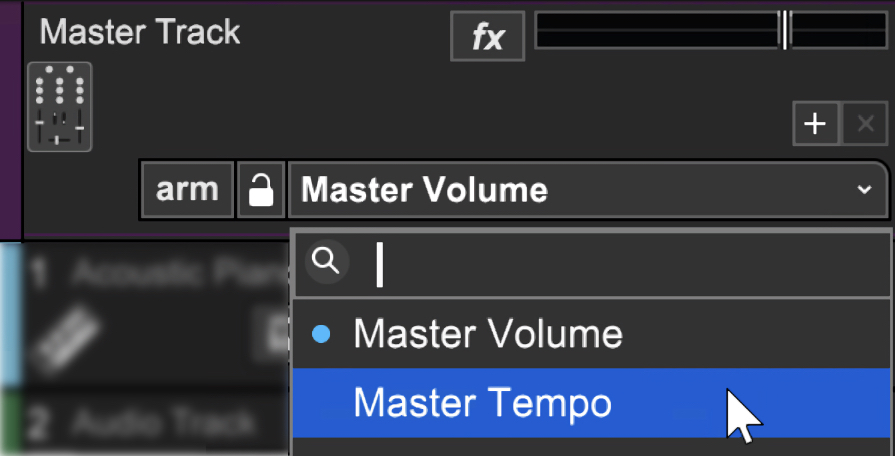
To view the tempo automation lane, click the pop-up next to the Arm button (this defaults to Master Volume) and select Master Tempo. You’ll see the tempo change in the display area of the transport as the song position pointer is moved. All standard automation line operations work as with any other type of automation including adding and deleting points, adjusting overall amounts, or adjusting curve types.
USING TEMPO MARKERS WITH TEMPO AUTOMATION ENVELOPE
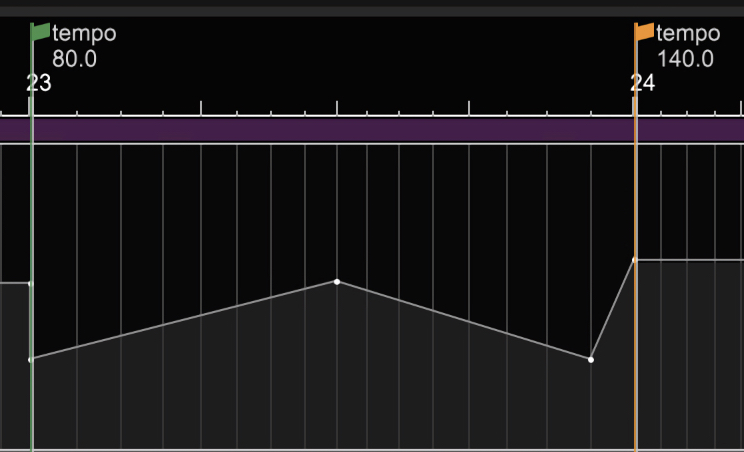
If a marker containing a tempo change is created, the tempo automation line will reflect this by creating two nodes automation line nodes, occurring at the same time - one is an “anchor,” at the previous tempo position, and the other reflects the new tempo.
MANUALLY ENTERING TEMPO IN THE TRANSPORT TEMPO DISPLAY WITH AUTOMATION
When tempo automation is used, new tempos can only be entered via the Transport tempo display if the current Song Position Pointer line is a “flat” area of tempo automation, i.e., a position where tempo automation isn’t currently ramping up or down.
The Transport tempo display numbers are dimmed slightly to indicate when the Song Position Pointer is currently atop an automation ramp.
ADDITIONAL AUTOMATION PARAMETERS
Right-click in the track automation header to display additional parameters.
• Clear
Deletes automation data in the currently selected lane.
• Invert
Reverses the positions of automation data in the currently selected lane. This is useful for reversing the channels with pan automation.
• Boost
Raises automation data value in the selected lane by 5%, 10%, 25%, or 50%.
• Reduce
Lowers the value of automation data in the currently selected lane by 5%, 10%, 25%, or 50%.
• Clear All Automation
Deletes all automation in all lanes for the current track. Be careful with this one!
• Hide Automation Lane
Hides the current automation lane - the same as clicking the X in the lane’s header.