RENDERING VIDEOS
Once the editing of a video is completed, it needs to be output to a single file for playback. Because videos typically contain a large amount of data representing moving picture and audio, video is usually “compressed” as it renders for output using special algorithms designed to reduce file size and required processor power for playback. This compression process can take a while, dependent on your computer’s processor speed.
Mixcraft supports saving video in MP4, WMV, and AVI formats. AVI is an uncompressed format, so the files it creates will be larger than files created using WMV or MP4 format. If you’re uploading video to YouTube, you should choose WMV or MP4 format (to avoid potentially excessive upload times, dependent upon the speed of your Internet connection).
Note: MP4 format is only available with Windows 7 or higher.
To save the current project as a video, click File>Mix Down To>, then select MP4, WMV, or AVI.
MP4 RENDER SETTINGS
To render a movie using the MP4 format, click File>Mix Down To>MP4 in the Main Window menus.

To customize MP4 render settings, click the Edit Details button in the file save window.
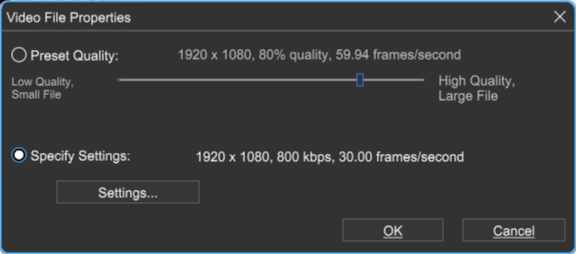
When creating a movie file, you’ll generally need to choose between quality and final file size (i.e., a larger file size equals better quality). If you’re not a video compression guru, simply choose the Preset Quality radio button and move the Quality slider left to choose a preset resulting in a smaller file size at lower quality, or right to choose presets with larger file sizes at higher quality.
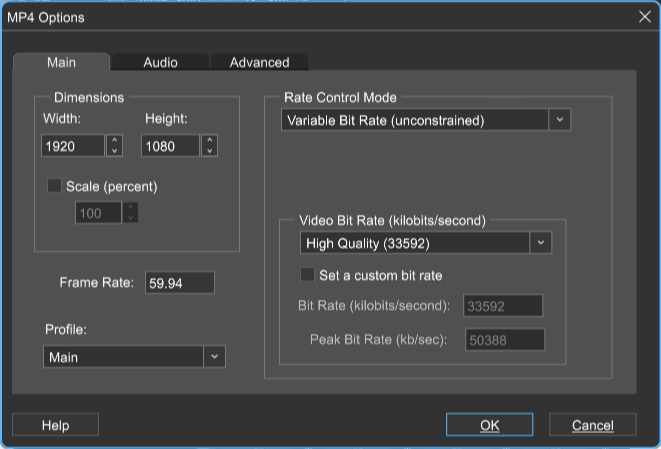
If you’re a little more familiar with video compression and want to further customize MP4 rendering parameters, choose the Specify Settings radio button and click the Settings button. This opens the only-slightly-scary MP4 Options window:
MP4 Compression Settings In The Modern World
Generally speaking, saving every last bit of file size is far less important than it was in the past due to faster Internet connections and larger hard drives. If you’re creating video content for a video upload site such as YouTube, keep in mind that they will compress the file size (and therefore the quality) on their end, so it’s often a better idea to render larger, better-quality videos to maintain fidelity.
MAIN TAB
• Dimensions
The Dimensions drop-down menu allows the selection of the most common standard definition and high-def (HD) sizes. The Set Custom Dimensions checkbox allows a custom video size to be specified.
• Scale
Checking this box lets you scale output dimensions from 1 - 100% of the original video size, with a few restrictions (videos must be at least 40 x 40, for instance).
• Frame Rate
Allows selection of the most common frame rates used in video, film, and TV. The Set Custom Frame Rate checkbox allows a custom frame rate to be used (odd frame rates sometimes don’t play nice with some playback platforms, usually showing up as weird sync issues).
• Profile
Controls the degree of sophistication in encoding and decoding with High resulting in the best quality (and largest file size), and Base resulting in the smallest file size with the lowest fidelity. Main is an intermediate setting between Base and High.
RATE CONTROL MODE
• Variable Bit Rate (Unconstrained)
The unconstrained part means that while the encoder tries to maintain the average bit rate you’ve specified, the bit rate could temporarily hit peak values of any amount. This is the default mode.
• Quality Level Mode
A quality level from 1 - 100% can be specified and the encoder chooses bit rates to match. Lower values result in smaller files and lower quality, higher values result in larger files and higher quality. Microsoft suggests a default value of 70%. We’ve found that setting the quality level at 100% doesn’t guarantee a lossless video. If videos show rendering artifacts at 100% quality, try Variable Bit Rate (Constrained) for improved quality.
• Constant Bit Rate
This generally produces larger file sizes than the VBR options but could be useful if a video needs to be streamed at a specifically limited bit rate and you want to be sure the video’s bit rate never exceeds that.
• Variable Bit Rate (Constrained)
Similar to Variable Bit Rate (Unconstrained) but in addition to setting an average bit rate, you can pick a peak bit rate the encoder isn’t to exceed. There’s a peak bit rate edit control on this tab that will only be enabled if you’ve selected this option.
Note: Constant Bit Rate and Variable Bit Rate are only available when using Windows 8 or higher.
• Video Bit Rate
Influences how large the rendered file will be; additionally, larger files will require a higher-speed Internet connection for smooth streamed playback. A higher bit rate will result in a larger file size, but better fidelity. Click the pop-up menu to choose from standard rates, or set a custom bit rate by checking the Set a custom bit rate box and entering a bit rate.
AUDIO TAB
These settings determine audio quality. Like video settings, higher kbps (kilobyte-per-second) settings result in larger files with improved fidelity. If the audio quality is non-critical (the audio content is spoken word or really really boring), you can reduce this and save file size.
ADVANCED TAB
These options require Windows 8 or higher. If you’re running Windows 7, you won’t see these. All Advanced tab parameters have checkboxes to enable them, so if you’re not sure what to do, just leave everything unchecked and Mixcraft automatically uses the default values.
• Use CABAC Compression
CABAC (Context-adaptive binary arithmetic coding) is a type of lossless compression that may be applied in addition to lossy video compression. It won’t affect video quality and usually results in a smaller file size. It won’t result in smaller file sizes 100% of the time, but it’s likely enough to help that we leave it enabled by default.
If you’ve selected the Base profile on the main tab, CABAC compression won’t be used. If you uncheck this option or you’re using the Base profile, the encoder will use an older and usually less efficient variety of lossless compression called CAVLC instead. To read more about this, see https://en.wikipedia.org/wiki/Context-adaptive_binary_arithmetic_coding. (We recommend listening to the Genesis tune “Abacab” playing while reading it.)
• Adaptive Frame Rate
Checking this allows the encoder to change the frame rate throughout the file; like variable bit rate, but for frame rate instead. We’ve found that this option rarely impacts the rendered file, but it will sometimes produce slightly smaller files if the input video has lots of non-moving video (such as with a slide show).
• Set Max Consecutive B Frames
B frames are non-key frames that can extract data from both the preceding and following frames (as opposed to normal non-key frames, which just get data
from preceding frames) to optimize compression. For more about frame types, see https://en.wikipedia.org/wiki/Video_compression_picture_types
This setting shouldn’t affect output quality, but could increase the amount of processing required for encoding and decoding. The default value is zero, but it can also be set to one or two. We’ve found setting this to non-default values sometimes reduces output file size and sometimes increases it - but we haven’t noticed a repeatable pattern.
• Set Quantization Parameter
Roughly speaking, this sets the amount of fine detail that can be compressed out of the video. The eye notices less detail in frames containing motion than in still frames, for instance, so given a higher Quantization Parameter setting, an intelligent compression algorithm has free reign to remove more detail from those frames.
The valid range is from 0 - 51, with smaller values meaning larger, higher quality files and higher values meaning smaller, lower quality files. However, 18 - 28 is considered the normal range, with 18 considered near-lossless and values above 28 having unacceptably low quality, and 23 a reasonable default value. In testing, we’ve found this to be generally accurate, with the additional caveat that values above 26 actually result in larger files to go with the lower quality.
• Set Rendering Complexity Factor
Microsoft describes this as a quality option, but in practice, we’ve found that higher values result in more compression and lower values result in less compression. The trade-off for high compression is slightly longer render times and potentially lower quality. The valid range is 0-100, with the high values leading to more compression.
AVI RENDER SETTINGS
To render a movie using the AVI format, click File>Mix Down To>AVI in the Main Window menus.

To customize AVI render settings, click the Edit Details button in the file save window.
When creating a movie file, you’ll generally need to choose between quality and final file size (i.e., larger file size will be better quality). Following are the settings in the AVI Render Details window:

• Dimensions
The Dimensions drop-down menu allows the selection of the most common standard definition and high-def (HD) sizes. The Set Custom Dimensions checkbox allows a custom video size to be specified.
• Frame Rate
The Frame Rate drop-down menu allows the selection of the most common frame rates used in video, film, and TV. The Set Custom Frame Rate checkbox allows a custom frame rate to be used (careful, funky frame rates sometimes don’t play nice with some playback platforms, usually showing up as oddball sync issues).
WMV RENDER SETTINGS
To render a movie using the WMV format, click File>Mix Down To>WMV.

To customize WMV render settings, click the Edit Details button in the file save window. This lets you choose specific compression settings when you’re rendering a video project to a WMV video.
If you’re not a video compression guru, select Preset Quality and adjust the slider for the best compromise of file size vs. playback quality. Move it all the way to the left for the smallest possible file size, or all the way to the right for the highest-quality video.
WMV ADVANCED SETTINGS DIALOG
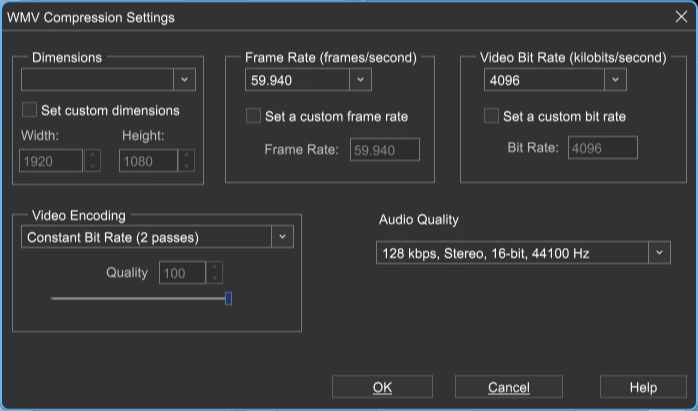
For more detailed control over WMV compression characteristics, select Specify Settings and click Settings... Now would be a good time to put on your propeller cap!
• Dimensions
Specifies the height and width of the video. It defaults to the same resolution as the smallest video in the current project. The dimensions combo box holds a variety of standard settings, or the Set Custom Dimensions box can be set to any desired size.
A few things to remember when setting custom dimensions: height and width must both be even multiples of four, or DirectShow will refuse to render. If the dimensions you choose are too large, DirectShow may not have enough memory to render the video. If the chosen dimensions are a different aspect ratio than the original videos, the resulting video may look stretched or squashed.
• Frame Rate
Specifies how many frames per second the video contains. The frame rate defaults to the highest frame rate found in the project’s video clips. (To find a video’s native frame rate, right-click on the video clip and select Properties.) The Frame Rate combo box contains a variety of standard frame rates, but if you don’t see the frame rate needed, check the Set a custom frame rate box and type in a specific frame rate.
Should I change the default frame rate?
Probably not. Increasing the frame rate to one higher than any of the project’s video clips won’t improve the final video quality while decreasing the frame rate will usually lower the quality. Even if the primary concern is video size, changing the frame rate is not necessarily useful; depending on the chosen encoding method, lowering the frame rate can potentially increase the file size. If you’re trying to alter the frame rate to produce smaller file sizes, you’ll need to experiment to find the best setting.
• Video Encoding
This setting specifies approximately how much bandwidth video playback will require, in kilobits per second. It’s one of the primary factors affecting compression. A higher bit rates mean larger files and higher quality, while lower bit rates result in smaller, lower-quality video files. The right bit rate to use will depend on the dimensions and frame rate. A bit rate that produces a high-quality 720 x 480 video may result in a grainy, pixelated video at 1440 x 1080. Again, you’ll likely need to experiment for the best results.
Microsoft provides a handful of encoding methods for WMV creation. Which one to use depends on your priorities (quality vs. file size) as well as the video content. In practice, an encoding method that produces the best results for one video may not produce the best results for another.
• Constant Bit Rate (One Pass)
This method was designed to handle live streaming video and will usually produce the lowest quality results when rendering to a file. Because it’s a one-pass method, though, it takes half as long to render to file as the two-pass methods, so it might be the choice for you if the world’s ending in a few minutes and you really want to be able to watch the video before it’s all over.
• Constant Bit Rate (Two Pass)
This method will usually produce good-quality video if you’ve set a sufficiently high bit rate. Because it’s a two-pass method, it’ll take twice as long to create the video as one-pass methods will. Since the bit rate will be consistent for the entire video, it should work well for videos intended to stream over a network or the Internet.
• Variable Bit Rate with Quality Setting
Using this encoding method with the quality slider at its highest setting usually results in higher-quality videos than the aforementioned encoding methods. However, the resulting video files tend to be about three times larger. Use this method if quality is the highest priority. This is a one-pass encoding method, which means it will take roughly half as long to create
the video as with two-pass methods. (The number of passes refers only to the creation of the video, and doesn’t affect the speed of video playback.)
• Variable Bit Rate with Bit Rate Ceiling
This two-pass method uses a variable bit rate, which means that it’s likely (but not guaranteed) to produce smaller file sizes than the constant bit-rate methods. With variable bit rate encoding, the bit rate you choose will be the average bit rate, but actual bit rate during playback may vary depending on how complex the video is. (Sections of video with lots of motion will probably have a higher bit rate, and sections with little motion will have lower rates.) This method has a max rate ceiling, which means that it’ll keep the highest bit rates from exceeding the average bit rate. Consequently, this
method is better suited to streaming than the Unconstrained Variable Bit Rate method, but may not produce video of quite as high a quality.
• Variable Bit Rate (Unconstrained)
This method is similar to the VBR with Bit Rate Ceiling method but lacks the bit rate ceiling. This means that, while your specified bit rate will be the average bit rate for the video, the bit rate could reach infinitely high (or at least really, really high) levels during short sections of the video. This could cause choppy playback during these sections during streaming, but can also result in higher quality for these sections, making it a better choice for video to be played back from a hard drive.
• Audio Quality
This section lets you choose the quality sound. It will list all WMV-compatible audio quality options installed on the computer. Audio almost always uses far less disk space than video, so choosing a high audio quality setting will rarely have much relative effect on overall video size. A setting of 128 kbps usually produces acceptable audio quality.
DIMENSION DEMENTIA...
You think audio has lots of format options? We music people have it easy. Video can have a myriad of options with regard to size, frame rate, compression, and more. Just to simplify things a bit, “dimensions” refers strictly to a movie’s size, vertically and horizontally on the screen, expressed in pixels. Here’s a quick primer on sizes and their typical application:
• 320x240
Really small, from back when computers and Internet connections had a tough time handling video content. Rarely used these days.
• 640x480
This was the standard for full-screen video on computers for many years but has fallen by the wayside with faster processors and online connections.
• 720x480 NTSC
Remember that big heavy thing with a glass screen that used to reside in your living room? Me neither. Before high-def, 720x480 was the standard for televisions in the US. NTSC is an acronym for, “a bunch of guys who used to argue about US analog TV standards and are probably now unemployed.” Actually, it stood for “National Television System Committee.”
• 720x576 PAL
The European equivalent of the NTSC, with slightly different dimensions and a different number of resolution lines, so you couldn’t play your Fellini and Truffaut VHS tapes in the US.
• 1280x720
Referred to as 720p, this is the smaller of high-definition formats, generally seen in the “first wave” of flat-panel LCD TVs and digital cameras with video capabilities.
• 1440x1080
Referred to as 1080p, this is super high-def, butterfly-wings-in-your-face-at-the- store resolution. The difference between 1080p and 1080i gets a little confusing, but the basic idea is that the “p” stands for “progressive scan,” meaning that displays are drawn one after the other for more realistic motion. Progressive scan presents the most realistic motion.
• 1920x1080
Referred to as 1080i, the difference between this and 1080p is that the display line drawing is “interlaced.” Content is broadcast at 30 frames per second, but it’s displayed at 60 frames per second by drawing lines in two passes; one for even lines and one for odd lines. This is done to reduce perceived flicker.
OPTIMIZING VIDEO OUTPUT
If you’re using the WMV Compression Settings dialog, you’ll probably want to dig in and read all the details, but here are a few quick answers to help assist with some common goals:
How do I achieve the highest quality video?
Using the Variable Bit Rate with the quality setting encoding option and then setting its quality slider to the highest setting (by sliding it all the way to the right) will almost always produce the highest quality results, but it will also produce files that are about three times larger than other methods. If that’s too big, try reducing the quality slider a bit or choosing a different encoding method. (That said, we don’t recommend the Constant Bit Rate (1 pass) method, as it usually produces low-quality results.) Which encoding method works best generally differs depending on the video content; you might have to experiment with multiple methods.
Bit rate also has a large impact on video quality. Higher bit rates will result in higher video quality, albeit with larger file sizes. There will usually be a point at which a higher bit rate won’t have any noticeable effect, but raising the rate won’t hurt video quality.
How can I create the smallest video files?
Video dimensions and bit rates will usually impact file size the most, with smaller dimensions and lower bit rates producing the smallest files. The encoding method can also be important - don’t choose the Variable Bit Rate (unconstrained) method, and if you choose the Variable Bit Rate with a quality setting method, don’t set the quality slider to its highest setting.
What video settings should I use for YouTube uploads?
YouTube recommends using the same resolution and frame rate as the original video. Unless the file size exceeds YouTube’s limits, it’s best to use bit rates that err on the side of quality rather than file size (in other words, higher bit rates), since YouTube can compress video to produce smaller file sizes but can’t “re-add” quality removed by low bit rates. To view the video clip’s original resolution and frame rate, right-click on the clip and then select Properties.