EFFECTS SIDECHAINING
Sidechaining allows an audio track to control the parameters of a VST plug-in on a different track. This may sound a bit esoteric and complex but once you wrap your head around the concept, it’s easy to do and can be a real lifesaver.
Sidechaining is often used to “drive” a compressor. This is referred to as “ducking.” A common trick in techno and EDM music is to insert a compressor into the master mix bus and route the kick drum to the compressor’s sidechain input. This briefly reduces the overall mix volume with every kick drum hit for a dramatic increase in perceived impact.
A far more pedestrian, but equally useful application of ducking is to reduce the volume of a background music track when an announcer speaks. The sidechained compressor is inserted into the background music track while the sidechain input is driven by the announcer’s voice. When the announcer is silent, the music plays at a nominal level; when the announcer speaks, the music bed level is reduced. Unlike our techno kick drum example, the compressor’s attack and release to slower settings would be set to act slowly to prevent the music bed volume from rapidly jumping up and down between words.
Sidechain inputs aren’t limited to just compressors. Expanders and gates (essentially the opposite effect of a compressor) frequently feature sidechain inputs; these are often used for stuttering synchronized gating effects (the rock band Garbage is fond of applying this effect to guitars; check out the track “Vow”). Other VST effects that often feature sidechain inputs include filters and vocoder plug-ins.
Can I Sidechain Any VST Effect?
Unfortunately no, because only certain VST effects feature a sidechain input. If the effect has this capability, you’ll see the Sidechain Source menu, plain-as-day on the right side, at the top of its edit window.

As of this writing, Mixcraft 10 doesn’t include a sidechain-capable compressor, but we really dig Variety Of Sound’s Density mkIII. It sounds great, includes tons of cool
features, and it’s totally free. We encourage you to find it on the Intergoogle and add it to your plug-in collection.
BTW, the included Acoustica Vocoder has a sidechain input (and needs it to do its thing properly). Technically it’s not a compressor, but configuring it is almost identical to setting up a compressor with a sidechain, detailed below.
HOW TO USE THE EFFECTS SIDECHAIN INPUT
Since effects numerous effects types include sidechain inputs, the sidechain input can influence effects parameters in varying ways, but sidechain routing operation is the same regardless. In this example, we’ll insert a sidechained compressor into a MIDI virtual instrument track playing sustained synth pads, and we’ll impart the rhythmic groove of a drum pattern from a different track upon the synth pad by routing the drum track audio into the compressor’s sidechain input.
The main track window looks like this:

Click the Synth Pad fx button in the track list, then click the <Select An Effect> down arrow in the Effect List window. Select a sidechain-capable compressor (in this case, we’ve used the aforementioned Density mkIII, which is not included with Mixcraft, but it’s free to download it).
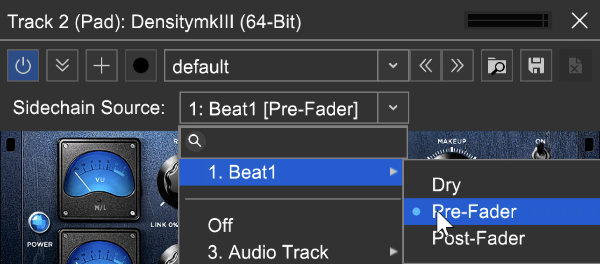
Click the Edit button in the Effect List window, then click the Sidechain Source pop-up menu. This is where you’ll choose an audio track to influence the VST effect. The list will display all current tracks usable as sidechain audio sources, including standard audio tracks and SubMix tracks. The current track with the sidechain effect inserted will display Off in the Sidechain Source menu. When the mouse is positioned over a track input selection, a submenu appears. Here are your options:
• Dry
As its name implies, the source track audio is sent into the effect’s sidechain completely unadulterated. In other words, its current volume level, mixer EQ, and insert effects are bypassed and have no effect on audio sent to the sidechain input.
• Pre-Fader
As with Dry, the channel’s current fader volume has no effect on the sidechain input signal, but mixer settings and insert effects will be “in the chain.”
• Post-Fader
Post-Fader is just like Pre-Fader, with mixer EQ and insert effects active, but here the current fader volume will affect the audio level sent to the sidechain input. This can be useful because some sidechain-enabled effects won’t have any provision for adjusting the signal level entering the sidechain input.
Let’s get back to our drums-adding-rhythmic-groove-to-constant-synth-pad example... If you’re using the Density mklII compressor, you’ll need to set the SC (i.e., sidechain) switch to Ext. (Some VST effects will automatically respond to a sidechain input signal, while others won’t.)
For our Sidechain Source, we’ve chosen the Drums track, set to Pre-Fader. Using the Dry or Pre-Fader setting makes setup especially easy because the fader volume for the sidechain source track can be set to zero, making it easier to hear how the sidechain signal alters the sidechain-compressed track.
If you’re digging all the things you can do with compressor sidechaining, we think you’ll love Mixcraft’s innovative Audio Control feature. It works in a somewhat similar fashion, but instead of using audio to manipulate plug-ins with sidechain inputs, Audio Control lets you use ANY audio track to control ANY MIDI-controllable plug-in or instrument parameter. See “Audio Control” for more information on how to set this up.
EDITING, ARRANGING, AND MOVING INSERT EFFECTS
• Opening Effects Edit Windows
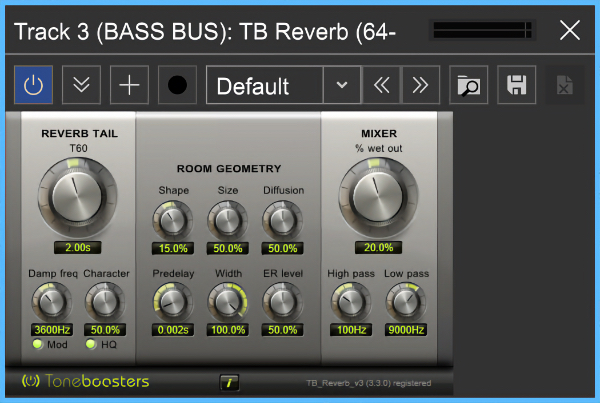
To open the edit window for an effect, click on it in the mixer. Effects edit windows can be closed either by clicking the X in the upper corner or by clicking a second time on the insert effect in the mixer channel. You can open as many simultaneous effects editing windows as you like.
• Rearranging Insert Effects
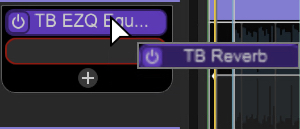
Audio signals flow from the top of the channel strip downward through each insert effect. To change the position of an effect in the chain, simply grab the effect insert block and drag it up or down. But that’s not all… insert effects can also be moved to different audio channels by dragging sideways. Holding down the [ALT] key while dragging will make a copy of the effect. This can be a major time saver. As an example, if you’ve layered numerous vocal tracks, and you’d like to use the same compressor, EQ, or perhaps a GSnap Pitch Corrector with the same settings, [ALT]-dragging allows easy duplication of effects across multiple channels.
ADDITIONAL EFFECTS INSERT FUNCTIONS
Right-clicking an effects insert offers a few more options:
• Active
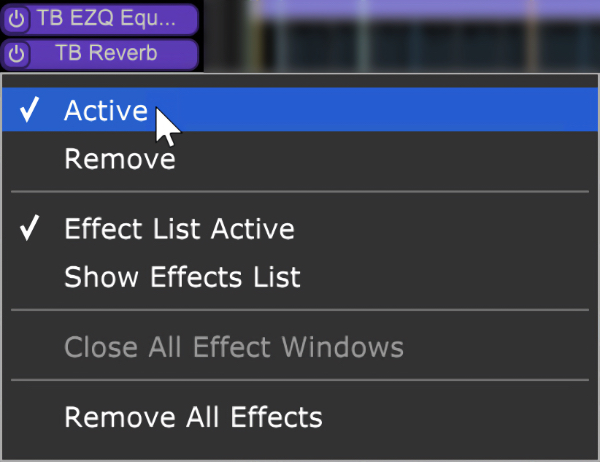
Right-clicking an effects insert and clicking Active toggles the effect between active and bypass modes. A check mark is displayed next to the word Active when an insert effect is active. The effects insert background turns dark gray when an effect is in bypass mode.
•Effects Chain
Right-clicking this opens the channel’s effects list; this is the same as clicking the fx button in the channel strip or track list. Most insert effect-related tasks can be accomplished directly from the mixer window, but the effect list allows you to open and edit effects chains as well as assign MIDI hardware controllers to effect parameters.
• Remove
Right-click and select Remove to delete an insert effect. So long!
• Remove All Effects
Right-clicking and selecting Remove All Effects deletes all current insert effects on the channel.