SOUND TAB
Click the Sound tab at the bottom left of the screen to edit and set parameters for audio, MIDI, and video clips with greater precision. The sound tab parameters will vary depending on what type of clip is currently selected, but here we’ll go over the parameters common to all clip types.
Sound Tab Navigation Bar
The Sound Tab Navigation Bar allows clip previewing, vertical and horizontal zoom in/out, and lets you hide or show the Sound Tab Parameter Editor. Its appearance and operation are the same whether editing audio or MIDI notes.

Preview
The preview play button at the top of the Sound Tab Navigation Bar plays back the currently selected clip.
Zoom Controls
The up/down magnifying glass and left/right arrow icons adjust the current vertical and horizontal zoom view of the current audio clip. In the Piano editor, vertical zoom can also be quickly adjusted with the key shortcut [CTRL]+[ALT]+mouse wheel. The zoom controls have no effect on the sound.
View MIDI Clips Using Project Time
The icon with two fat horizontal lines and vertical line in the middle toggles between editor timeline (beginning at 1), and the global project timeline (uses the actual clip location in the project). Note that this works for MIDI clips only.
Hide Sound Tab
The dual left arrows hide the sound tab parameters for increased viewing size.
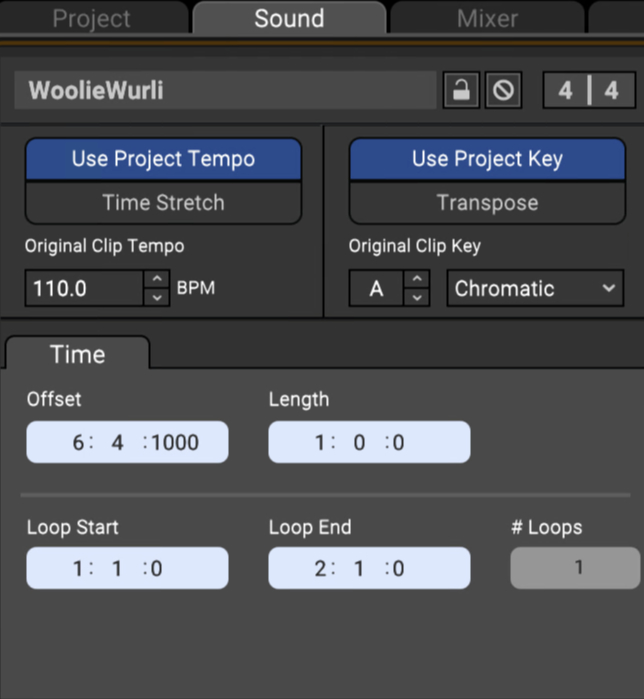
SOUND TAB (WITH AUDIO CLIP SELECTED)
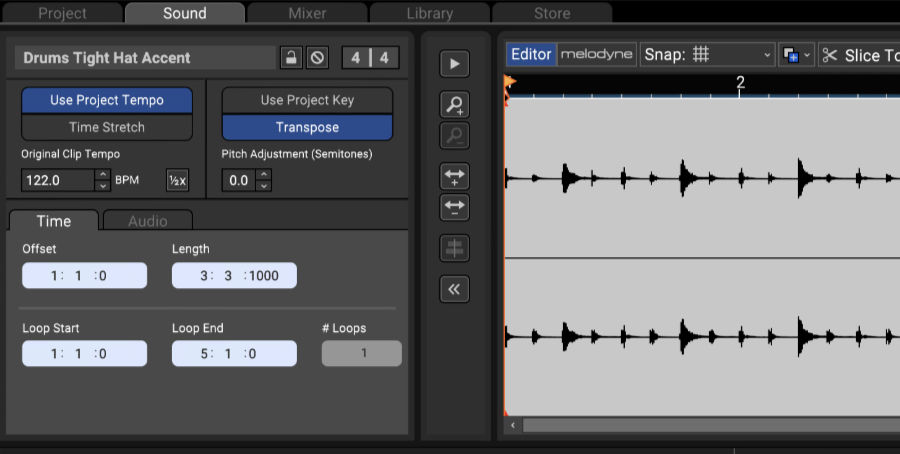
Pitch, key, loop points, and time stretching can be set and edited in the Sound tab. The Sound tab defaults to Mixcraft’s standard wave editing window view shown above.
INTEGRATED MELODYNE PITCH EDITING (MIXCRAFT 10 PRO STUDIO ONLY)

You can switch between standard wave editing and Mixcraft’s integrated Melodyne functionality by clicking the Editor and Melodyne buttons above the wave
display area. For a tutorial on how to use Melodyne, see “Appendix 1: Using Melodyne For Basic Vocal Tuning.” LINK HERE Melodyne is an amazing vocal tuning (and creative) tool. It’s worth the upgrade price to Mixcraft 10 Pro Studio on its own!
• Name Field
The name of the currently selected clip appears here. (“Crash” is the name of the clip in the above screenshot.) To edit a clip name, click on the name text and type a new name. Changing the name of audio clips from the Mixcraft library will not affect the filename in Windows Explorer, only within the current project.
• Lock/Unlock
Clicking the Lock icon will prevent changes to the clip’s Loop Start, Loop End, and Snap Point. Lock also prevent clips from being moved in the grid.
• Mute /Unmute
This is the circle-with-a-cross-through-it next to the Lock icon that mutes or unmutes the clip. When muted, all instances of the clip will turn gray. The Mute Sound button in the Sound tab is interchangeable with the Mute Sound button on the clip itself - you can mute or unmute with either button.
• Time Signature
This lets you set the time signature of an audio loop with an individually settable numerator (beats per bar) and denominator (note value constituting a beat). Keep in mind that the time signature setting has no effect on the sound; it only changes the placement of beats on the ruler above the waveform to simplify setting in/out points and looping.
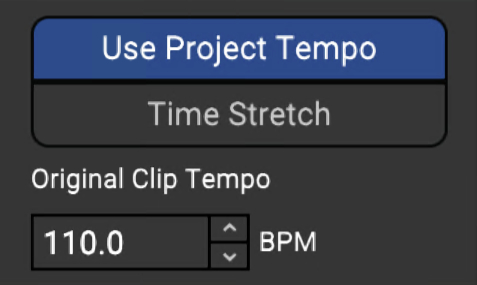
• Use Project Tempo/Time Stretch
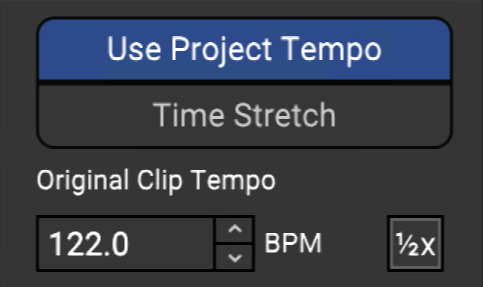
Mixcraft plays audio clips in one of two time-domain modes:
• Use Project Tempo
• Time Stretch
• Use Project Tempo
In this mode, Mixcraft adjusts sounds based on the difference between the project’s tempo and the sound’s detected tempo. For example, if the project tempo was 120 BPM and the sound’s detected tempo was 60 BPM, it would time-stretch the sound to be half as long, because it would be playing the sound back two times as fast.
However, a project’s tempo may not remain constant throughout. For example, in a transition between two songs, you could slowly ramp the tempo up with multiple tempo changes. In Use Project Tempo mode, Mixcraft dynamically adjusts the playback rate of audio to maintain perfect synchronization based on the current tempo. This offers lots of latitudes to mix and match loops of various tempos.
To set the loop speed by tempo, click Use Project Tempo. The numeric display will show the loop’s original tempo. Enter a tempo by clicking in the number field to the right, or use the up/down arrows.
• Time Stretch
In this mode, the sound is simply time-stretched by a fixed amount. The sound will not adjust to the project tempo. You’ll most likely use Use Project Tempo mode most of the time, but there are situations when automatic tempo change isn’t desirable. For example, if you had a long drone with no inherent tempo, and you didn’t want its length affected. Fortunately, Mixcraft’s audio playback mode is settable on a per-sound basis, so you can mix and match modes as you please.
To set the loop speed by percentage, click the Time Stretch and enter a percentage value by clicking in the field, or by using the up/down arrows.
• Double/Half-Speed
If the current clip is set to Use Project Tempo mode, clicking on the 2x button will play loops at double speed. Clicking once will play the loop at half-speed, a second click will play the loop at double speed, and clicking a third time will return the loop to standard playback speed.
Note: Loops can be slowed down or sped up by up to four times their normal speed (i.e. 25% - 400% of normal playback speed). If values set are above or below this, Mixcraft “maxes out” at 25% - 400% normal playback speed.
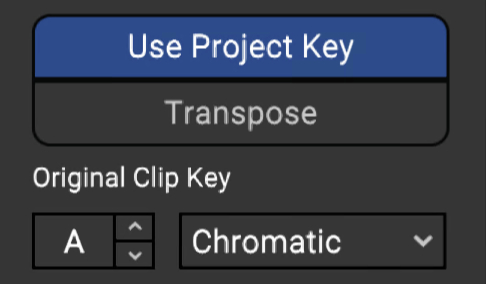
• Key/Pitch Adjustments
Mixcraft plays audio clips in one of three key/pitch modes:
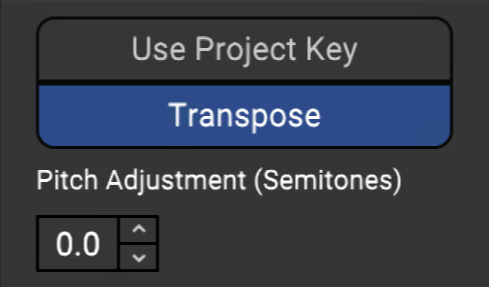
• Use Project Key
• Transpose
• No Pitch Adjustments
Changing The Key of a Sound, aka Songs in the Key of Right
Assuming that the key of the sound is correct, you can change the key of a sound by adding markers with key changes and/or by changing the project’s key. You do not need to change the key of the sound on the Sound tab. It’s recommended to change the project key or add key change markers. In short, if you want to change the key of a sound, change the project key. (Changing the key of a sound should only be done if the detected key is wrong!) If the sound’s key is wrong, you can adjust it with the Original Clip Key control.
• Use Project Key
Mixcraft adjusts the pitch of the sound based on the difference between the project’s key and the sound’s key. (The project key can easily be seen and adjusted in the transport bar display.) For example, if the project key was F# and the sound’s key was F, it would adjust the pitch of the sound up by one semitone so that it was in tune with F# instead of F.
However, you can have more than one key change in a project. A sound in Use Project Key mode will adjust in real-time to the correct number of half steps in order to play in the correct key based on the most recent key change. To continue the example, if the sound was in F and there were two key changes to A and then G, it would correspond to shifting the pitch of your sound by four semitones up to A and then by two semitones up to G.
Mixcraft adjusts the pitch by the shortest distance between two keys. For example, if the project key was G and the sound’s key was F, it will adjust it by +2 semitones, instead of -10 semitones.
• Transpose
This gives manual control over the playback key of audio. It’s useful if you don’t want audio to follow Mixcraft’s project key setting or obey key changes on the timeline.
You can type in a partial amount such as 1.26 semitones or use the up/down to adjust pitch in semitones up to 24 semitones in either direction. You might use this option to fix a slightly off key vocal performance or transpose a sound into a key you are more familiar with.
• No Pitch Adjustments
If Use Project Key and Transpose are both deselected, No Pitch Adjustments appears beneath the buttons and audio will play “as is” with no pitch transposition.
SOUND TAB - TIME SUB TAB
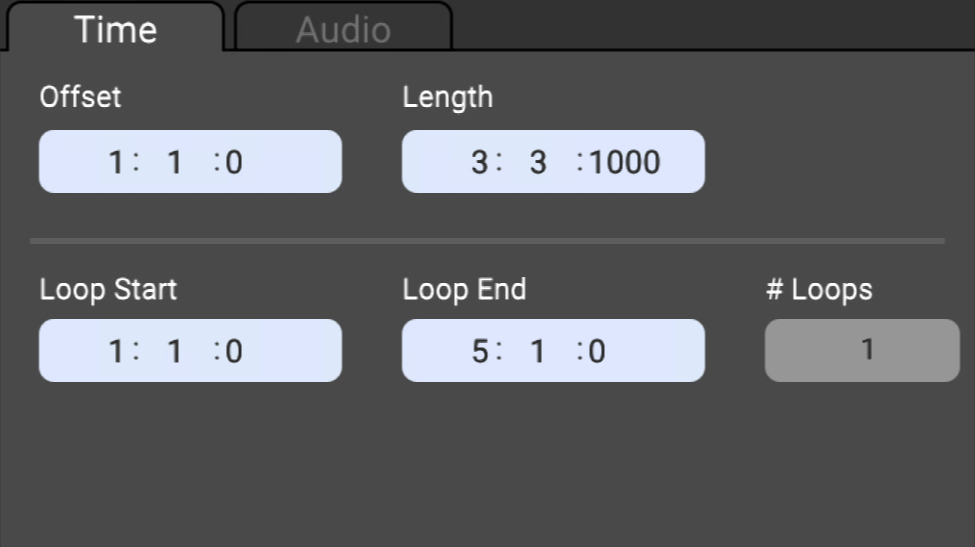
These controls let you fine-tune a clip’s location in the Main Clip Grid as well as its length and looping parameters. If the project is set to Beats mode in the top toolbar (next to the handsome Mixcraft 10 logo) the edit boxes display in measures, beats, and partial beats. If the project is set to Time mode, the edit boxes display positions in minutes, seconds, and milliseconds.
Helpful Hint: You can use the mouse scroll wheel to quickly set values by clicking in the number fields and spinning.
• Offset
The offset setting defines a clip’s location in the Main Clip Grid.
• Length
The length setting defines the size of the clip. If the length value setting is longer than the entire audio clip, the clip will repeat until it reaches the set length value. The clip will show “indentations” in the bottom where it repeats.
• Loop Start/End
Defines a clip’s playback start and end points. Example: say you like the second half of a four-bar loop, but don’t like the first half. Changing the Loop Start setting from 1:1:0 to 3:1:0 will skip playback of the first half. Loop start and end points can be set either by clicking in the number fields in the Sound>Time tab, or by moving
the Loop Start and Loop End markers in the audio waveform display. You can also set a clip’s start and end points by grabbing and moving its start and end points in the Main Clip Grid. Regardless of how a clip’s start and end points are set, all displays will update.
• # Loops
The number of times a loop will repeat. (This setting can potentially overlap with the Length setting - changing one automatically updates the other.)
SOUND TAB - AUDIO SUB TAB
Here you’ll find some useful extra parameters.
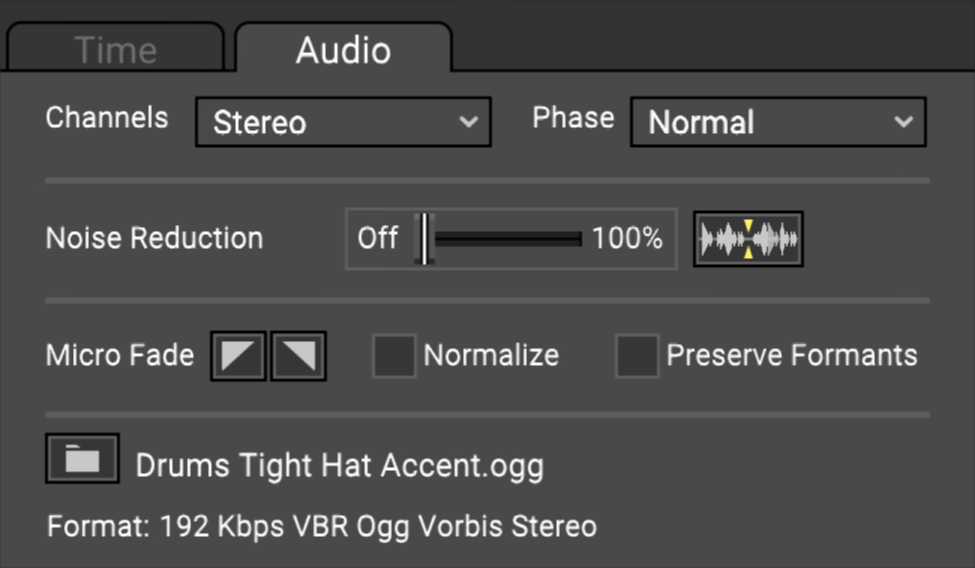
• Channels
If the audio clip is stereo, the pop-up menu selects regular stereo playback or left or right channel only. If the left or right channel is selected, playback becomes mono and the channel pan slider will control panning. (If a clip is playing in stereo, the pan slider acts as a balance control.)
• Phase
Normal plays in standard stereo; Invert Left, Invert Right, and Invert Both flips the waveform phase 180 degrees of each respectively.
• Noise Reduction
Mixcraft features a built-in noise reduction feature for audio clips. Noise may be background hum, clicks and pops, or any other unwanted sound (not including your band’s drummer). However, Mixcraft’s noise reduction works best on steady-state noise such as fans, air conditioners, or other constant noises throughout the recording.
To use Mixcraft’s noise reduction, highlight the audio clip you’d like to remove the noise from, then click the Sound tab on the bottom. Now click the Noise Reduction button next to the slider, and select a value up to 100%. Once an amount is selected, Mixcraft attempts to locate a good noise sample. Mixcraft displays the noise sample region between the Noise Start and Noise End markers.
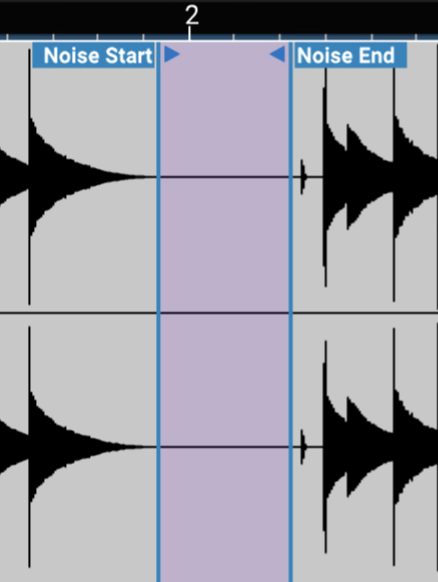
The image above shows an example of a good noise sample. The noise sample region can be edited by clicking and dragging the Noise Start or Noise End controls. To automatically locate the next best noise print, click the Find Next Noise Sample button next to the Noise Reduction slider. (It’s the button with the green downward arrow on a wee waveform.) This instructs Mixcraft to look for the next best noise sample based on what it thinks might be noise.
Finding A Noise Sample
The best candidate for noise reduction is a snippet of the noise by itself. For example, if you had an air conditioner in the background and began recording, there would likely be a second of the air conditioner by itself - this would make an ideal noise sample. If you don’t have a good sample of the noise, you could potentially record the noise by itself and then merge the clips together. Once you’ve located a good noise sample, highlight it in the audio tab, then right-click and select Set Noise Reduction From Selection.
• Micro Fades
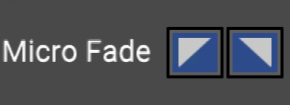
Micro Fades automatically adds a short (5 ms) fade-in or fade-out at the beginning and/or end of a clip. Sometimes clips may start on a non-zero value, which can cause clicks at their beginning and end points; this can likely occur when editing clips to begin or end in the middle of an audio wave. Micro Fades ensures that audio will very rapidly “fade up” or down from silence, thus eliminating clicks.
The potential downside is that attack segments of transient sounds (that’s drums and percussion to you, bucko) can get lopped off, so it's usually best to use Micro Fades only when you’re hearing unwanted clicks. Fade-in and fade-out can be individually enabled for clips by clicking the wee upside triangles in the Sound tab. Clips with Micro Fades enabled will display teensy triangle icons in their top corners.
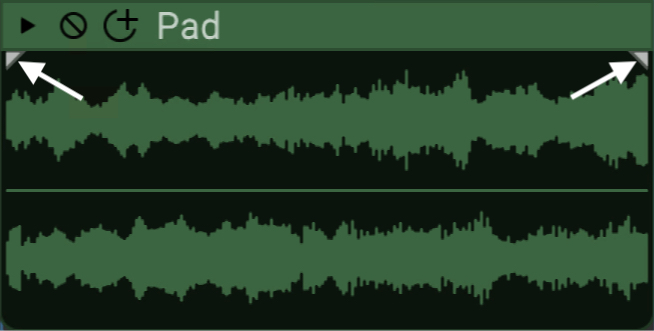
(We’ve doctored up the clip above with red circles to make the fade triangles easier to see.)
Micro Fades can be simultaneously added to multiple clips. Micro Fades can also be globally enabled for all new clips in the Mixcraft Preferences/Project window.
• Normalize
Checking the Normalize check box automatically increases the peak level of an audio waveform to full 100% scale while proportionally increasing the level of the entire waveform. In this way, audio files will play back as loudly as possible before clipping. Unlike a compressor or limiter, the dynamic range of a sound is not altered; normalization simply makes the entire waveform proportionately louder. Like most Mixcraft audio processes, normalization is non-destructive, so unchecking the Normalize checkbox will return the waveform to its original gain state.
• Formant Preservation
The Formant Preservation checkbox allows Mixcraft to maintain the harmonic “imprint” of a sound when transposing pitch up or down. This is useful for avoiding the “chipmunk” effect when transposing vocals upward, and conversely, the “born-under-a-bad-sign-bluesman” effect when transposing downward.
• File Path
Not really a parameter per se, but the actual file name as displayed in Windows Explorer is shown in yellow text for reference. Clicking the yellow folder icon to the left of the filename opens the enclosed Windows Explorer folder. This can be a time saver if you’re trying to determine where the original file is located on your drive.
Why Does Mixcraft Ask If I Want To Change My Project’s Tempo?
If you’ve tried dragging loops from the library onto the playback grid, you’ve probably seen this window. You may have clicked Yes, not knowing exactly what it meant. Understanding the relationship between project tempo and the timing of clips used in a project is important, so read on!
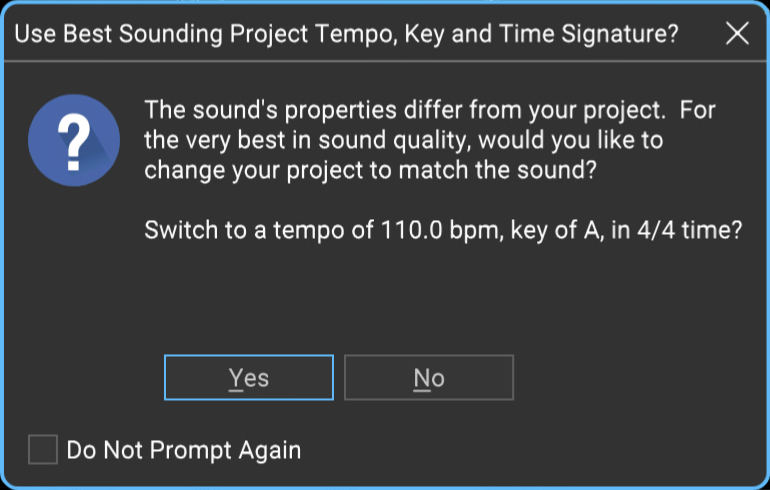
When a new, empty Mixcraft project is opened, the project tempo setting is displayed in the transport in beats per minute. (If you want to get a feel for the tempo, click the Metronome icon, then click the Play button.)
Most of Mixcraft’s included loops are beats or musical phrases, and are precisely edited to be an even length to ensure that they’ll loop smoothly. They contain embedded information that “tells” Mixcraft their original key and tempo. (You can see the original key and tempo when browsing clips in the Library tab.)
For example, a new Mixcraft project and its tempo were set to 100 BPM. If a 90 BPM loop is placed at at bar one, it won’t play in time with the project tempo. It also won’t line up to bars and beats very well. If we drop in a second loop with a native tempo of 163 BPM at bar one and play back, it’ll be a timing train wreck. This is where the Use Best Sounding Project Tempo window comes in. Clicking Yes when this window pops up automatically changes the project’s tempo to match the first loop’s native tempo. Additional clips dragged into a project are automatically adjusted to match the project tempo. Now everything plays in sync. Mixcraft works a similar kind of magic with key signatures by transposing imported clips to match the project key signature (which is displayed and adjustable in the Transport Bar).
You can set how Mixcraft handles matching the project’s tempo and key to imported sounds in the Preferences>Project menu.
If the Change Project Tempo and Key To Match First Sound check box is checked, Mixcraft will always match the project tempo and key automatically for the first imported sound. If the Ask To Change Project Tempo and Key To Match First Sound box is checked, Mixcraft will politely ask first.
If neither box is checked, Mixcraft won’t adjust the project tempo or key when the first sound is imported, so be careful! You can also disable both checkboxes by clicking the Do Not Prompt Again check box in the Use Best Sounding Project Tempo, Key & Time Signature window.
• Format
Again, not an adjustable parameter, this displays the current audio clip’s format (e.g., WAV, Ogg, etc.), as well its sample rate, bit depth, mono/stereo, etc.
SHOW/HIDE CONTROLS BUTTON
Click the [<<] Show/Hide Controls button to see more sound data, instead of the controls. This toggles between showing and hiding the controls. To show the controls again, click the [>>] button.
SOUND TAB WITH MIDI CLIP SELECTED
The Sound tab enables editing of a MIDI clip’s speed, pitch, key, grid placement, and looping parameters.
• Name Field
The name of the currently selected clip appears here. To edit the name, click on the name text and type a new name. Click outside of the name field when done.
• Lock/Unlock
Clicking the Lock icon prevents a clip from being moved in the grid. It also disables cropping and resizing.
• Mute /Unmute
This silences the clip. All instances of the clip will turn gray. The Mute Sound button in the Sound tab is interchangeable with the Mute Sound button on the clip itself - you can mute or unmute using either button.
• Time Signature
This lets you set the time signature of a MIDI clip with an individually settable numerator (beats per bar) and denominator (note value constituting a beat). Keep in mind that the time signature setting has no effect on the sound; it simply changes the placement of beats on the ruler in the selected MIDI editor to the right of the Sound tab.
• Setting MIDI Clip Playback Rate
Mixcraft plays MIDI clips in one of two time-domain modes:
• Use Project Tempo
• Time Stretch
• Use Project Tempo
MIDI clips will lock to the current project tempo. Original Clip Tempo is displayed and can be altered by clicking the number field and entering a new temp, or by using the up/down arrows.
• Time Stretch
To set the playback rate by percentage, select Time Stretch and enter a number value by clicking in the field, or by using the up/down arrows.
• Key/Pitch Adjustments
Mixcraft plays MIDI clips in one of two key/pitch modes:
• Use Project Key
• Transpose
• Use Project Key
Mixcraft adjusts the pitch of the sound based on the difference between the project’s key and the sound’s key. (The project key can easily be seen and adjusted in the transport bar display.) For example, if the project key was F# and the sound’s key was F, it would adjust the pitch of the sound up by one semitone so that it was in tune with F# instead of F.
However, you can have more than one key change in a project. A sound in Use Project Key mode will adjust in real-time to the correct number of half steps in order to play in the correct key based on the most recent key change. To continue the example, if the sound was in F and there were two key changes to A and then G, it would correspond to shifting the pitch of your sound by four semitones up to A and then by two semitones up to G.
Mixcraft adjusts the pitch by the shortest distance between two keys. For example, if the project key was G and the sound’s key was F, it will adjust it by +2 semitones, instead of -10 semitones.
The MAJ/MIN popup selector conforms notes to the correct major or minor scale notes for the selected key signature. (It’s mainly there to ensure that the correct key signature is displayed when using the Score editor.)
SOUND TAB> TIME SUB TAB
These controls let you fine-tune a clip’s location in the Main Clip Grid as well as its length and looping parameters. If the project is set to Beats mode in the top toolbar (next to the handsome Mixcraft 10 logo) the edit boxes display in measures, beats, and partial beats. If the project is set to Time mode in the top toolbar, the edit boxes display positions in minutes, seconds, and milliseconds.
Helpful Hint: Use the mouse scroll wheel to quickly set values by clicking in the number fields and spinning.
• Offset
The offset setting defines a clip’s location in the Main Clip Grid.
• Length
The length setting defines the size of the clip. If the length value setting is longer than the entire audio clip, the clip will repeat until it reaches the set length value. The clip will show “indentations” in the bottom where it repeats. If the sound is made long enough, this will also cause it to loop.
• Loop Start/End
Defines a clip’s playback start and end points. Loop start and end points can be set either by clicking in the number fields in the Sound>Time tab, or by moving the Loop Start and Loop End markers in the Piano, Step, or Score editors. You can also set a clip’s start and end points by grabbing and moving its start and end points in the Main Clip Grid. Regardless of how a clip’s start and end points are set, all displays will update.
• # Loops
The number of times a loop will repeat. (This setting can potentially overlap with the Length setting - changing one automatically updates the other.)
CONVERT AUDIO TO MIDI (MIXCRAFT 10 PRO STUDIO ONLY)

This feature doesn’t really live in the Sount Tab per se, but it has to do with audio and is super cool. Any audio clip containing single-note melodic content can be converted to a MIDI file by right-clicking and choosing to Convert Audio To MIDI (or by choosing it from the Sound menu at the top of Mixcraft). This is really convenient for doubling up vocal lines or instrumental solos.
This semi-miraculous feature does have some limitations - it only works correctly with single-note lines (it won’t work with chords), and it works best with clean, unprocessed sound - audio with a lot of effects such as reverb or delay won’t work too well. You may also notice that some notes are converted to the correct note, but in the wrong octave. This is easy enough to fix in the Piano Editor.