USING VIRTUAL INSTRUMENTS
Virtual instruments are like having a keyboard instrument within Mixcraft that can be played and recorded using a USB or MIDI keyboard controller. The Instrument Preset Window offers powerful layering, splitting, and more (oh, how we love some “and more”). Mixcraft supports VSTi and VST3 formats.
64-bit vs. 32-bit Effects
Mixcraft 10 is a native 64-bit application, so you'll want to use 64-bit virtual instruments whenever possible. Mixcraft can still run older 32-bit virtual instruments - these will automatically load in a shell and operate like any other instruments.
With recent advances in processor technology, all new PC's feature 64-bit processors. It's a little confusing, but the number of processor bits is totally separate from the bit-depth of audio files. Unlike higher bit-rate audio, there is no difference in the sound quality of 32-bit plugins vs. 64-bit. It isn't necessary to understand all the technical nitty-gritty, but the important takeaway is that a 64-bit system is capable of moving far more data, far more quickly than a 32-bit system. In regard to audio plugins and instruments, this means they'll run more efficiently and will be able to address much more system RAM if needed (e.g., if you're using large sample library-based instruments).
Older 32-bit plugins will still run in Mixcraft, but you may encounter stability issues. If possible, we strongly recommend updating to 64-bit versions if available.
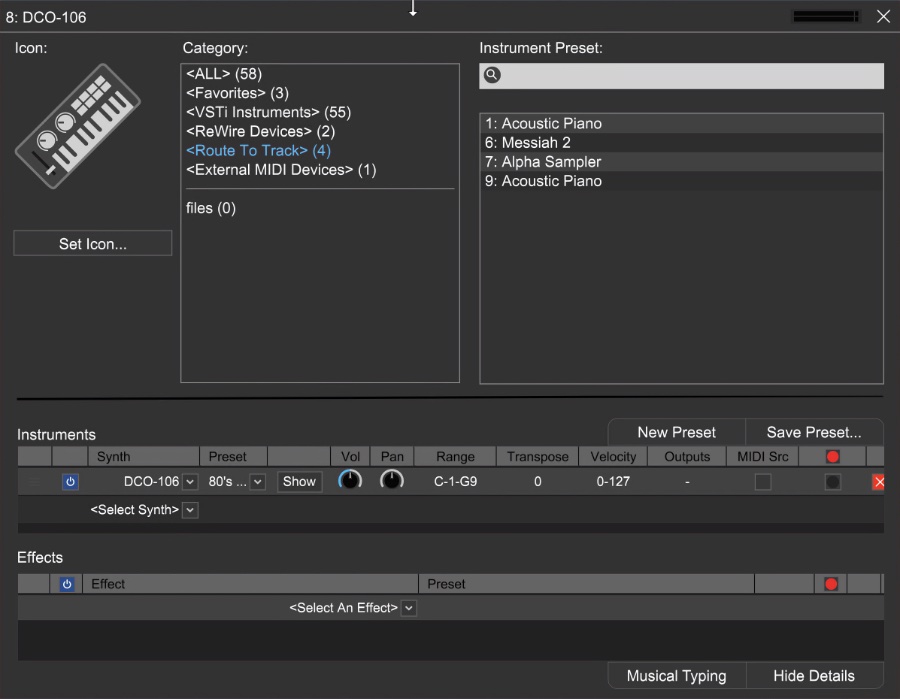
INSTRUMENT PRESET WINDOW
Click the piano keyboard icon in the track header to open the Instrument Preset window.
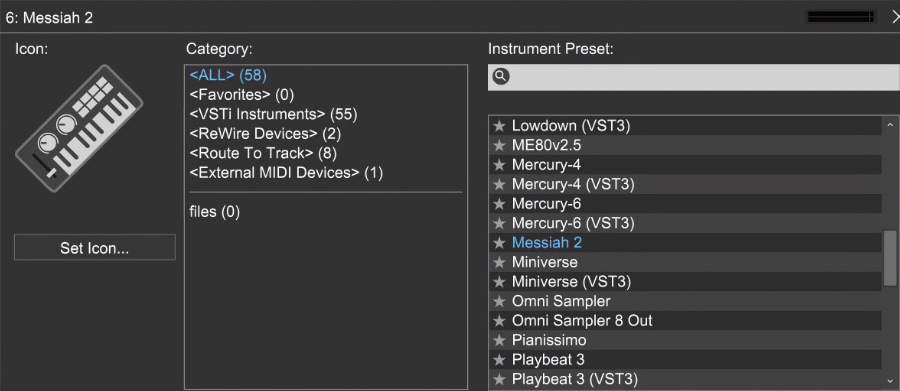
This opens the Instrument Preset window. On the left side you’ll see numerous categories. For now, we’ll leave this on the default <All> setting and explore some Instrument Preset sounds.
Instrument Presets
Click on a category on the left, then choose an Instrument Preset on the right. The main default categories include:
Bass | Percussion |
Brass | Reed |
Combinations | Sound Effects |
Ethnic | Strings |
Guitar | Synth |
Hits and Stabs | Voice |
Keyboard | Wind |
Click the X button at the top right of the window to close the instrument dialog. Alternatively, click the instrument button on the track header to toggle viewing the instrument preset window.
ADDITIONAL INSTRUMENT WINDOW CATEGORIES
There are five additional preset categories: <Favorites>, <VSTi Instruments>, <ReWire Devices>, <Route To Track>, and <External MIDI Devices>. Here’s what they do:
• FAVORITES
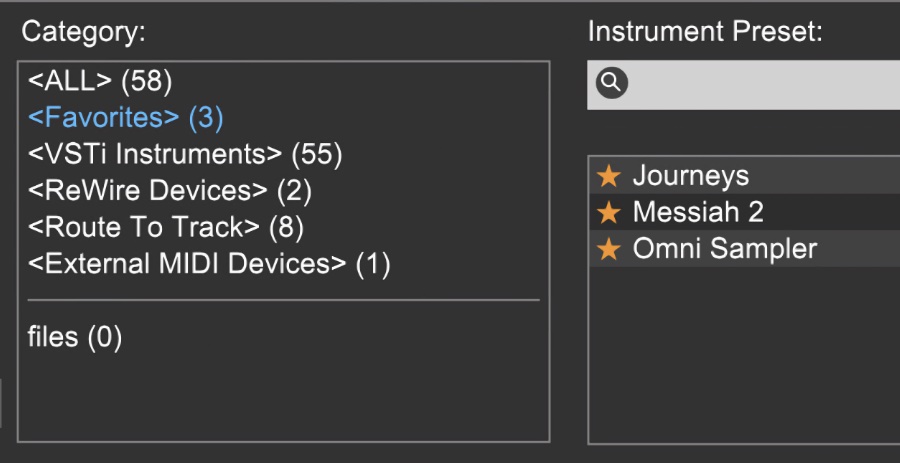
Frequently used Instrument Presets can be tagged by clicking on the star next to an Instrument Preset name. Choosing Favorites from the category displays all starred selections in the Instrument Preset list.
VSTi INSTRUMENTS
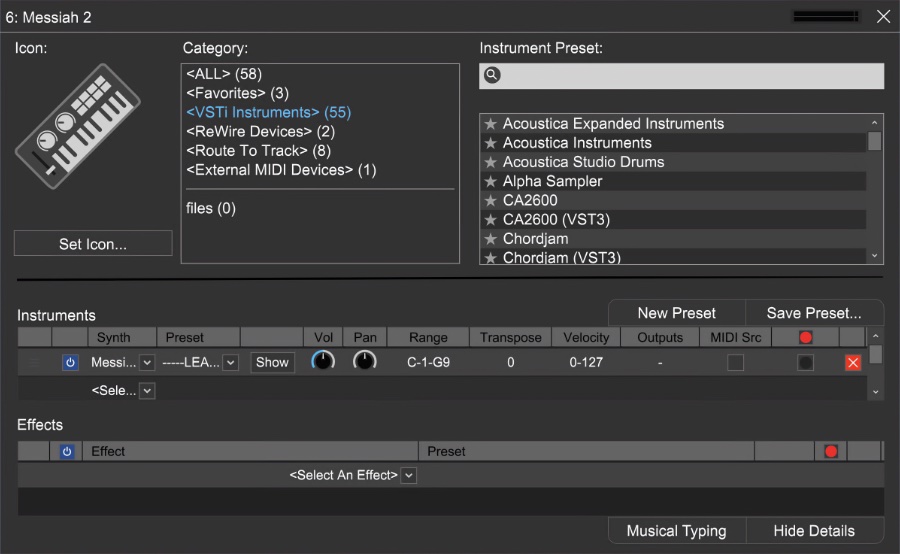
This shows all available virtual instruments including user-installed instruments.
(VSTi and VST3 are the only supported third-party instrument formats. If you have a Virtual Instrument that is not showing up, you may have to edit the plug-in folders in Preferences>Plug-Ins>Edit VST/VSTi Folders.)
Clicking a Virtual Instrument expands the window downward (you can also expand the view by clicking the Show Details button). Click the down arrow in the Preset column to browse presets for the selected instrument.
REWIRE DEVICES
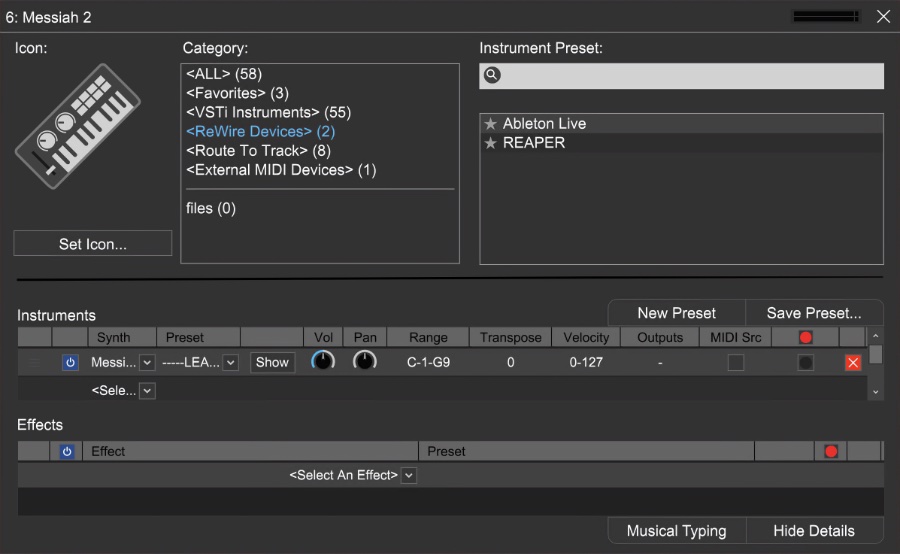
This section displays available ReWire applications. Selecting a ReWire application automatically creates a ReWire track for that application. In the Show Details view, available ReWire instrument sources can be selected (under Presets). Played or recorded MIDI data from the Virtual Instrument track, will be routed to the ReWire application. Audio generated by the application appears on the ReWire track in the Main Window.
ROUTE TO TRACK
Route To Track is a specialized instrument type that functions as a MIDI router. Specifically, it lets you route MIDI from one Mixcraft track to another. That may not sound like a big deal, but it’s super useful, particularly if you’d like to take advantage of Virtual Instruments with multi-timbral capabilities. Here are some ways to make use of Route To Track:
• Ex. 1: Play Multiple Instruments From A Single Track
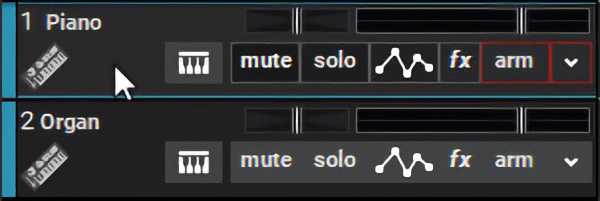
1. Begin by setting up a couple of instruments on instrument tracks. Here we’ve set up a piano on one track, and an organ on another.
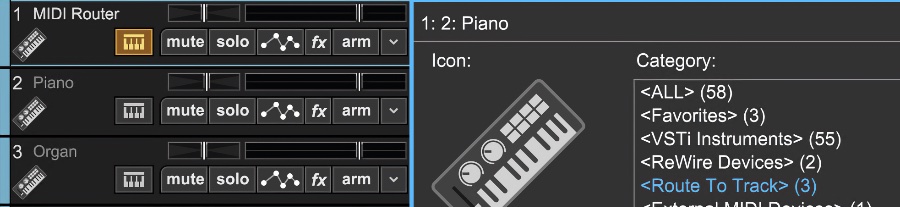
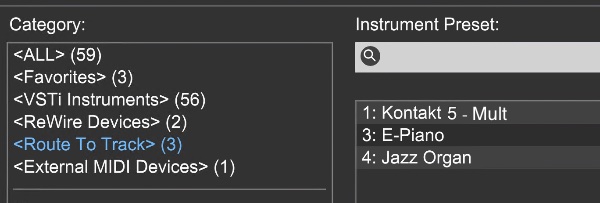
2. Add a Virtual Instrument track (click +Track), then click the track’s keyboard icon to open the Instrument Preset window. Select Route To Track from the Category list. We've renamed the track MIDI Router for clarity.
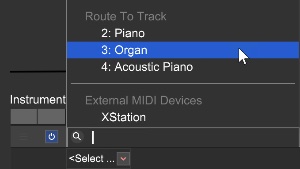
3. The Instrument Preset list on the right shows all instrument tracks in the current Project. In this example, these are the Piano and Organ instrument tracks. Click on Piano in the Instrument Preset list.
If we click on the MIDI Router track to select it and play notes on a USB or MIDI controller, the Piano track plays. If we click Organ in the Instrument Preset list, the Organ track gets played.
We can also play both instruments simultaneously. Click on Select Synth in the Instruments area below and scroll down to the Route To Track section. Here you can choose from any of the instrument tracks in the current Project.
(You may have to scroll down a bit to see the Route To Track section).
• Ex. 2: Play and Record Multi-Timbral Virtual Instruments On Separate Tracks
A multi-timbral virtual synth or sampler allows the setup of different sounds on up to 16 MIDI channels within one instance. If you were to use “regular” instrument tracks in Mixcraft, there would be no way to play each MIDI channel (i.e. each instrumental sound) individually; there would also be no way to play or record separate MIDI clips for each MIDI channel.
We can get around this by creating a “master” multi-timbral instrument with separate sounds on each MIDI channel, and then creating individual Virtual Instrument tracks set to Route To Track. These all get routed to the master multi-timbral instrument track, but we can separately play each of its sounds by setting a different MIDI channel output for each of the Route To Track Virtual Instruments. Here’s how:

1. Create a Virtual Instrument track (+Track), open up a multi-timbral Virtual Instrument, and set up multiple instruments on separate MIDI channels. In this example, we’ve added Upright Bass on MIDI channel 1, a Jazz Organ on MIDI channel 2, and a Mute Trumpet on MIDI channel 3.
2. Create new Virtual Instrument tracks for each instrument/MIDI channel you’d like to use in the multi-timbral Virtual Instrument. We’ve named the newly created Virtual Instrument tracks Upright Bass, Jazz Organ, and Mute Trumpet.
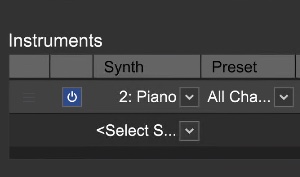
3. Now we’ll click the keyboard icon in the track header of the Upright Bass track to open the Instrument Preset window. Select Route To Track from the Category list. Click the name of the multi-timbral Virtual Instrument in the Instrument Preset list, which would be Kontakt 5 in our example.
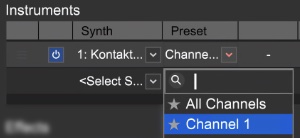
4. Here’s the important part: select the appropriate MIDI channel for the instrument you’d like to hear in the Preset column of the Instruments section. (If you don’t see the Instruments section, click the Show Details button.) Make sure you don’t leave it on All Channels, or else all the multi-timbral instrument channels will play at once, making your tune sound like a Michael Bolton ballad from 1989, and no one wants that.
5. Repeat steps 3 and 4 for each separate multi-timbral instrument part. The only setting that will be different will be the MIDI channel. You’ll now be able to play and record clips of the individual “sub” instruments on each track.
Super Quick Multi Timbral Sub Track Creation
Since the only parameter that gets changed is the MIDI channel, one quick way to create many “sub” Route To Track instrument tracks is to create one and set it up as described at left. Now right-click the Route To Track instrument track and choose Duplicate. Make additional duplicates for as many sub-instruments as needed. Now select each track individually, click the keyboard icon in the track header, and set the appropriate MIDI channel in the Preset column. Now name each sub track as needed.
EXTERNAL MIDI DEVICES
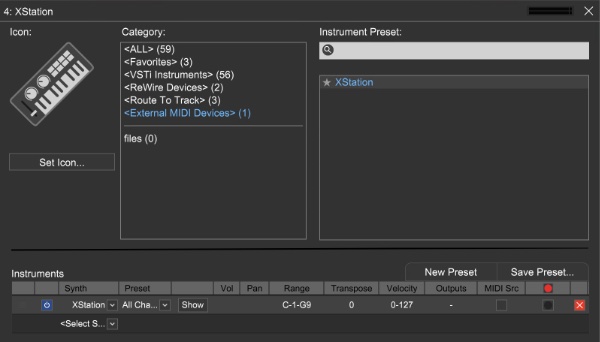
This category displays all external MIDI outputs and sound card MIDI synthesizers. Typically you’d use this to send MIDI to hardware keyboards or sound modules, like that DX7 that’s been collecting dust in Uncle Mike’s coat closet.
If an external synthesizer is connected via a MIDI interface, select the appropriate MIDI output interface. Please note that you will not be able to render or burn the audio made by external synthesizers unless they are first recorded to an audio track (because they aren’t magically living inside Mr. Computer like Virtual Instruments).
VIRTUAL INSTRUMENT PARAMETERS
Custom Virtual Instrument presets featuring multiple layered synthesizers, edited presets, custom key ranges and more can be created. Begin by clicking a Virtual Instrument track’s Instrument icon.
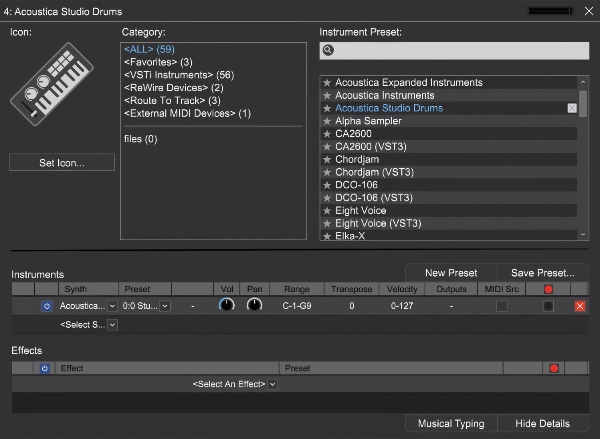
This opens the Instrument Preset window shown above. Click the Show Details button to extend the instrument window and display more details about the preset.
You can either modify the current preset or begin with a “blank slate” by clicking the New Preset button. To add a virtual instrument, click <Select Synth> and choose a synthesizer from the drop-down list.
After selecting an instrument, the following parameters can be set.
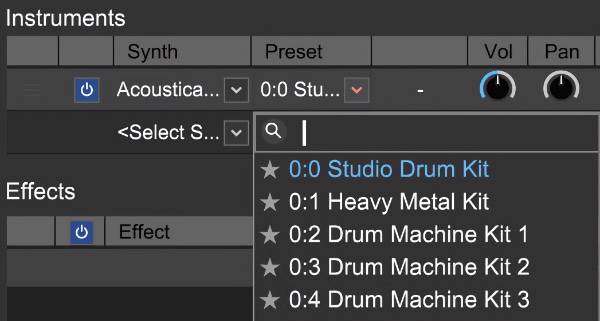
• Preset
Selects a preset or patch from individual instruments.
• Edit
If the synthesizer has an editable user interface, click the Edit button to view and adjust its parameters.
• Volume
Click on the Vol column and type in a value.
• Pan
Click on the Pan column and type in a value -100% to 100%.
• Range
The range of MIDI notes the synthesizer responds to. Click and select a range of notes from the pop-up keyboard. The synthesizer will respond only to notes in the specified range.
• Transpose
Type in a transposition value for this synthesizer. For example, if transpose is set to 12, playing C4 will actually sound C5.
• Velocity
Type in a velocity range the synthesizer will respond to including a low and high note limit, e.g.1-
127). Make sure to include a dash so the software understands the range. For example, if you wanted it to respond to velocities from 120 to 127, you would type in 120-127.
• Outputs
If the virtual instrument supports multiple output channels, click the Outputs field to configure which output channels to use.
• MIDI Source (Mixcraft Pro Studio only)
Checking this box allows the routing of MIDI data directly from one virtual instrument to the one beneath it in the plug-in list. Most virtual instruments don't actually output MIDI data, but this feature is primarily intended for MIDI arpeggiator/sequence/pattern generator plug-ins. Typical instrument plug-ins may or may not output MIDI data, so be please aware of this. (See the Using a Third-Party Arpeggiator Plug-in section at the bottom of the page.)
Checking the MIDI Source box will effectively block MIDI data from clips for the track, so don't enable it unless you're sure the plugin outputs MIDI data.
• Record Source (Mixcraft Pro Studio only)
Allows virtual instruments to become Mixcraft recording input sources. This is useful for converting virtual instrument MIDI clips to pure audio files.
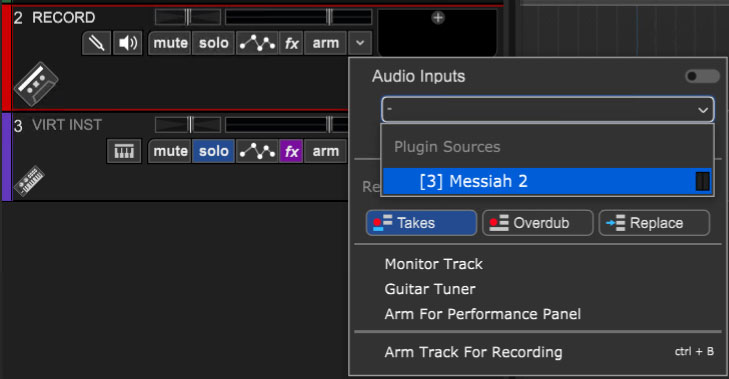
When the Record Source box is checked, a red dot appears, and the instrument will appear in the track record arm dialog as a recording source.
• X
Removes an instrument and returns its slot to the <Select Synth> dialog.
ADDING EFFECTS TO INSTRUMENT PRESETS
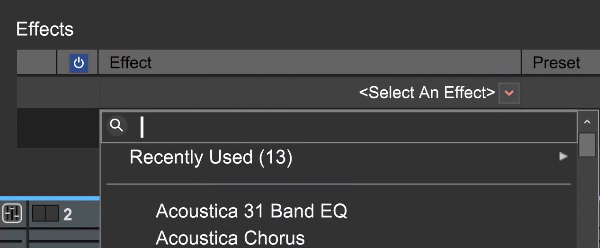
To add effects to Instrument Presets, click <Select An Effect>. Once an effect is chosen, an effects preset can be selected from the Preset column. To customize effects settings, click the effects Edit button. An effects chain can be created with as many effects as desired.
SETTING AN INSTRUMENT PRESET ICON

To add a custom icon to an Instrument Preset, click the Set Icon button and select an icon (or add a custom icon using the Add My Own Image File… button).
CREATING AND SAVING CUSTOM INSTRUMENT PRESETS
Custom Instrument Preset can easily be saved and recalled. This saves all parameters of the Instrument Preset including effects.

To create a new Custom Instrument Preset, click the New Preset button.

To save a custom instrument preset, click the Save Preset button.
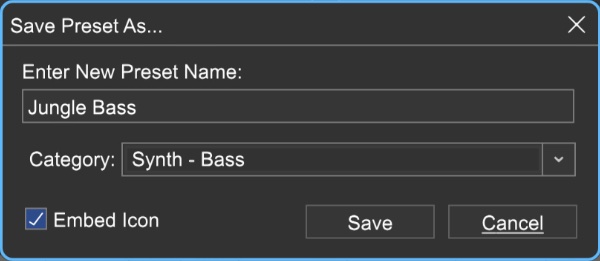
Type a preset name and select a category from the Category drop-down menu. To save the currently selected instrument icon, check the Embed Icon checkbox.
INSTRUMENT PRESET FILE LOCATION
Instrument Preset files are located in the Mixcraft folder in a directory called InstPresets. Preset files have a .instrument extension and may be traded and sent between computers and users. Please note that you’ll need the same VSTi’s and virtual synths installed.
Custom presets will be saved under %appdata%\Acoustica\Mixcraft\InstPresets\
( %appdata% is a Window’s shell variable that is expanded to something like C:\Users\ UserName\AppData\Roaming\ )
EDITING INDIVIDUAL VIRTUAL INSTRUMENT PARAMETERS
Many Virtual Instruments feature extensively editable control panels. To access these parameters, click the Edit button.
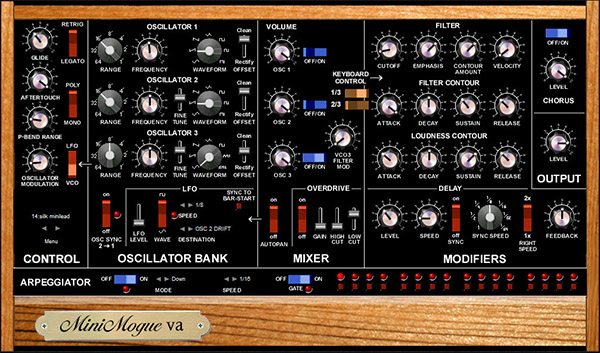
On the preceding page is the Minimogue VA virtual instrument. Use the mouse to create custom sounds by turning virtual knobs, switches, etc.
VIRTUAL INSTRUMENT PRESET MANAGEMENT

Though each Virtual Instrument will have a unique user interface, they share the same controls on the top of the instrument window. These controls work exactly like the ones for effects.
• Level Meter
In the top-right corner of every VST Effect and Virtual Instrument is a stereo VU meter. This is helpful when adjusting input and output levels, and in those inevitable “what the heck?@#?” moments, it’ll let you know the signal is present.
• Active Checkbox
Exactly the same as the Active/Inactive checkbox in the Effect List window, just replicated in the effect interface for convenience.
• Select Preset

Allows selection of Mixcraft and user presets.
• Load VST Preset File

Some VST effect and instrument manufacturers distribute additional sound banks in the form of .fxb files, replacing current presets with a new presets.
• Save A New Preset
Saves the current instrument settings to a new preset. You’ll be prompted to enter a preset name. The preset will then appear in the preset list.
• Remove A Selected Preset

Permanently removes the currently selected preset. Factory presets cannot be deleted.
Note: If a virtual instrument track is frozen, its controls will not be editable until the track is unfrozen.
ADDING THIRD-PARTY VIRTUAL INSTRUMENTS
If a VSTi instrument has been installed and it’s not visible in the Instrument List, you’ll need to add the folder that stores the VST instrument. There are two ways to accomplish this:
The simplest way is to drag-and-drop its DLL file into Mixcraft’s main window. Mixcraft automatically installs the file in the correct location and adds it to the VSTi search path list (in other words, it’ll just work!). The alternative method is to “manually” add VSTi instruments to Mixcraft’s VST/VSTi folders.
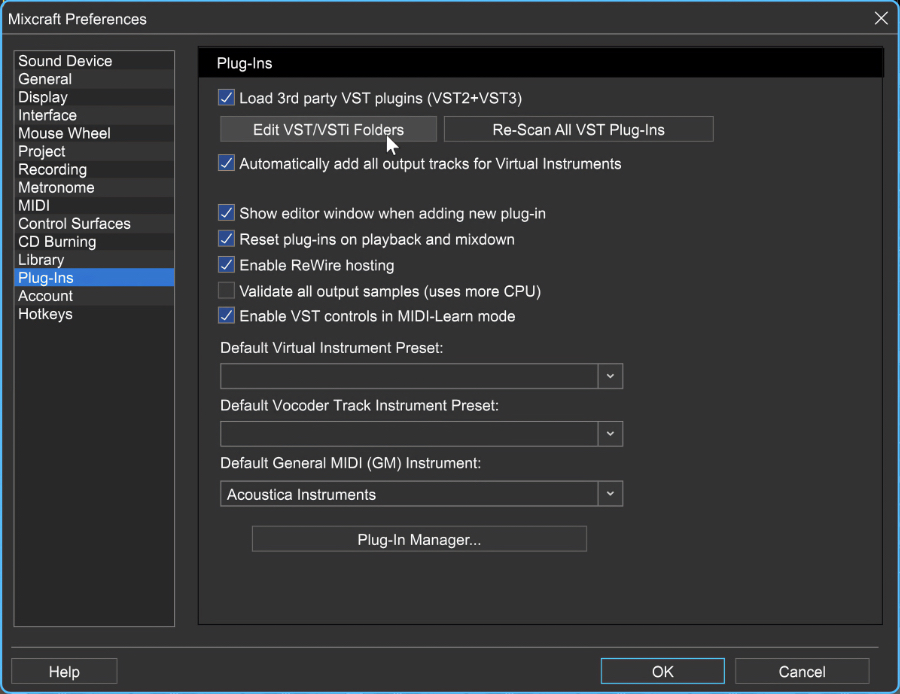
Select File>Preferences>Plug-Ins from the Main Window menus., then click Edit VST/ VSTi Folders and navigate to the folder containing the Virtual Instrument.

Add the folder by clicking the Add… button. If you’re having trouble locating installed Virtual Instruments, click Auto-Scan For VST/VSTi Directories. Mixcraft will attempt to locate folders containing VSTi instruments.
USING A THIRD-PARTY ARPEGGIATOR PLUG-IN
A number of third-party software companies offer arpeggiator plug-ins that can be used to “play” VST either Mixcraft’s included instruments or installed third-party VST instruments.

To use an arpeggiator plug-in, open the Instrument Preset window and select the arpeggiator as an instrument in a slot above the instrument you’d like it to control. No other fancy setup is necessary!