BURNING AUDIO CD’S
For those of us who still appreciate Physical Objects That Contain Music, Mixcraft supports CD-R burning. It should go without saying that your PC will need to have a CD drive capable of burning CD-R's.
To burn an audio CD, select File>Burn CD... ([CTRL]+B) from the Main Window menu, insert a blank CD-R and click the Start Burn button.
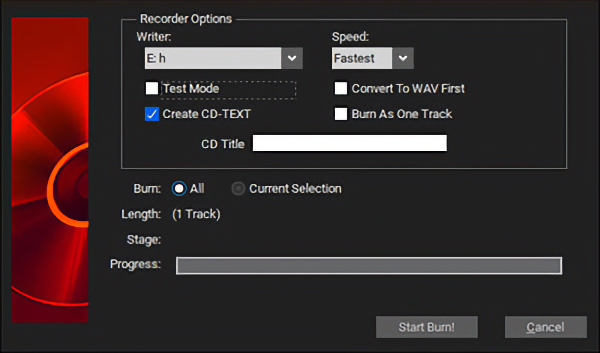
• Writer
Selects a CD burner if more than one is available.
• Speed
Choose a CD writing speed. In some cases, burning at a slower speed may improve the success rate of burning and may be more compatible with older CD players. If the CD writer features Burn Proof-type protection, you can burn at maximum speed without worrying about a burn failure.
• Test Mode
In this mode, the CD writer will go through the process of transferring the data to the CD without turning its laser on for writing. This lets check if your computer can send data to the CD writer at the desired speed. If you’re having problems burning a CD, see the “Troubleshooting” section.
• Convert To WAV First
This converts the mix to one or more WAV files on your hard drive. CD-quality WAV files require around 8 MB for every minute of audio burned. Therefore, a 74-minute mix will require about 650 MB of hard drive space. The advantage to converting to WAV first is that it may help the success rate of burns for some older CD recorders, especially if the CD writer does not have Burn Proof.
• Create CD-TEXT
If the CD writer supports CD-TEXT, you should be able to check the CD-TEXT box. When the CD is played on a player that supports CD-TEXT, the titles and names of each track are visible. Sony CD players often support CD-TEXT.
You can enter a CD-TEXT title for the CD’s title. Track names will be derived from CD track markers.
• Burn As One Track
This option essentially skips CD track markers created in the project and burns the whole project as one track. If your burner is only supported in IMAPI mode this is a good option for a seamless mix, because IMAPI mode places a two-second gap between tracks. (The main drawback is that you can’t skip to specific tracks when playing the CD.)
• Burn All Or Selection
Choose Burn All to burn up to 80 minutes of audio, depending on the blank CD capacity. Choose Burn Selection to burn the current selection of audio. This can be useful if the mix goes beyond 74 or 80 minutes and you want to burn extended sections. (Note that it simply uses the selected area to define a time range to burn.)