PLUG-IN AND VIRTUAL INSTRUMENT CONTROLLER MODULES
Controller Modules allow MIDI controllers to manipulate plug-in and virtual instrument parameters in a number of ways, and appear between the menu bar and plug-in interface sections of all plug-ins and virtual instruments. We’ll explain what each of the three modules does below.
You can create as many Controller Modules as desired. If the number of visible Controller Modules created exceeds the width of the current plug-in, a scroll bar appears beneath, allowing horizontal scrolling to view all Controller Modules.
SHOW/HIDE CONTROLLERS BAR
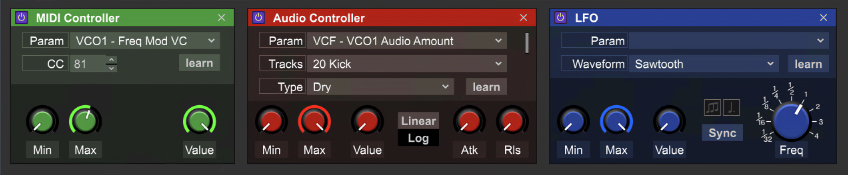
The Controllers Bar is an area above all plug-ins and virtual instrument UI's where the following MIDI parameter Controller Modules can be created: MIDI Controller, Audio Controller, and LFO’s. (red outline added for clarity).
The Controllers Bar is also a hoppin’ watering hole where air traffic controllers hang out between flights at the St. Paul Downtown Airport, but that’s not important right now.
CONTROLLER MODULE BASICS

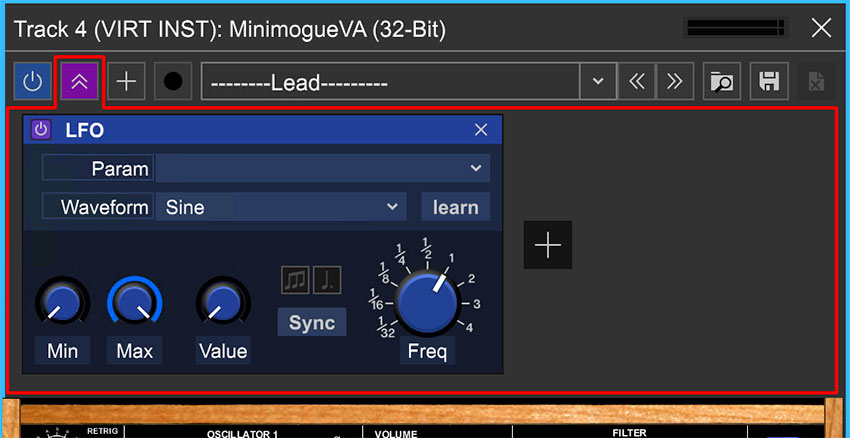
To show or hide the Controller Bar click the double arrows at the top of a plug-in (for this section, “plug-in” will refer to an effects plug-in or virtual instrument interchangeably).
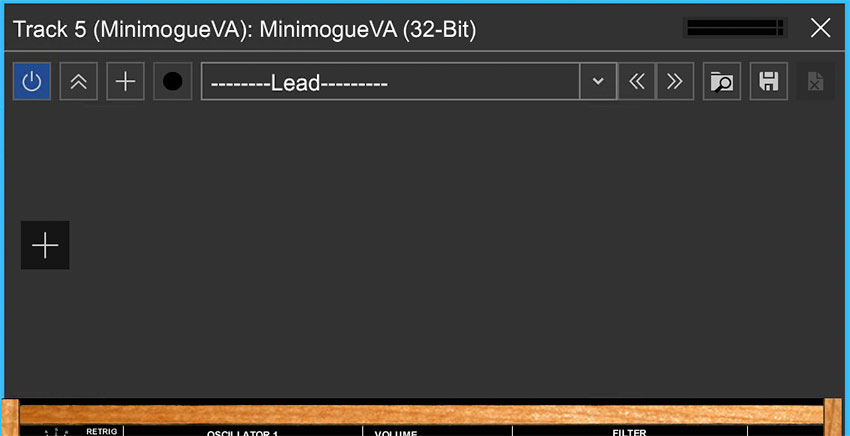
If no Controller Modules have been created, the bar will appear as a blank gray space with a + sign.
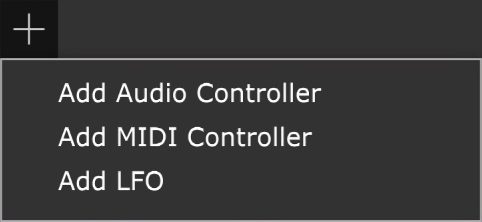
Clicking the + sign next to the show/hide button or the one in the blank Controller Module area opens a pop-up menu to add Controller Modules.

All module types are enabled or bypassed with the tiny power button icon in the upper-left corner and can be deleted with the X button in the upper-right corner. Let’s go over the functionality of each Controller Module Type:
MIDI CONTROLLER MODULE
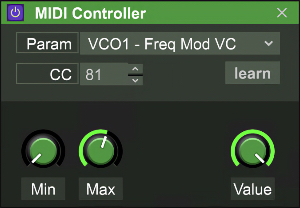
The MIDI Controller module is used to assign hardware knobs, faders, buttons, etc. to plug-in parameters. This, in turn, allows the recording of plug-in and virtual instrument automation moves into Mixcraft.
• Setting Up The MIDI Controller Module
The Learn button does double-duty in the MIDI Controller module, which makes setup very easy.
To set the parameter you’d like to control, click the Learn button, then move the control you’d like assign in the plug-in’s onscreen user interface. The Param box will instantly show the selected parameter, and learn mode will be disabled (the Learn button will say Stop while it’s in Learn mode, i.e. waiting for you to move a control).
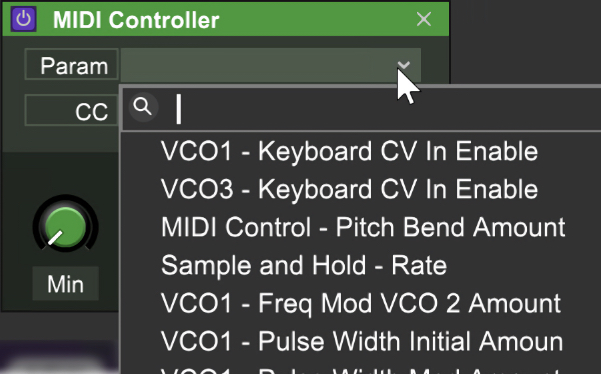
Parameters can also be assigned manually by clicking in the Param box. This displays a pop-up menu displaying all of a plug-in's parameters. The desired parameter can be selected by clicking on it.
Hardware controllers are assigned to the chosen parameter in a similar fashion-click the Learn button and move a knob/slider/switch/button on your hardware controller. When waiting for a controller move, the Learn button will say stop; when a signal is received from the hardware controller, a MIDI controller # appears in the CC box and Mixcraft automatically exits Learn mode. The Value knob moves when the controller moves, as does the assigned control in the plug-in interface.
If nothing happens when you move the controller during assign mode, click Stop to escape Learn mode. This usually means your hardware MIDI controller isn’t communicating with Mixcraft - this can be checked in Preferences>MIDI or Preferences>Control Surfaces.
The incoming MIDI controller can also be manually assigned by double-clicking the number next to CC or changed using the up/down buttons, but learn mode is the fastest and easiest in most situations.
Assigning the parameter to be controlled as well as the hardware controller can be done at the same time while in Learn mode, which makes the setup super-duper quick.
• Min and Max controls
The Min and Max knobs limit the lower and upper limits of incoming hardware controls. This is useful for utilizing the entire range of a hardware control to precisely manipulate a parameter’s “sweet spot.”
• Value
The Value knob reflects the current position of incoming controller data and moves in lock step with the currently assigned parameter.
LFO
LFO is short for “low-frequency oscillator.” Generally seen in synthesizers, LFOs use a slow-moving repeating waveform to modulate (fancy word for “change over time”) a parameter. For example, using a sine wave to modulate pitch at around 6 Hz (cycles per second) creates the familiar sound of vibrato. Using a square wave to module pan position results in a ping-pong delay - the possibilities are vast.
Mixcraft’s LFO Controller Module is really simple to use and can be synced to the master project tempo with the click of a button, meaning those modulation waveforms can do their cycling thing in perfect time with the music.
• Setting Up The LFO Module
To set the parameter you’d like to control, click the Learn button, then move the control you’d like assigned in the plug-in’s onscreen user interface. The Param box will instantly show the selected parameter, and Learn mode will be disabled (the Learn button will say Stop while it’s in Learn mode, i.e. waiting for you to move a control).
Parameters can also be assigned manually by clicking in the Param box. This displays a pop-up menu displaying all of a plug-in's parameters. The desired parameter can be selected by clicking on it.
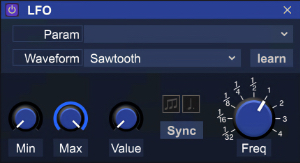
• Waveform
Choose from Square, Sawtooth, Ramp, Triangle, Sine, or Random. Because the LFO is always running, the Value knob constantly runs and its movement clearly illustrates the unique motion of each waveform.
• Min and Max controls
These determine the depth of the LFO sweep and are useful for zeroing on a portion of the control’s span. The best way to get a feel for how the Min and Max control parameters is to assign an LFO Controller to a parameter (preferably one controlled by a knob), then set Min and Max both to 50%; this essentially shuts the LFO off. Now try gradually reducing the Min knob setting and increasing the Max knob setting.
• Value
The Value knob displays the motion of the current LFO settings and mirrors the motion of the currently assigned plug-in parameter.
• Frequency / Sync
This controls the speed of the LFO. By default, the Sync button is enabled, which synchronizes the LFO cycles to the current project tempo.
When in Sync mode, the Frequency knob can be set to note values ranging from 1/32 to four bars. The tiny buttons above the Sync button allow triplet and dotted note values.
Disabling the Sync button puts the LFO’s in free-run mode. The note values around the Frequency knob disappear as well as the Triplet and Dotted value buttons, and the knob can be freely adjusted from 0.02 Hz up to 20 Hz.
AUDIO CONTROL
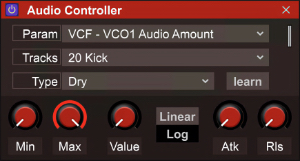
Instead of using a knob or slider on a MIDI hardware controller, Audio Control lets the relative level of any Mixcraft audio channel control plug-in and virtual instrument parameters. The source Audio Control track can be a standard audio track, a Virtual Instrument track, or even live audio from an armed audio track.
• Setting Up The Audio Control Module
To set the parameter you’d like to control, click the Learn button, then move the control you’d like assigned in the plug-in’s onscreen user interface. The Param box will instantly show the selected parameter, and Learn mode will be disabled (the Learn button will say Stop while it’s in Learn mode, i.e. waiting for you to move a control).
Parameters can also be assigned manually by clicking in the Param box. This displays a pop-up menu displaying all of a plug-in's parameters. The desired parameter can be selected by clicking on it.
The Tracks pop-up selects the audio source used to control the MIDI controller value. This can be any current audio, submix, or instrument track.
• Type
This pop-up menu determines where the control signal is tapped inside Mixcraft, which can have a great impact on its behavior as a control source.
Post-Fader- Audio Control signal is tapped after mixer fader level, channel EQ, and insert effects. This means all these parameters will affect the control signal.
Pre-Fader- Audio Control signal is tapped prior to the fader level but after insert effects and EQ. Fader level adjustments have no effect on the control signal, but inserted effects - keep this in mind if you use this setting with delay or reverb insert effects.
Dry- Audio Control signal is tapped prior to fader level, insert effects and EQ. Fader-level adjustments have no effect on the control signal. The safest choice for most situations.
• Level Meters
Not actually a control, but they visually indicate incoming Audio Control signal level. Helpful for making sure everything’s working as it should.
• Min and Max controls
The Min and Max knobs limit the lower and upper limits of incoming audio control signals. This is useful for utilizing the entire range of a hardware control to precisely manipulate a parameter’s “sweet spot.”
• Value
The Value knob reflects the current position of Audio Control data and moves in lock step with the currently assigned parameter.
• Linear/Logarithmic
This defines the “taper” of how audio level affects control amount. Think about it sort of like setting the velocity curve on a MIDI keyboard controller.
Linear- An even one-to-one relationship between level and signal modulation amount.
Logarithmic- Applies a greater amount of modulation as levels go up (this works more like the hearing curve of the human ear. Science is rad.) Pretty sure Logarithmics did that creepy 80s song with the cows in the video, but don't quote us on it.
• Attack
Much like the attack knob on a compressor, Attack slows down the effect a loud or quick transient in the audio signal has on parameter control. Setting the Attack knob at zero equates to an instant effect on the control parameter; higher Attack settings slow the effect of loud or fast transients.
• Release
When a loud signal quickly loses amplitude, Release slows down the effect it has on parameter control. Setting the Release knob at zero equates to an instant effect on the control parameter; higher Release settings slow the effects of audio signals that quickly get softer.