RECORDING AUDIO TRACKS
RECORD ARMING
Arming a track simply means you’re preparing it for recording. You’ll want to make sure the correct audio hardware input is selected and the recording level is optimally set, however Mixcraft will display the input level regardless of track arming status.

To arm a track, click its Arm button; the button will turn red letting you know that the magic is about to happen. You can also arm the current track with the key shortcut [CTRL]+B.
Note: If you’re using Core Audio/Wave RT or Wave audio drivers, the track volume fader turns red as shown in the picture on the previous page. If you’re using the ASIO audio driver, the track volume fader disappears. This is normal, and we’ll explain why a little later.
CHOOSING RECORDING INPUT
Mixcraft allows recording from multiple sound cards and different inputs simultaneously. Many audio interfaces allow the recording of multiple inputs simultaneously.
To select the hardware audio device input for recording, click the selector arrow on the right side of the Arm button. You’ll see a list of all available inputs from your audio device(s).
Select the device, followed by the input that you’d like to arm for recording.

If you’re recording a mono signal, click the sound device followed by Left or Right depending on where you’ve plugged into your device. If you’re recording in stereo with left and right inputs, select Stereo. Pay close attention to this setting, because it’s easy to unnecessarily record mono input sources (e.g., lead vocals, bass guitar, etc.) as a stereo file if you’ve set this incorrectly. It won’t hurt anything, but you’ll unnecessarily use twice as much hard drive space.
After selecting the input, feed some audio to the input to verify that the correct input was chosen. You should see the meters moving onscreen in the recording track.
SETTING THE RECORD INPUT LEVEL

When using Core Audio/Wave RT or Wave audio drivers the volume slider turns into a red recording level adjuster when the track is armed. Move the slider to adjust the recording input level. If peaks send the meter into the red, back off the level. Ideally, the input signal should nominally sit in the yellow area.
As mentioned above, unlike previous versions of Mixcraft, the meters will always display signal input level, regardless of whether the track is armed or not.
Important Note: If you’re using an audio device with an ASIO driver (you can check in File>Preferences>Sound Device), the volume slider disappears when the track is armed for recording. This is because ASIO recording drivers do not support input level adjustment in software. To set the proper recording input level, you’ll need to use either the input level on your audio hardware or if it doesn’t have one, the output level control on an external preamp or channel strip. If you don’t have any of these, stand further away from the microphone. (Kidding!)
RECORDING MULTIPLE TRACKS SIMULTANEOUSLY
Multiple tracks can be armed simultaneously if your sound device supports it. In this way, you can record an entire band in real-time, with each input recording to a separate track, allowing far greater flexibility at mix time. Remember that you’ll need to set the record inputs individually for each track.
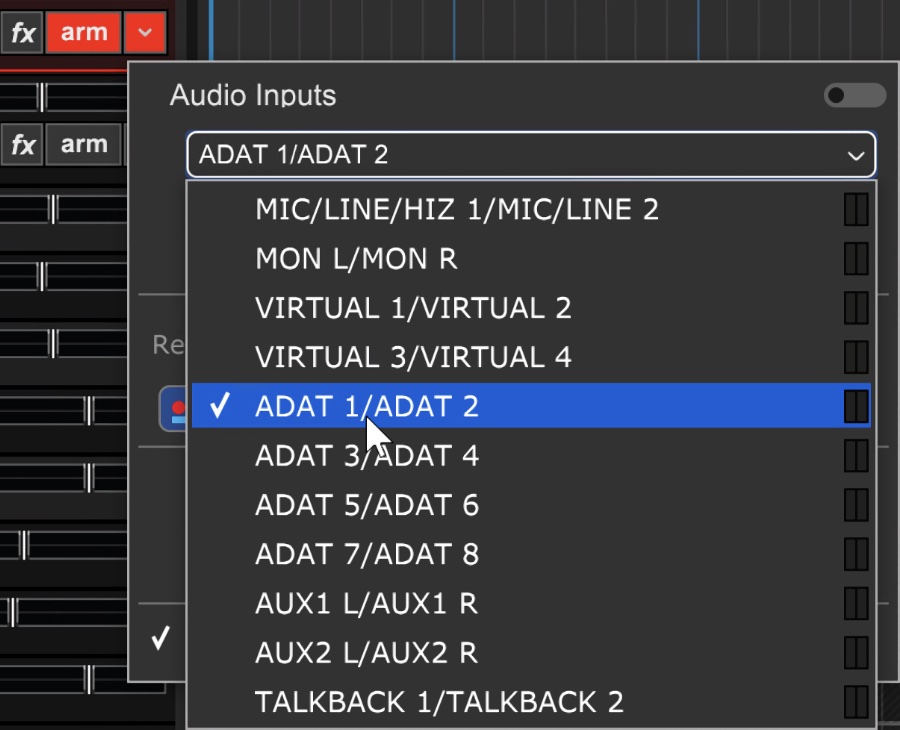
In this example, we’re using an audio interface and would like to record one mono track through the left channel input. To choose an input, click the Arm arrow for track 1 and choose Left(1). Next, select the input you would like to record from. In this case, ADAT1/ADAT2 is our input and because we selected Left(1) ADAT1 is the mono input that will be recorded. If you wanted to record a stereo input, you would select Stereo(1+2).
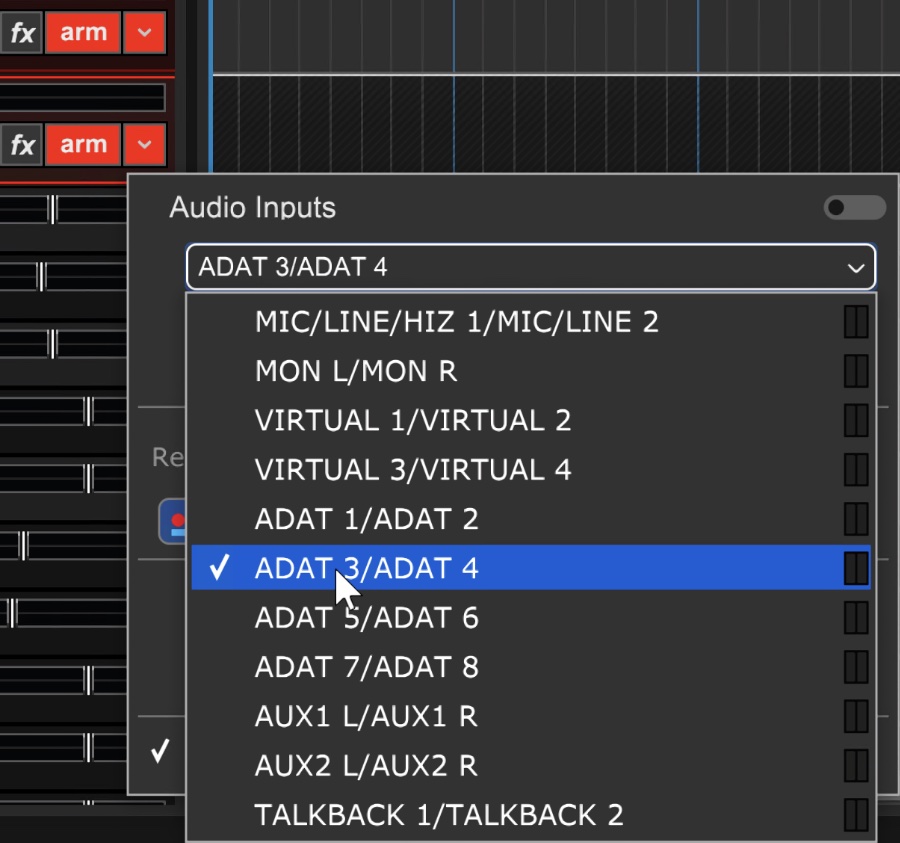
On the second track, we’ll record a second mono input. We click the Arm arrow on track 2, select Right(4), and ADAT3/ADAT4. The signal coming in on ADAT4 of our interface will be recorded. If we wanted to record a stereo audio track, we could have selected Stereo(3+4).
Both tracks are now armed for recording.
SETTING UP THE METRONOME
The metronome lets you play in time with the project’s tempo during recording. To turn on the metronome, click the metronome button in the middle of the transport.
This opens the Metronome Settings dialog:
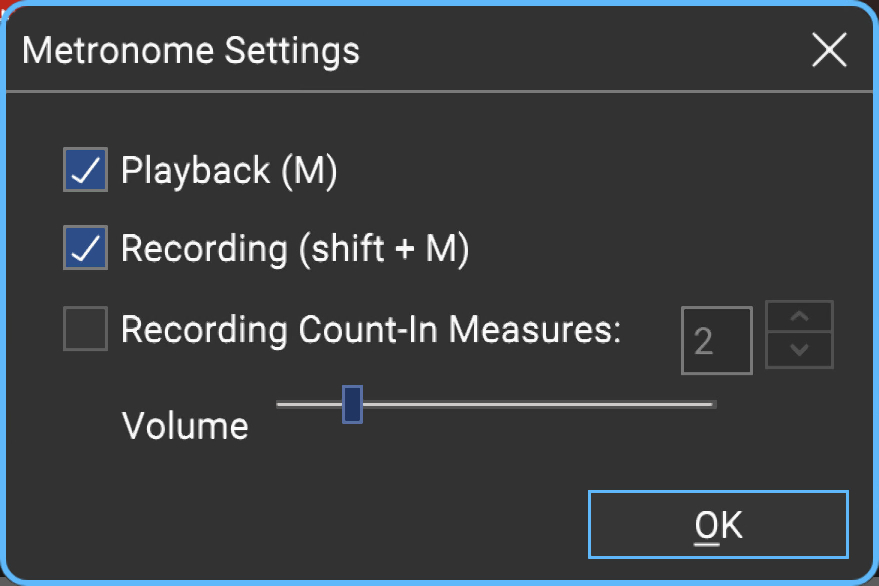
Check the Recording box. This makes the metronome clicks during recording. Checking the Playback box makes it click during playback, but we can leave this off for now. If it’s not already checked, check the Recording Count-In Measures box.
SETTING TEMPO

The tempo is displayed in beats-per-minute in the transport bar. To adjust the tempo, hover the mouse and use the arrows either on the left to adjust in 1 BPM increments, or use the arrows on the right to adjust in 1/10th of BPM increments. To enter an exact tempo, click on the numbers and enter the desired tempo.
RECORD AN AUDIO CLIP
Once a track (or multiple tracks) is armed, you’re ready to record clips.
1. Position the Caret for recording by clicking on the track.
2. Click the Record button on the transport control to start recording.
3. To stop recording, click the Record button again, or press the [Space Bar].
SOFTWARE MONITORING
“I need more me!,” said every musician who ever lived, to every sound engineer who ever lived.
Some sound devices let you listen to the input recording in real-time, or very close to it, during recording. This is known as software monitoring. To enable software monitoring for a track, click the speaker icon. The speaker icon turns blue to indicate that software monitoring is enabled for the track.
We recommend using headphones in order to avoid feedback when recording with a microphone. Closed-ear headphones also help to prevent the click track from bleeding into mics during recording - there’s nothing worse than the sound of “bleep-bleep-bleep” as the final chord of a difficult acoustic guitar performance fades.
One caveat when using software monitoring is that audio hardware must be set to a low latency, otherwise, the monitored audio will have an audible delay. For the lowest latency and best audio performance, use the ASIO audio driver, if available.
Check in File>Preferences>Sound Device to see if ASIO is available; you may need to download and install drivers from the manufacturer of your audio hardware. The downside to reducing buffer size is, depending on your sound card and computer speed, you may hear gaps or clicks in the audio. Learn more about setting up sound devices in “Important Sound Setup Information.”
HEARING EFFECTS DURING RECORDING
If effects are added, they’ll be audible when software monitoring is on. This is often desirable, e.g., adding reverb when tracking a vocalist, or when tracking electric guitar with Mixcraft’s Voxengo Boogex Amp Simulator. Though you’ll hear the effects during recording, they will not be recorded into the track. In other words, Mixcraft will record audio dry, with no effects. The exception to this is if you're using the Record Effect function in Mixcraft Pro Studio (more on this in the Using Effects section).
Saving Time With a Multi-Input Recording Template
A project with the correct inputs and armed tracks for multiple-input recording can be set up and saved as a project template. This is handy if you’re recording an entire band - the next time you record the band, simply load the template and all inputs will be ready to go!
(Provided all instruments and inputs are plugged into the same input - keep notes!)
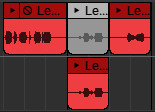
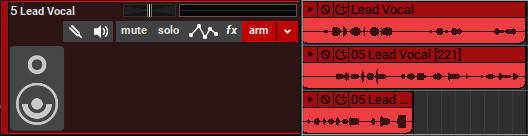
LANES
Lanes allow multiple tracks of audio (or MIDI) to occur on the same channel and are created automatically when looping is enabled in Takes or Overdub recording mode.
ADDING LANES
Empty lanes can be manually added by right-clicking in the Main Clip Grid and selecting Lanes>Add (or with the shortcut [ALT]+L). If multiple tracks are selected, extra lanes will be added to all selected tracks.
DELETING LANES
A track’s bottom-most lane can be deleted by right-clicking and selecting Lanes>Delete. To delete unused lanes, right-click and select Lanes>Delete Empty Lanes (or with the shortcut [ALT]+K).
MUTING LANES
All clips on any lane can be muted or unmuted by right-clicking on an empty part of a lane and clicking Lanes>Mute All or Lanes>Unmute All.
DENNY LAINE
Not only was Denny Laine the unsung rhythm guitarist and bassist in Wings in the 70s, he was also a member of The Moody Blues in the 60s, and sang their hit "Go Now," before they got all cosmic and groovy. It's funny that a guy named Denny Laine was in a band with the guy who sang "Penny Lane." Very strange...
RECORDING MODE
There are three recording modes:
• Takes
• Overdub
• Replace
To choose a recording mode, click the down arrow next to the track Arm button and select the appropriate Recording Mode:
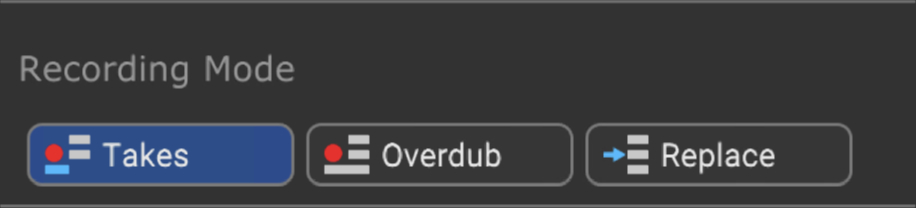
Recording Mode can also be selected by right-clicking in the track header or by clicking Track>Recording Mode in the Main Window menus. Recording Modecan be set independently for each track in a project.
The default Recording Mode for audio and MIDI can be independently set in Preferences > Recording in the Main Window menus.
• Takes
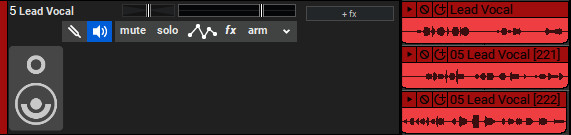
Takes mode is very useful for laying down multiple performances without starting and stopping each time. It’s generally used in conjunction with Loop Mode wherein a section is looped and each cycle records a new “take” (see Loop Recording below). Mixcraft automatically creates recording Lanes to accommodate each pass.
As new takes are recorded, the clips of previous recording passes are automatically muted. Audio tracks default to Takes mode. The resulting Clips on Lanes can be freely moved to their own audio tracks.
When Takes mode is used in conjunction with a punch in/out, it creates a clip on a new lane in the punch area but only mutes the portion of the audio clips in the punch area.
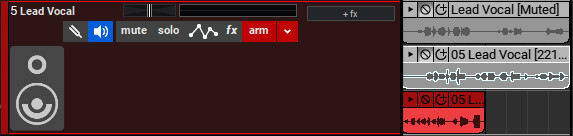
• Overdub
In this mode, all previous clips are heard during recording. This works well for quickly stacking parts. Each new recording is placed on a new lane.
• Replace
In this mode, existing audio is replaced by new recordings. New lanes are not created.
• Loop Recording
Loop recording allows the recording of multiple takes or overdubs without stopping the transport.

To create a loop, click the Loop mode button in the Transport, then drag the Loop Start and Loop End markers in the Timeline to set a loop area. Loop regions can also be set by drawing a purple region in the Timeline or an empty area of the clip grid, then double-clicking the Loop button. Be aware of the Snap setting when setting Loop points- it’s usually a good idea to set it to Snap to the Grid.
• Punch In/Out
Punch In/Out recording lets you place markers that define where to start and end recording. To mark a region for punch in/out recording, click the Punch In/Out button. The punch region can be set by grabbing the Punch In and Punch Out handles in the Timeline and moving them. A faster way to set the punch area is by dragging a purple highlight region in the Timeline or an empty area of the Clip Grid and double-clicking the Punch In/Out button.

After setting up a punch area, press record, and the new recording will be created within the punch start and end region.