USING THE PERFORMANCE PANEL WITH THE NOVATION LAUNCHPAD
The Performance Panel can be used with a standard USB keyboard controller (see Using Generic MIDI Controllers and Control Surfaces)or even just your computer’s mouse or trackpad, but it really shines when paired with a Novation Launchpad USB grid controller. Instead of controlling set and cell playback with individual mouse clicks, the Launchpad features a multicolor 64-button grid for rapid control of cell playback and recording, as well 16 additional buttons for controlling set playback and navigation. Mixcraft includes some special features designed to specifically take advantage of the Launchpad controller.
CONFIGURING THE LAUNCHPAD CONTROLLER
The Novation Launchpad doesn’t need any special drivers. Here’s how to get it up and running in a jiffy:
1. Plug the small end of the included USB cable into the the Launchpad, and the big end into an open USB port on your PC.
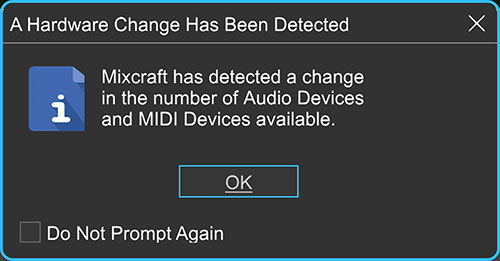
2. Upon plugging in the Launchpad, Mixcraft will display the above window. This acknowledges that you’ve plugged in a new piece of hardware. Click OK.
3. In the upper-left corner, click File>Preferences, then select Control Surfaces. In the left column, choose Launchpad. In the Input and Output columns to the right, select Launchpad in each of these. Click OK at the bottom of the Preferences window and you’re ready for Launchpad rock!
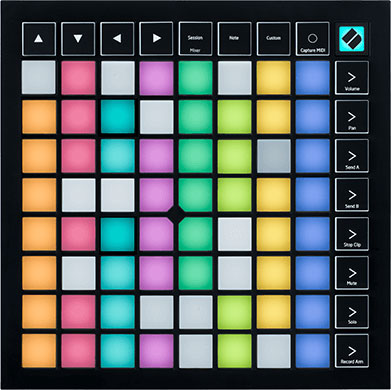
LAUNCHPAD BUTTONS
- Main 8x8 Grid - The main 8x8 button grid functions just as the corresponding onscreen set, clip, and grid play, stop, and record buttons. The following table describes button color and states (like Idaho and Vermont).
button color | state | cell activity |
|---|---|---|
off | - | no clip present in cell* |
amber | solid | clip present, not currently playing |
green | solid | clip currently playing |
green | flashing | clip plays following Cue duration |
red | solid | track/lane is record armed, press to begin recording |
red | dim | count-in measures or Cue duration currently elapsing |
red | flashing | currently recording |
* Pressing an unoccupied grid button during playback will stop playback for clips in the same row, following the duration of the Cue setting (if any). The button flashes red during the cue duration, indicating clips playing in this row will stop following the cue duration.
- 1 - 8 Buttons
These start and stop sets just like the play/stop buttons along the top of the Mixcraft’s onscreen Performance Panel.
- A - D Buttons
Though there are Launchpad’s main grid buttons “only” comprise an 8x8 grid, Mixcraft’s onscreen grid has no size/cell number limit. When Mixcraft detects a Launchpad controller, a 8x8 cell blue box appears in the Performance Panel; this surrounds the current corresponding cells represented on the Launchpad controller.
The 8x8 cell grid represented on the Launchpad can be shifted up and down with the A and B buttons, and left and right with the C and D buttons. The blue box surrounding the 8x8 grid moves accordingly.
(This only becomes relevant if the Performance Panel grid is larger than 8x8 cells.)
- H Button
The H button in the bottom-right corner acts as a master stop button. It glows solid red whether the Performance Panel is stopped or playing. If it’s pressed while the Performance Panel is running, it flashes for the Cue setting duration, then all currently playing clips are stopped. This is the same as clicking the onscreen stop button in the upper-left corner of the Performance Panel.