OUTPUT BUS TRACK
An Output Bus Track is typically used to route audio to physical audio outputs when using audio hardware with multiple outputs, or the outputs of additional audio interfaces attached to your computer.
To create an Output Bus Track, click the +Track button and select Add Output Bus Track. You can also click Track>Add Track>Output Bus Track in the main window menu or right-click in the Track List area and use the Insert Track menu.
OUTPUT BUS TRACK HEADER

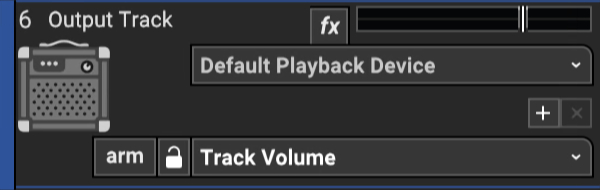
TRACK NUMBER
All tracks in a Mixcraft project are numbered, starting at 1 at the top track, and increasing up as tracks are added below. Note that track numbering always stays constant - that is, track numbers increment from 1 upward no matter how tracks are arranged or moved. (Track numbers aren't "attached" to specific tracks.)
TRACK NAME
Every track has a name. Default names are generally the type of track (Output, Video, etc.). Tracks can be renamed at any time by double-clicking and typing a new name, and either clicking outside the naming field, or clicking the [RETURN] or [ENTER] key.
FX LIST
Click the fx button to open the Effect List window. Here effects can and presets can be selected.
LEVEL CONTROL & METER
Track volume is adjusted by the horizontal slider with a built-in level meter. Click down on the slider and move it left or right to decrease or increase volume. Volume can be set from 0% to 200% (-Inf dB to +6 dB).
To set an exact track volume, choose Track>Properties>Set Volume>Set Exact Value… from the Main Window drop-down menu and enter the desired volume. This can also be accessed by right-clicking on the track.
Tip: Hold down [ALT], [SHIFT], or [CTRL] and click-drag the slider for finer and more accurate adjustment.
The horizontal volume fader contains an integrated level meter which displays the output level as the track plays.
SELECT HARDWARE OUTPUT
Opens a menu where individual physical hardware outputs can be selected for the output bus track.
ADD/REMOVE AUTOMATION LANE BUTTONS
The + button adds automation lanes beneath the send track, the X button will hide the closest automation lane the track. Keep in mind that clicking the X button does not delete automation data, it just hides the lane displaying it. For full information on using track automation, see the Automation and Controller Mapping section.
AUTOMATION PARAMETER POPUP MENU
Click this to select the current track/lane automation parameter.
AUTOMATION LOCK BUTTON
Synchronizes the movements of lane automation with onscreen displays of channel volume and pan. See the Automation and Controller Mapping section for a full explanation.
ARM AUTOMATION RECORDING
Allows recording of automation data either via the onscreen control associated with the lane’s automation parameter, or by using a hardware controller assigned to a parameter.
TRACK COLOR
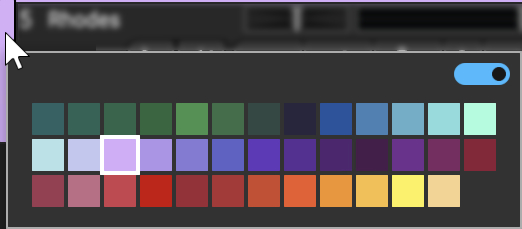
Track colors can be individually set by selecting Track>Properties>Track Color in the main window drop-down menus, by right-clicking a track and choosing from the color palette, or by clicking directly on the vertical color bar at the far left of the track. This affects the track’s highlight color and all clips on the track.
TRACK IMAGE
Each track can have its own image beneath the track name for personalization as well as organization. Choose from Mixcraft’s included images or import your own.
To change the track image, double-click an existing track image or hover over the track image and click the pop-up button. You can also select Track>Properties>Choose Image… in the main window drop-down menus, or right-click on a track and select Properties>Choose Image...
The Choose A Track Image window opens:
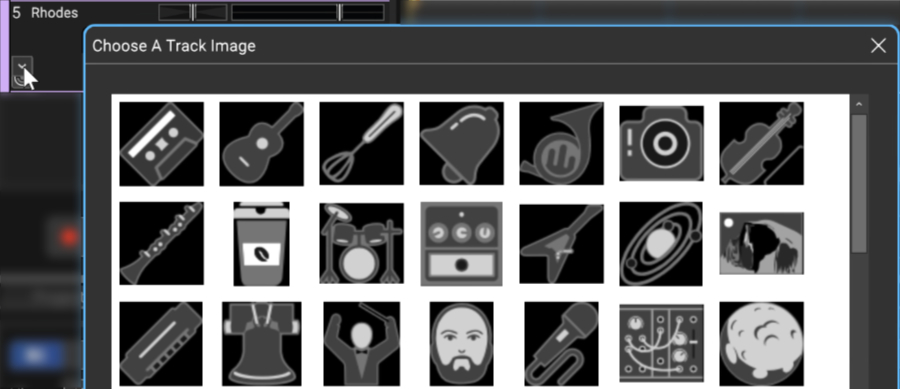
To use an existing image, select one and click OK. To use a custom image, click Add My Own Image File..., navigate to the image to be added, select the desired image, and click Open. The image replaces the existing track image and is added to the list of thumbnail images.
JPG, BMP, PNG, and GIF formats are supported, and custom images are permanently added to the track image library for use in future projects.
ROUTING AUDIO TO AN OUTPUT BUS TRACK
Output routing for audio tracks must be set in the Mixer window. We’ll talk more about mixer-window stuff in the “Mixer Tab” chapter, but we’ll take a little detour into mixer land to explain Output Bus Track routing.
Click the Mixer tab at the bottom left of the screen. At the top of each mixer channel, you’ll see each audio channel’s output selector pop-up.(this is the default location, but it can be rearranged to appear elsewhere... we trust you’ll find it). The bottom half shows the current routing; by default, this will be Main Mix. Clicking on the bottom half opens a pop-up menu where you’ll select either Main Mix or any Output Bus tracks you’ve added to the project. Once selected, the current setting for track changes in the lower half of the output selector pop-up. At the risk of stating the obvious, you can route as many channels as desired to an Output Bus Track (it is a mixer, after all!).
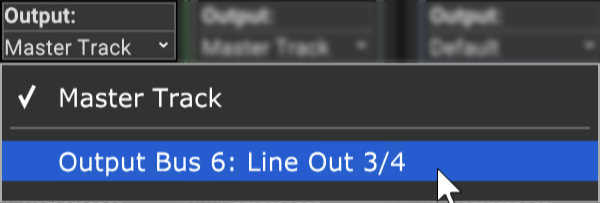
ROUTING OUTPUT BUS TRACKS TO AUDIO HARDWARE OUTPUTS
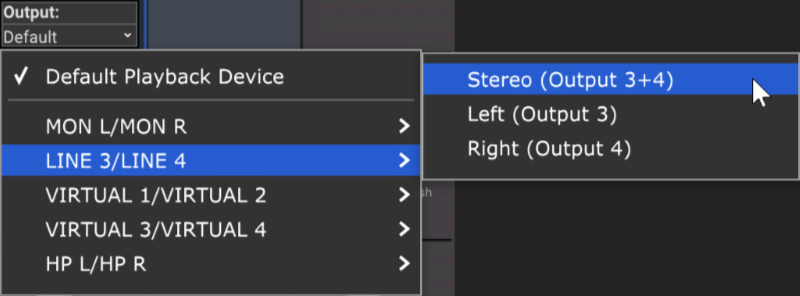
If you’re using an audio device with multiple outputs, click on an Output Bus Track’s Output drop-down menu beneath the level meter (it’ll say Default Playback Device). Here, you’ll be able to select from your audio hardware’s available physical outputs. The routing of tracks to physical outputs can also be configured in the Mixer tab; see the Mixer Tab section. There are many ways to use Output Bus Tracks to enhance a mix. For some swell examples, check out Appendix 3: Nifty Uses For Output Bus Tracks.