VIRTUAL INSTRUMENT CLIP RIGHT-CLICK MENU
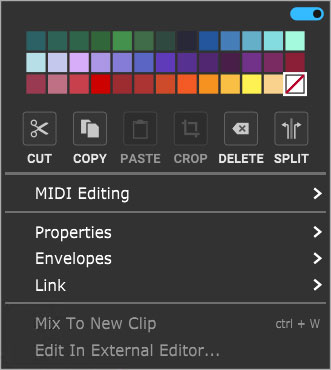
• Menu Persist Switch
The blue horizontal slider at the top-right of the menu enables persistent menus. When enabled, the right-click menu stays open while multiple functions and options are selected; to close the right-click window, simply click anywhere outside of it.
If the Menu Persist slider is disabled, the right-click window automatically closes when a single action or option is selected.
• Clip Color Palette
Use this to select a color for the clip.
• Cut, Copy, Paste
Allows cutting, copying, and pasting of the clip.
• Crop
If a portion of a clip is currently selected by clicking and dragging, either on or outside of the clip, Crop removes any part of the clip outside of the selection range. (It's generally easier to start the highlight part of the clip from outside the clip.)
• Delete
If a portion of a clip is currently selected by clicking and dragging, either on or outside of the clip, Delete removes the selected part of the clip - essentially the opposite of the Crop command. This often results in splitting the clip into two clips.
• Split
Splits the clip into two separate clips at the current Playhead location. Split has no effect if the Playhead isn't atop the clip.
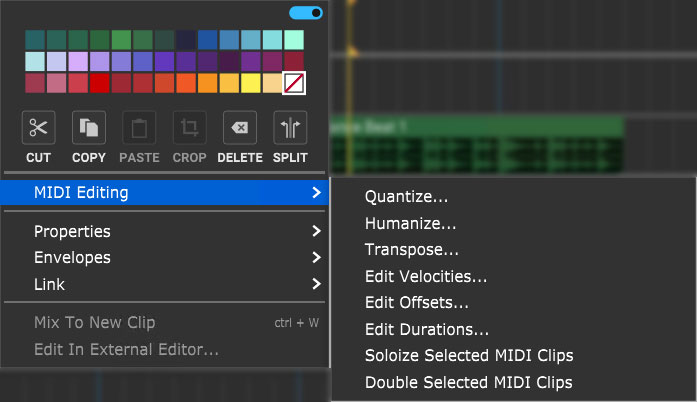
• MIDI Editing
These submenus allow precise editing of MIDI note and controller data. The same menus can be accessed from the right-click menu, or via the Sound>MIDI Editing menu at the top of the Mixcraft UI. For full details on MIDI Editing functions, have a look at the MIDI Editors: Clips section.
Quantize...
Quantization is the process of moving notes closer to a set note value or “grid,” in order to tighten the timing of sloppy performances. To access the Quantize menu, right-click on a MIDI clip or MIDI data in the Piano Roll Editor and select MIDI Editing>Quantize...Note Type - Specifies the snap setting to quantize to.
- If this is set to eighth-note but you’re actually quantizing a whole note, it will not adjust the length of the note to an eighth-note, but rather align it to the closest eighth-note.
- If the Start Times box is checked, then the start times of each note will be quantized to this note type.
- If the Note Ends box is checked, then the end times of each note will be quantized to this note type.Start Time - Click the checkbox next to Start Time and then choose a Note Type setting. Mixcraft adjusts all notes to the closest beat or partial beat, based on the Note Type.
Note Ends - Mixcraft adjusts the note endings to the closest beat or partial beat, based on the Note Type.
Swing - If you want to quantize with swing, click Swing and choose an intensity %. Swing will offset every note that is on an odd beat, depending on the quantize note start setting.
For example, if you had a recording of eighth notes, set the Note Type to eighth-notes and then set swing to 30%; every other eighth-note would be offset by 30%.Before: “Unswung” eighth notes:

After: Quantized eighth notes with a 35% swing. Swingin’, baby!

All / Selection - Choose whether to quantize the selected notes or all the notes in the current virtual instrument clip. (Only applies if a region is highlighted within the Piano Roll Editor.)
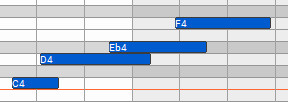
Before quantizing:
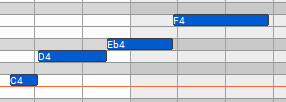
Afterquantizing Start Times and Note Ends to 1/8 Note:

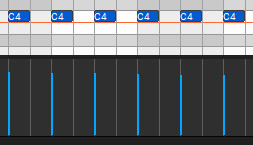
Humanize...
Humanizing is the process of adding a random and more “humanized” feel. When entering MIDI data via the mouse and using snap, music can sound stiff and artificial; Humanize lends a more natural feel.Note Start and Duration
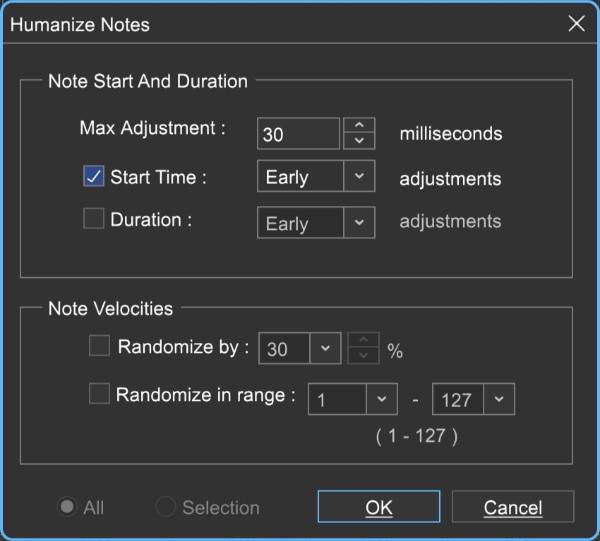
Max Adjustment - The maximum note duration to humanize towards.
Start Time - Specifies humanizing the start time with options for Random, Early, or Late timing.
Duration - Specifies humanizing the start time with options for Random, Early, or Late timing.
Note Velocities
Allows randomization of note velocities with the following options:
Randomize by - A percentage of the original note value.
Randomize in range - A new note velocity is randomly chosen in the range entered.
All / Selection - Choose whether to edit the selected notes or all the notes in the current virtual instrument clip. (This applies only if a region of notes has been highlighted within the Piano Roll Editor.)
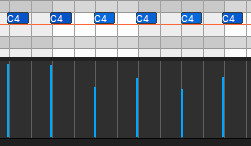
Before humanizing - velocities are the same on every note:
After humanizing - randomized velocities:
Transpose...
The Transpose dialog allows the shifting of all notes or selected notes in a clip by octaves or semitones. Right-click a MIDI clip or MIDI data in the Piano Roll and select MIDI Editing>Transpose...
Transpose By - Choose Octave(s) or Semitone(s) from the Transpose By drop-down menu, then enter the amount and click OK. To transpose selected notes only, click the Selection radio button.
Edit Velocities...
The Note Velocities dialog allows adjustment of all or selected note velocities. A MIDI velocity indicates how hard the note has been struck. The range is from 1 to 127.
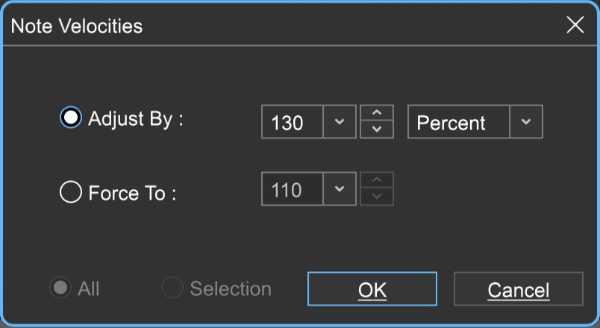
Adjust By
Adjust velocities by a specific percentage.Force To
Specify a velocity to adjust all notes to. The valid range is from 1 to 127.All or Selection
Choose whether to edit the selected notes or all the notes in the current virtual instrument clip. (This applies only if a region of notes has been highlighted within the Piano Editor.)
Edit Offsets...
Allows adjustment of all notes or the selected notes time offsets.
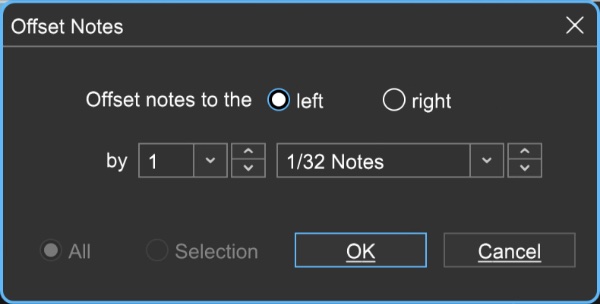
Offset Direction
Choose left or right.Offset Amount
Select the desired note value here.All or Selection
Choose whether to edit the selected notes or all the notes in the current virtual instrument clip. (This applies only if a region of notes has been highlighted within the Piano Editor.)
Edit Durations...
Note Durations allows adjustment of all notes or selected note durations.
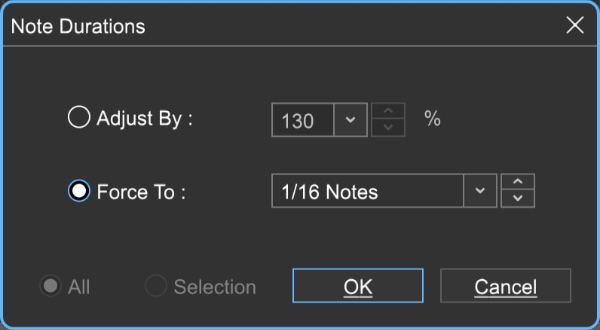
Adjust By
Adjusts notes durations by a percentage.Force To
Select the desired note value here.All or Selection
Choose whether to edit the selected notes or all the notes in the current virtual instrument clip. (This applies only if a region of notes has been highlighted within the Piano Roll Editor.)
Soloize Selected MIDI Clips
Soloize is a unique function that modifies the note data in a MIDI clip by forcing it to play one note at a time - in other words, it eliminates legato overlaps.Before soloizing:
After soloizing:
Double Selected MIDI Clips
Duplicates the current clip and merges them, creating one large double-length clip.Before doubling:

After doubling:
• Properties
Muted- Checking this mutes the clip MIDI note output. Muted clips will appear grayed out and [Muted] text will be added to the onscreen clip name.
Locked- Freezes all location and clip size/length parameters. [Locked] text will be added to the onscreen clip name. Clips can be unlocked by unchecking the Locked check box.
• Envelopes
These add a preset-configured volume adjustments to individual clips in the form of fade-ins, fade-outs, or overall level.
Envelope settings are reflected in the volume curve line that's superimposed on top of the clip waveform display and clips will always default to a volume setting of 100%. Envelopes can adjust clip volume between a range of 0-200%.
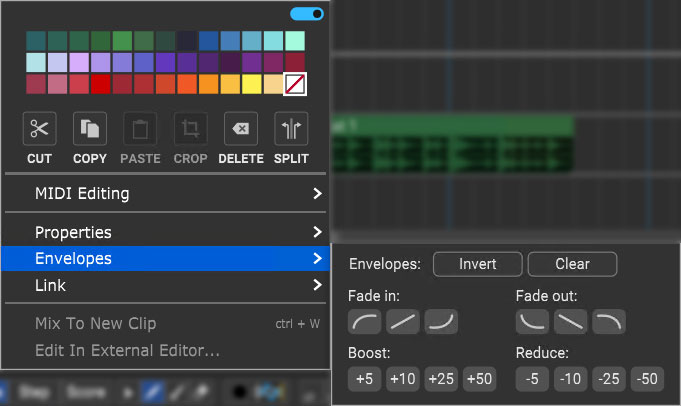
Invert- Vertically "flips" the current Envelope curve. For example, if a clip has a fade that begins at minimum volume and gets louder, Invert will make the clip begin at maximum volume, and get quieter. Invert even works on static volume settings; for example, if the clip is at 80% volume, Invert will change the clip volume 20%. Note that Invert can be undone by simply clicking a second time.
Clear- Initializes the clip volume setting to 100%
Fade In/Fade Out buttons- These six buttons automatically apply logarithmic, linear, or exponential fade in or fade out volume curves.
Boost/Reduce: These buttons add or subtract overall clip volume in 5, 10, 25, or 50% increments.
When the blue Menu Persist switch is enabled (at the top of the right-click window), the Envelopes window remains open, making it easy to experiment with various volume curves. You can always hit the Clear button and start over if things get crazy.
• Link
Related clips can be linked together letting them move as a single unit. This is useful when moving video clips with associated audio, multiple-mic drum recordings, or layered background vocals.
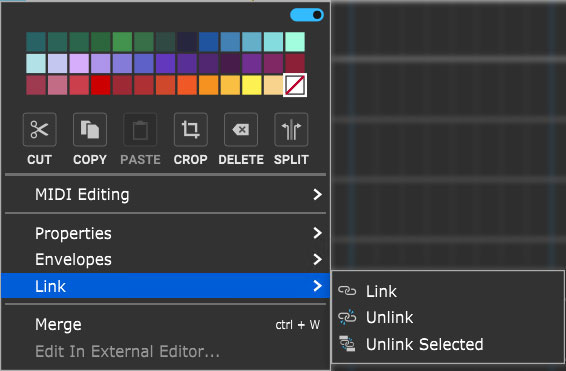
Link- Links clips together. Multiple clips must be selected (otherwise the Link command will be grayed out).
Unlink- Unlinks only the clip that's being right-clicked.
Unlink Selected- Unlinks all linked clips in the group.
Linked clips will add [Linked] to the clip name and display an "interlocked rings" icon.
• Merge
Combines multiple clips into one.