MIXER CHANNEL STRIP SECTIONS
Below we've listed all mixer channel sections in the their default order, going from top to bottom, but keep in mind that channel strips can be customized as described in the preceding section.
OUTPUT/ROUTING

Use this popup to select signal output destinations. This generally will be set to Master Track to route signals to the main left/right outputs, but can optionally be used for routing to Output Bus tracks, and ultimately, to the separate physical outputs of an audio interface.
SENDS
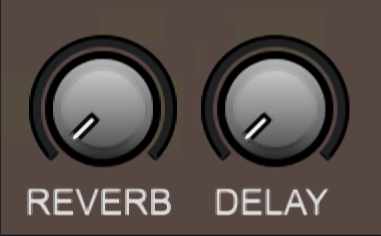
Send track knobs appear when one or more send tracks have been added to a project. The number of knobs corresponds to the number of send tracks in a project, and the name shown next to the knob will be the same as the send track’s name in the track list. The mixer displays a maximum of ten send knobs at once; if more than ten send tracks have been added, a scroll bar appears at the right; just slide that guy up and down to view and adjust all 437 of your send tracks.
Due to space limitations in the mixer window, only the first nine characters and spaces will be visible in the mixer knob label, so don’t give your send tracks names like “Send 46 - Billy-Bob’s Sweet ‘Ol Gimungous Reverberation” or something equally lofty. We do recommend that you retain something like “Send 2” or similar at the beginning; this will simplify keeping track of signal flow, especially with larger projects.
Send Me A Send Track... Right Now
Send tracks are independent channels that allow multiple mixer channels to send signal to them. These are frequently used for time-domain effects, such as reverbs, delays, or other situations where it’s desirable to have the dry signal at full volume while adding an effect at a lower level.
A good example would be if you wanted to add reverb to the components of a drum kit that was split out over multiple audio channels (kick drum on one track, snare on another, etc.). Not only would using a send track let you save CPU power by using a single instance of reverb, but because each channel has its own send knob, you could feed a great deal of snare drum signal to the reverb for dramatic impact, but only a tiny bit of the kick drum (because kick drums generally sound like cannons gone awry when over-reverbed).
Another great way to use Send Tracks is for grouping related tracks, such as backing vocals. Not only does this let you put numerous related tracks under one fader for easy control, inserting effects into a Send Track also lets you add effects to many channels at once (for adding compression and EQ to all those backing vocals in one fell swoop, for example).
GAIN

This is a handy “initial gain” control, as seen on hardware mixing boards. Use it to adjust super quiet or hot signals (or to really slam the compressor and drive sections discussed below).
Turning it left or right adds or subtracts 15 dB of gain.
COMPRESSOR
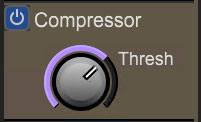
This is a handy “one-knob” compressor for taming transients. At lower settings, it works especially well for vocals, guitars, and bass, and it’s great for crushing drum loops at higher settings. Its volume is compensated, so that the overall output level remains roughly constant as the compression amount is increased. The Threshold knob increases the amount of squashing as it’s turned clockwise, as well as decreasing the attack time for more aggressive gain reduction.
CHANNELS
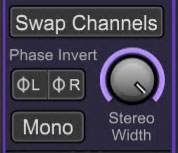
New in Mixcraft 10, this handy channel strip module incorporates the following useful audio utilities typically reserved for a VST plugin:
• Swap Channels
Reverses the left/right orientation of stereo audio; the button turns blue when on when engaged.
• Phase Invert
Inverts the phase of the left or right channel. This is useful when two mics have been used to record the same source - sometimes flipping the phase on one of the channels improves sound quality.
• Stereo Width
Sets the left to right channel width for stereo content. Note that the Stereo Width knobs doesn't add or exaggerated the stereo image - maximum setting the same as "uneffected," but narrowing stereo sound field width is often useful in mixing situations.
• Mono
Sums stereo signals to one mono signal.
DRIVE

The Drive control introduces natural “mixing console”-style saturation, from a little to a fair amount of raunch. It’s voiced with a warm, natural tone. Though it will increase overall volume, the channel fader will still keep the overall volume under control, making it easy to use while adding some grit without losing control of mix elements.
PARAMETRIC EQ
In addition to the basic three-knob EQ, more advanced users can choose Mixcraft 10’s full-featured four-band Parametric EQ. The high and low bands are semi-parametric with a switchable shelf or bell mode, while the two mid bands are fully parametric - this means that in addition to sweepable frequency selection, they each have variable bandwidth (aka, “Q”). The frequencies of all bands overlap as well. We think you’ll find Mixcraft 10’s channel EQ to be tremendously useful and flexible. Let’s go over the Parametric EQ’s controls:
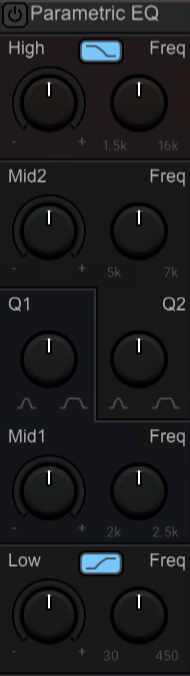
• High +/- Boosts/cuts selected high frequency range +/- 15 db.
• Bell/Shelf Button - Toggles between bell mode or shelf mode. See the sidebar Bell vs. Shelf, The Throwdown for more information, because we love a sidebar!
• High Freq - Selects a center frequency between 1500-16,000 Hz.
• Mid 2 +/- Boosts/cuts the selected mid frequency range +/- 15 db.
• Mid 2 Freq - Selects the center frequency between 500-7000 Hz.
• Q2 - Sets the bandwidth of the boost or cut range from 0.5 octaves to 3 octaves.
• Mid 1 +/- Boosts/cuts the selected mid frequency range +/- 15 db.
• Mid 1 Freq - Selects the center frequency between 200-2500 Hz.
• Q1 - Sets the bandwidth of the boost or cut range from 0.5 octaves to 3 octaves.
• Low +/- Boosts/cuts the selected high frequency range +/- 15 db.
• Bell/Shelf Button - Toggles between bell mode or shelf mode. See the sidebar Bell vs. Shelf, The Throwdown for more information.
• Low Freq - Selects the center frequency between 30-450 Hz.
Bell vs. Shelf, The Throwdown
These refer to the two types of response curves available for the high and low bands of Mixcraft 10’s channel EQ. The high and low bands of Mixcraft 10’s channel EQ both include a switch for selecting between these two modes.
It’s important to understand that setting an EQ to a given frequency doesn’t just boost or cut that frequency only - not only is that difficult to accomplish in conventional analog circuitry, it also wouldn’t serve much practical purpose. In reality, an EQ boosts or cuts in the vicinity of the selected frequency with boost or cut heard most strongly close to the selected frequency, and diminishing effects as you get further from the chosen frequency, which is far more useful.
When the bell curve is selected, the audible effects of the boost or cut are greatest at the selected (aka, center) frequency, and trail off proportionally above and below the center frequency. When boosting frequencies, this has the rounded appearance of a bell on a response plot, hence the name.
The shelf mode operates a little differently. In the case of a low band EQ in shelf mode, all frequencies below the selected frequency (referred to as the “corner” frequency in this case) are boosted or attenuated, depending on the setting. This response curve appears like two horizontal lines on a response plot, hence the “shelf” name. A high shelf operates in a similar but reversed fashion; all frequencies above the corner frequency are boosted or cut depending on settings.
In use, bell-curve EQs are useful for boosting a specific frequency range or cutting out a specific troubling frequency range (like an air conditioner hum, or that 600 Hz snare ping that people loved in the 90s). Shelf EQs are great general tone controls. They’re useful for slicing off a lot of low-end frequencies (for vocalists, who have nothing happening beneath around 150Hz anyway, or drum room mic fudge) or wideband high boosts (to brighten dull cymbals, singers, or add “air” to entire mixes), amongst other uses.
EFFECTS
Insert effects are effects that are placed into or “inserted” into the signal path of a mixer channel. To be clear, this means the signal passes through the effect in series and if the effect doesn’t have a wet/dry mix knob, the effect will balance and be 100% wet, with no unaffected signal mixed in. As a result, insert effects slots are useful for effects such as compression, EQ, distortion, etc., i.e. situations where you don’t want to mix some portion of the dry and wet signal together. If the chosen effect has a wet/dry control, such as a delay or reverb, you certainly can place them in an insert, but we recommend using a Send Track+its own insert, as this offers a lot more flexibility with regard to stereoization and panning (and can save a great deal of computer processor power by allowing multiple tracks to feed a single instance of a resource-hogging reverbs or other effects).
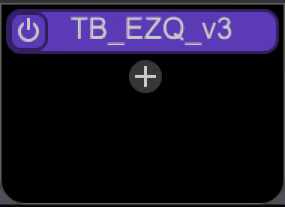
One or more insert effects can be added in the main track window by clicking on a channel strip’s fx button, or by clicking the +fx button in a mixer channel strip. By default, mixer insert effects are located above the built-in three-band EQ in the mixer. Clicking the +fx button opens a list of built-in and third-party VST effects as well as any user-created effects collections. To add an effect, simply scroll through the list and click on the desired effect. Additional effects can be added by clicking again on a channel’s +fx button.
Effects inserts displayed in the mixer are the same as the effects shown at the far right of a track in the Main Window track list (you may need to drag the far right of the track list to “open” up the insert effects view).
For more information about using effects, please have a look at the appropriately named Using Effects section.
TRACK BUTTONS
The track buttons will be a little different for virtual instrument and audio tracks.
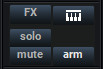
FX- Opens the Effects List window. Individual effects can be opened for editing from within the Effects List window, but you can also just click the effect itself in the channel for direct editing access

Solo- Plays the selected track only, and disables sound from other tracks. Solo buttons can be enabled on multiple tracks.
Mute- Silences audio on the selected track. Mute buttons can be enabled on multiple tracks.
Arm- readies a track for recording.
Keyboard Icon (virtual instrument tracks only)- Opens the Instrument List window where virtual instruments and effects chains can be configured.
Mon (audio tracks only)- Short for “monitor,” this enables software monitoring for an audio channel.
EQ
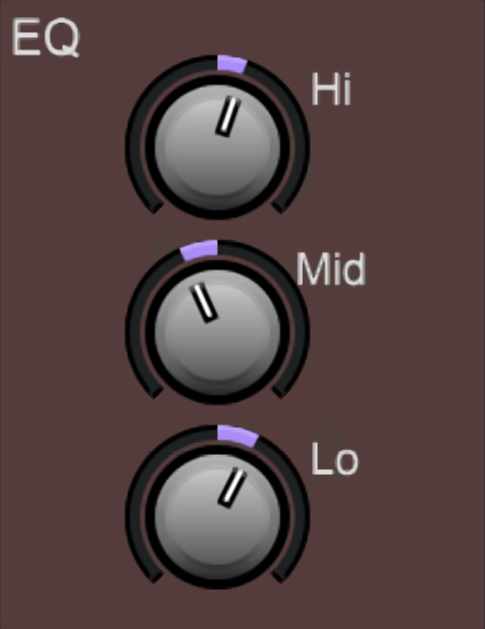
The 3-Band EQ allows quick and easy boosting or cutting of low, mid, and high frequencies. the low knob is a shelving EQ with 15 dB of boost or cuts at a corner frequency of 125 Hz. The mid knob is a one-octave wide peaking filter with 12 dB of boost or cut, centered at 2500 Hz. The high knob is a shelving EQ with 15 dB of boost or cuts at a corner frequency of 8000 Hz.
The 3-Band EQ works independently of the Parametric EQ in the next section, and can be used in conjunction with it (but things could quickly get confusing, so it’s probably best to use the Parametric EQ on its own).
INPUTS

This pop-up selects a channel’s input source. For virtual instruments, this allows the selection of MIDI devices or a specific MIDI device; for audio channels, this selects physical inputs on an audio interface.
OSCILLOSCOPE

Displays the current audio waveform. This is most useful for individual sound sources such as synthesizer waves or pure electronic drums.
FREQUENCY VIEW

Displays audio energy throughout the frequency spectrum. Low frequencies appear toward the left, and high frequencies appear on the right, with vertical height representing the approximate level.
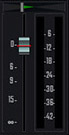
VOLUME/PAN
At the risk of explaining the obvious, the big slider sets the volume of the channel, with 0 db representing unity gain. The horizontal pan slider above it adjusts the position of the signal between the left and right channels (pan is short for “panorama,” which is also a really great record by The Cars).
Tip:Double-clicking on any Mixer control will revert it back to its default- handy for returning pan controls to the center position.
The stereo level meter indicates approximate signal level, and like just about every audio meter, should be set to avoid consistently being “in the red,” otherwise nasty digital clipping can occur.
TRACK IMAGE
Each track can have its own image beneath the track name for personalization as well as organization. Choose from Mixcraft’s included images or import your own.
To change the track image, double-click an existing track image or hover over the track image and click the pop-up button. You can also select Track>Properties>Choose Image… in the main window drop-down menus, or right-click on a track and select Properties>Choose Image...
The Choose A Track Image window opens:
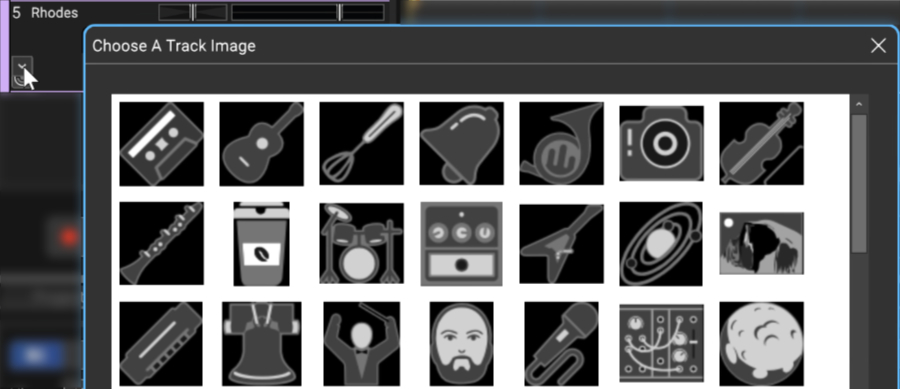
To use an existing image, select one and click OK. To use a custom image, click Add My Own Image File..., navigate to the image to be added, select the desired image, and click Open. The image replaces the existing track image and is added to the list of thumbnail images.
JPG, BMP, PNG, and GIF formats are supported, and custom images are permanently added to the track image library for use in future projects.