VIRTUAL INSTRUMENT/MIDI TRACK

Virtual instruments are used to play VSTi virtual instruments. These are like having a keyboard instrument within Mixcraft. They can be played and recorded using a USB or MIDI keyboard controller (or your computer’s QWERTY keyboard; see Musical Typing Keyboard (MTK)). Mixcraft includes numerous virtual instruments, or you can expand your palette by installing third-party VSTi instruments. Virtual Instrument tracks are easily distinguished from other types of tracks by the keyboard icon next to the Mute button.
Virtual Instrument Tracks are also used to play external MIDI instruments (even though they’re not technically virtual instruments, because they exist in three-dimensional reality... deep).
To load and play virtual instruments, check out the Using Virtual Instruments section, or for the quick ‘n’ dirty lowdown, Recording a MIDI Track in the Quick Start section.
VIRTUAL INSTRUMENT HEADER
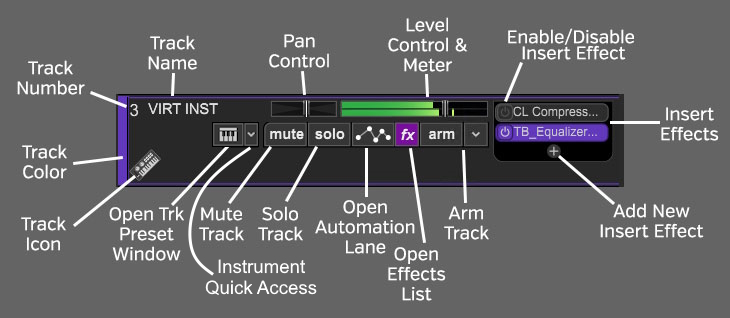
TRACK NUMBER
All tracks in a Mixcraft project are numbered, starting at 1 at the top track, and increasing up as tracks are added below. Note that track numbering always stays constant - that is, track numbers increment from 1 upward no matter how tracks are arranged or moved. (Track numbers aren't "attached" to specific tracks.)
TRACK NAME
Every track has a name. The default name will be the name of the virtual instrument. Tracks can be renamed at any time by double-clicking and typing a new name, and either clicking outside the naming field, or thwacking the [RETURN] or [ENTER] key.
PAN
The track’s pan control is the small horizontal slider to the left of the track volume control. Adjust the pan control by clicking and dragging it to the left or right. Pan is adjustable from 100% left to 100% right. The pan controls default to the center position - this means that the sound is equally balanced between the left and right channels. Track panning can also be set in the main window drop-down menu Track>Properties>Set Pan>Set Exact Value … This menu is also accessible by right-clicking a track.
Tip: For finer and more accurate pan adjustment, hold down [ALT], [SHIFT], or [CTRL] while dragging the pan slider.
LEVEL CONTROL & METER
Track volume is adjusted by the horizontal slider with a built-in level meter. Click down on the slider and move it left or right to decrease or increase volume. Volume can be set from 0% to 200% (-Inf dB to +6 dB).
To set an exact track volume, choose Track>Properties>Set Volume>Set Exact Value… from the Main Window drop-down menu and enter the desired volume. This can also be accessed by right-clicking on the track.
Tip: Hold down [ALT], [SHIFT], or [CTRL] and click-drag the slider for finer and more accurate adjustment.
The horizontal volume fader contains an integrated level meter. In standard playback mode, this displays the output level as the track plays. If the track is in record arm mode (The arm button will be red), the meter functions as an input level meter.
INSERT EFFECTS - ADD/ENABLE/DISABLE
The track effects slots make it easy to load and access insert effects without opening the Effects List window - effects can be added by simply clicking the + sign and choosing an effect. Effects can also be enabled and disabled by clicking the "power" switch on the left side of the button.
If you don't see the track effects slots, their visibility can be toggled by clicking Track>Show Effects On Tracks, right-clicking on the track header and choosing Show Effects On Tracks, or by hovering over the right edge of a track header - the mouse pointer will turn into double-horizontal arrows that can be dragged to the right.
For more information about using effects, check out the cleverly named Using Effects section.
INSTRUMENT QUICK ACCESS
New to Mixcraft 10.5, the aptly named Instrument Quick Access button allows you to edit and manipulate any instruments and instrument effects on the track. These work just like the Insert Effects listed above and provides you with a quick way to view, enable, disable, add, or remove plugins.
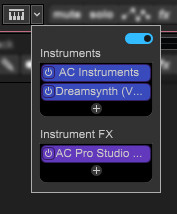
To quickly move an instrument to another track, drag it and drop it on to the keyboard button of the destination track. (Pro tips: to copy an instrument, ALT+drag it to the keyboard button of the destination track. In addition, you can drag instrument effects to the keyboard button or even the insert effect effect panel.)
ARM BUTTON AND AUDIO INPUTS MENU (DOWNWARD ARROW)
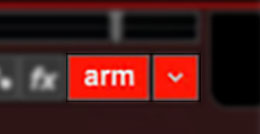
Clicking the Arm button readies the MIDI track for recording. (the button turns bright red). If nothing else is armed, the currently selected track is automatically be armed for the duration of the recording. More than one track can be armed for simultaneously recording to multiple MIDI tracks.
Clicking the downward arrow to the right of the Arm button opens the virtual instrument input menu where recording parameters are specified:
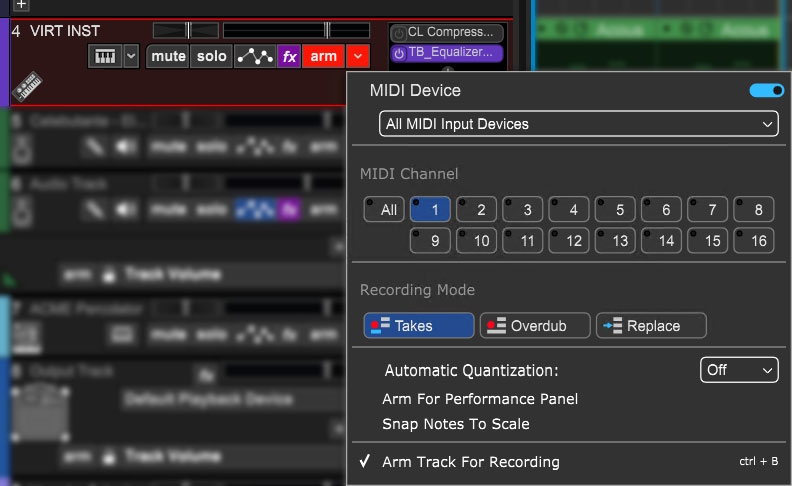
Menu Persist Switch
The blue horizontal slider at the top-right of the menu enables persistent menus. When enabled, the right-click menu stays open while multiple functions and options are selected; to close the right-click window, simply click anywhere outside of it.If the Menu Persist slider is disabled, the right-click window automatically closes when a single action or option is selected.
MIDI Input Device Selection Popup Menu
Click in the top box select the input device input for recording. "Input device" is generally a MIDI/USB keyboard, but could also be a drum pad controller, MIDI guitar, or maybe one those "EWI" MIDI wind controller doodads that were all the rage in the 80s.MIDI Channel
These buttons select which MIDI channel Mixcraft will record from. In most situations, leaving this set to All is the best choice, because you won't need be concerned about what MIDI channel your controller device is sending. Setting to specific MIDI channels is typically used if you're recording from a multi-keyboard instrument (think Hammond B-3 type controller with two manuals and a pedalboard), or if you're simultaneously recording multiple instrumentalists.Recording Mode
The Takes, Overdub, and Replace buttons define how Mixcraft handles recorded audio, specifically, when audio clips already exist in the location you're recording to. Please see Recording Mode in the Recording MIDI Tracks section for full information on how these work.Arm For Performance Panel
This readies Performance Panel slots for direct recording (instead of the main clip grid). For full information, please see the Performance Panel section.Automatic Quantization
Selecting a note value in this popup menu automatically quantizes notes "on the way in."Snap Notes To Scale
Similar to Automatic Quantization above, enabling this snaps incoming notes to the key signature and scale set in the transport area at the bottom center of the screen.Arm Track For Recording
Enables track arming (see Arm Button section above).
FX LIST
Click the fx button to open the Effect List window. Here effects can and presets can be selected.
OPEN AUTOMATION LANE (SQUIGGLY LINE ICON)
Opens a track automation lane for the track directly beneath the main track. This defaults to Track Volume. For full information on using track automation, see the Automation and Controller Mapping section.
SOLO
To hear a single track’s audio, click the Solo button. Multiple tracks may be soloed. For example, to hear how the bass and guitar sound together without drums, solo the bass and guitar tracks. Once soloed, the track’s solo button turns blue and all other tracks turn gray with diagonal lines. If multiple tracks are selected, all selected tracks are soloed simultaneously.

The currently selected track can also be soloed using the shortcut [CTRL]+L, or by right-clicking the track and selecting Properties>Solo.
If multiple tracks are soloed, [CTRL]-clicking a non-soloed track disables solo on all other tracks and soloes the clicked track. If multiple tracks are soloed and one of them is [CTRL]-clicked, solo is disabled for all tracks.
MUTE

Tracks can be temporarily silenced by clicking the track Mute button. Once muted, the solo button turns blue, and all clips on the track turn gray with diagonal lines. Tracks may also be muted using the shortcut [CTRL]+M, or by right-clicking the track and selecting Properties>Mute. If multiple tracks are selected, all selected tracks are muted simultaneously.
If multiple tracks are muted, [CTRL]-clicking an unmuted track unmutes all others and mutes the clicked track (sort of a mute “solo” function). If multiple tracks are muted and one of them is [CTRL]-clicked, all are unmuted.
Mute and Solo Button [CTRL] + Click Shortcuts
If multiple tracks are soloed or muted, you can unsolo or unmute all tracks in project by [CTRL] + clicking on a solo or mute button. Multiple tracks cannot be Han Soloed.
TRACK IMAGE
Each track can have its own image beneath the track name for personalization as well as organization. Choose from Mixcraft’s included images or import your own.
To change the track image, double-click an existing track image or hover over the track image and click the pop-up button. You can also select Track>Properties>Choose Image… in the main window drop-down menus, or right-click on a track and select Properties>Choose Image...
The Choose A Track Image window opens:
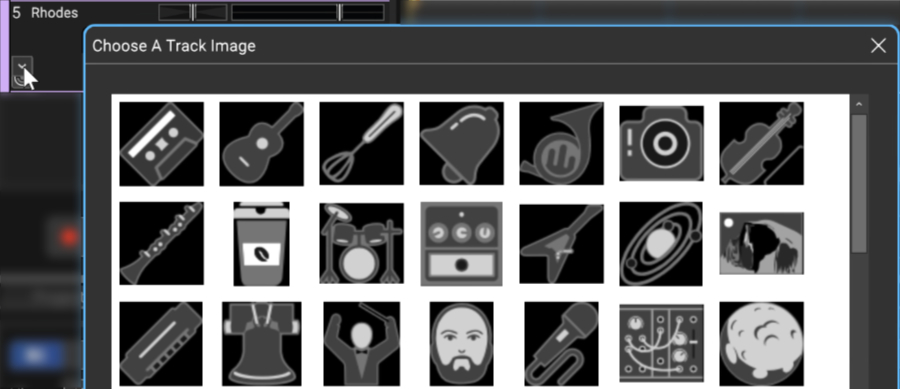
To use an existing image, select one and click OK. To use a custom image, click Add My Own Image File..., navigate to the image to be added, select the desired image, and click Open. The image replaces the existing track image and is added to the list of thumbnail images.
JPG, BMP, PNG, and GIF formats are supported, and custom images are permanently added to the track image library for use in future projects.
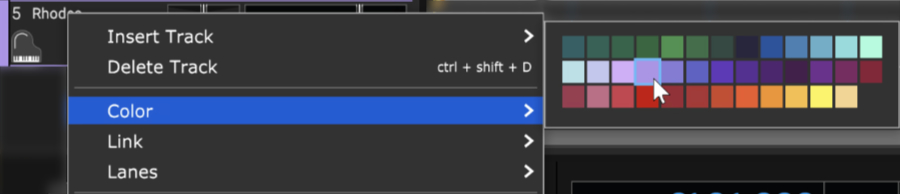
TRACK COLOR
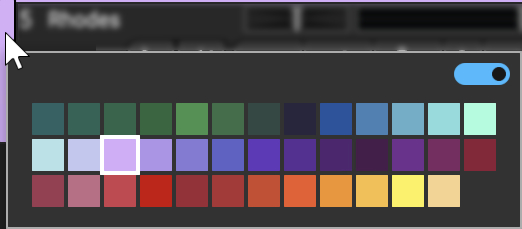
Track colors can be individually set by selecting Track>Properties>Track Color in the main window drop-down menus, by right-clicking a track and choosing from the color palette, or by clicking directly on the vertical color bar at the far left of the track. This affects the track’s highlight color and all clips on the track.