RECORDING REAL-TIME AUTOMATION
“Real-time automation” is a fancy way of saying that Mixcraft will record parameter changes as you’re moving a knob or slider, or pressing a button. Upon playback, all of these automation “moves” will dutifully be recreated, as if a swarm of magical elves were obediently working inside Mixcraft (don’t worry, they don’t eat much).
Parameter changes can be recorded using onscreen controls or with the physical controls on a hardware MIDI/USB controller or dedicated control surface.
RECORDING AUTOMATION USING ONSCREEN CONTROLS
The most straightforward way to record automation moves is to use your mouse or trackpad to move onscreen sliders and knobs. There a couple of ways to arm Mixcraft for recording automation. We’ll start with the easiest way... which is super-duper easy!

• Global “Record All Effect and Instrument Automation”
This transport button essentially tells Mixcraft to look out for any and all incoming automation moves once the Record button has been pressed. All channel volume, pan, or send knob moves are recorded, as well as knob or slider movements in effects or Virtual Instruments.
1. In the Main Window menus, check mark Mix>Record All Effect and Instrument Automation.
2. To begin automation recording, place the Caret in the desired starting location, and click Record. During automation recording, a new track automation lane for the associated parameter is automatically created and displayed whenever a knob or slider is moved. You can record as many separate controls as desired during automation recording.
• Overwrite vs. Touch Automation Record Modes
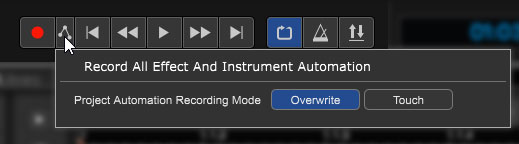
When the Record All Effect and Instrument Automation button is clicked, you'll see a popup menu with the following options:
Overwrite- Constantly records the current automation value. This has the effect of erasing any existing automation in its path; not an issue if a track has no existing automation, but be careful if you're already recorded or drawn in automation.
Touch- Only records automation data when a fader is moved. This is particularly useful if you're using a hardware controller with faders that know when your finger is touching them (e.g., Mackie Controls). In this way, automation data only writes when your finger is on the fader.
• Enabling Automation Recording for Specific Effects or Instruments
This is “Method #2.” Instead of globally enabling automation recording for all possible Mixcraft automation parameters, here we’ll enable automation recording for just one effect or instrument. We’ll demonstrate this with an effect plug-in, but the procedure is the same whether you’re automating an effect or an instrument.
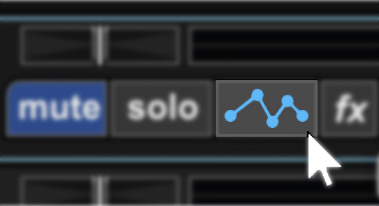
1. Click on the track you’d like to automate a parameter on in the track list. Click on the Automation button to open an automation lane.
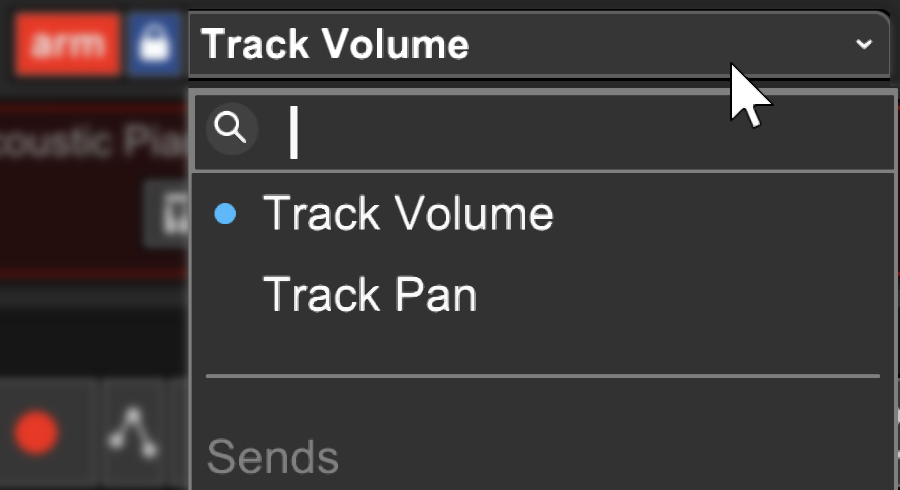
2. Click on the automation parameter in the track header next to the automation lane you just opened (by default it will say Track Volume). Scroll down to the name of the effect or instrument and click Record All in the submenu. When recording is engaged, all automatable parameters for this effect or instrument will be recorded. Control movements on all other effects or instruments are ignored.
Really Important Note: When you’ve finished recording automation for a particular parameter, remember to click the Arm button to disable arming for the automation lane, otherwise the automation will be overwritten (that’s a nice way of saying “erased”) if automation recording of a different automation parameter is initiated in the same section of the song. Along the same lines, be careful if Loop mode is engaged because the automation moves that you record may be instantly overwritten when Mixcraft “comes back ‘round.”
• Enabling A Single Parameter For Automation Recording aka, Keepin’ It Old School
The third method for recording automation is a holdover from older Mixcraft versions and requires the most setup. It’s still pretty easy though!
1. Click on the track you’d like to automate a parameter on in the track list.
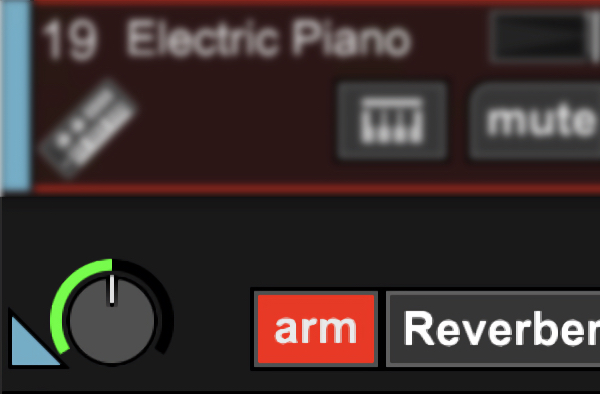
2. Click the track’s automation button. The automation button turns purple (or blue for a MIDI track), and an automation lane opens beneath it. The default automation parameter will be Track Volume; to choose a different parameter for automation, click the down arrow next to the default automation parameter. (When virtual instruments and plug-ins in the list are clicked, submenus display automatable parameters.)
3. Once the appropriate parameter has been chosen, click the Arm button beneath and to the left of the automation parameter display; this tells Mixcraft to record controller data for the selected parameter. (The track’s main Record Arm button does not need to be armed; it can be, but this means Mixcraft will record automation data and audio or MIDI note data depending on the track type.)
4. Position the playhead where you’d like the automation recording to begin by clicking on the ruler at the top of the project.
5. Press Record. If you’re recording volume, pan, send level, or other parameters with a parameter control on the main screen or in the Mixer tab, you can simply move these onscreen controls, and Mixcraft records their movements. If you’re recording automation for virtual instrument or plug-in parameters, make sure to open up their interface prior to recording (right-click on the keyboard icon or the fx icon) for access to controls. Either way, newly recorded automation will appear as it’s recording. Remember that you can add as many automation lanes and parameters as desired.
Remember to hit the Stop button when you’re done, and be careful not to enable Loop Mode, otherwise, the movements you record may be instantly overwritten when Mixcraft “comes back ‘round.”
Super Helpful Shortcut
If a virtual instrument or plug-in effect is already loaded into a channel, its user interface can be accessed directly by right-clicking on the keyboard instrument icon or FX button. This is a useful shortcut, and in this case, it will immediately get you to the “gear” icon for MIDI mapping.
TRACK AUTOMATION KNOB
This extra little doodad is easy to miss, but it’s really handy. If an automation lane for a track is displayed and the currently selected automation parameter is an instrument or effect parameter, a knob will be displayed to the left of the automation parameter pop-up menu. This knob can be used during automation recording just like the control in an instrument or plug-in. This may seem redundant, but there are a few good reasons to use the track automation knob:
• If you’re using a plug-in or instrument with a large user interface and your computer has limited screen real estate, the plug-in interface can be closed and the desired automation parameter can be manipulated using the track automation knob.
• If the plug-in or instrument’s onscreen control knob is tiny or awkward, thus making it difficult to accurately control with a mouse or trackpad, the track automation knob is easier to control.
• If you’re using a plug-in or instrument with tons of controls jam-packed into its user interface, and you’d like to quickly automate multiple parameters, it can be a lot easier to wrap your brain (and eyeballs) around a couple of neatly arranged knobs in the track list.
AUTOMATING EFFECTS ON NON-CLIP TRACKS
A non-clip track is any track that doesn’t have audio or MIDI clips associated with it. The primary track does not have an X, because these tracks only display automation in the main clip grip. However, if you choose to display additional parameters for a non-clip track (by clicking the + button), these will have an X allowing the extra parameters to be displayed or hidden. The following track types are non-clip tracks:
• SubMix
• Send
• Output
• Master
• Instrument Mix Output
• ReWire