CLIP AUTOMATION

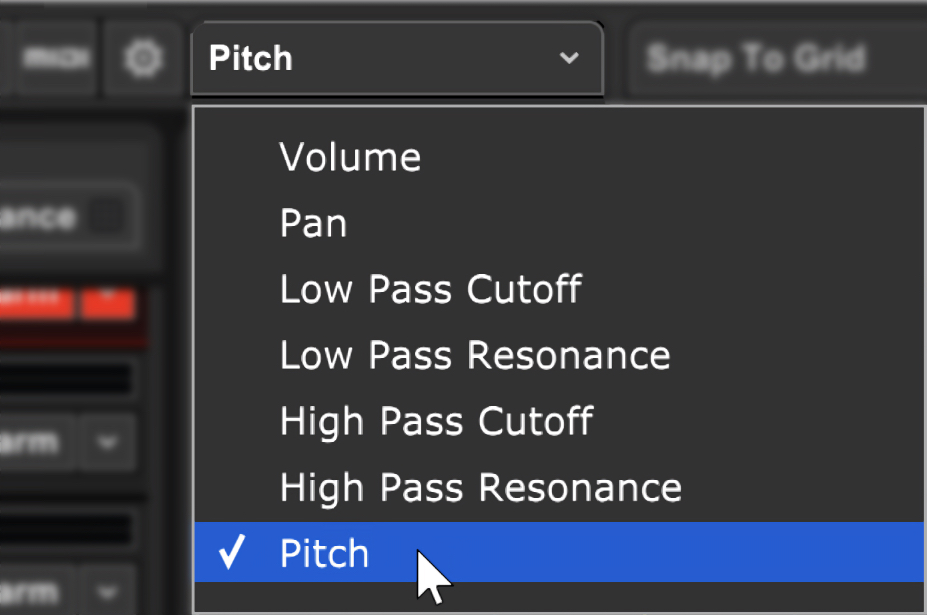
Clip automation is initially displayed by a horizontal line that appears when hovering over the bottom half of audio or MIDI clips. The current parameter represented by the automation line is selected with the drop-down menu at the top of the screen in the main menu tool bar. (Click the menu that says Volume to view all clip automation parameters.) The drop-down menu parameter selection is global for the entire project - for example, if the Pan parameter is selected, all clips display Pan automation.
Each audio clip has its own independent automation line for the following parameters:

• Volume
• Pan
• Low Pass Cutoff
• Low Pass Resonance
• High Pass Cutoff
• High Pass Resonance
• Pitch
All parameters are simultaneously available for any clip, including clips in the Performance Panel. Here’s a breakdown of what each does.
• Volume
Volume can be set to values from 0% to 200% (-Inf dB to +6 dB).
• Pan
Pan is the volume balance between the left and right channel (i.e. left and right speaker). By automating pan settings, sounds can move from left to right or vice-versa. Pan can be set to values from 100% left to 100% right.
• Low Pass Cutoff
A low pass filter is an audio filter that allows low frequencies to “pass” while removing high frequencies. Sounds below the cutoff frequency can be heard, while sound above the cutoff frequency is reduced or removed entirely. The cutoff frequency is set to maximum by default, i.e. all frequencies pass. As the automation line is lowered, additional high frequencies are removed.
• Low Pass Resonance
Resonance emphasizes frequencies in the vicinity of the cutoff frequency. If the cutoff frequency is set to 2000 Hz along with a high resonance value, frequencies above 2000 Hz will be removed, frequencies below 2000 Hz remain, and frequencies at and directly around 2000 Hz are emphasized. Resonance is a simple concept, but it can be a dramatic effect, especially if resonance is high and the filter’s cutoff frequency is changing. This effect is what’s known as a “filter sweep,” and produces a familiar “weeoow” sound often heard from analog synthesizers and in EDM music builds.
• High Pass Cutoff
A high pass filter is the exact opposite of a low pass filter, meaning that high frequencies above the cutoff point are allowed to pass, while frequencies below the cutoff point are reduced, resulting in a thinning out of the sound.
• High Pass Resonance
High Pass resonance parameter works exactly as in the low pass filter, but in reverse with frequencies below the cutoff frequency being attenuated, frequencies at or in the vicinity of the cutoff frequency emphasized, and frequencies above the cutoff frequency passing through.
• Pitch
The pitch of any audio clip can be statically changed or automated within a range of +/- 24 semitones. Playback speed remains constant, making it especially useful for drum loops, and as you might guess, the results can get pretty wild! Note that pitch envelopes only work on audio clips. Pro tip: apply pitch envelopes subtly to vocal and guitar tracks and accuse musician friends of tone deafness.
Fun and Useful Clip Filter Applications
A clip’s low pass filter can be used as an EQ effect, reducing certain high frequencies, such as acoustic guitar finger squeaks. You can also use them to create filter sweeps, by adding resonance while the cutoff frequency moves up or down. The cutoff frequency and resonance amount are each controlled via an envelope, and these values can change over time, in the same way, a volume or pan envelope can be used to change volume and pan amount over time.
In addition to a different flavor of the sweeps described above, High Pass filters are useful for getting rid of undesirable low-frequency noises, such as air conditioners, refrigerators and bass players (just kidding on that last one!).
ADJUSTING CLIP AUTOMATION

To create and adjust clip automation points, hover the mouse cursor over the lower section of a clip. The clip’s automation line will appear, and the cursor will turn into crosshairs. Click to create new automation points, and drag to position new or existing points.
FADES, BOOSTS, AND REDUCTIONS
• Fades, Boosts, and Reductions Using The Sound Menu
These sound like surgical procedures for rich old ladies, but they’re actually convenient shortcuts that add multiple envelope points at a time. Click+drag across an area of a clip and choose one of the following predefined options from the Sound menu in the Main Window. If a region of the clip isn’t selected, these get applied across the entire clip.
• Sound>Envelopes>Fade Out
• Sound>Envelopes>Fade In
• Sound>Envelopes>Reduce
• Sound>Envelopes>Boost
• Boosts and Reductions Using The Line Adjuster Tool
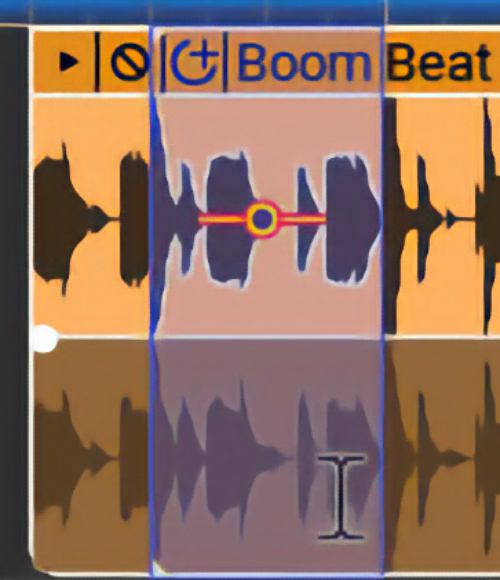
Here’s another slick way to boost or reduce segments in a clip. Click+drag across a purple highlight across a section of a clip. Now click and drag the Line Adjuster tool up or down (the little orange and yellow icon that looks like an incoming propeller plane from an Atari game) to automatically create four automation points and set an automation “shelf.” Remember that the preceding adjustments can be used for any type of clip automation, not just volume!
PITCH AUTOMATION (CLIP AUTOMATION ONLY)
The pitch of any audio clip can be statically changed or automated within a range of +/- 24 semitones using clip automation. Playback speed remains constant, making it especially useful for drum loops, and as you might guess, the results can be pretty wild! Note that pitch envelopes only work on audio clips.
Pitch automation only works in conjunction with clip automation (i.e., it doesn’t work with lane automation), and only works with clips containing audio content.
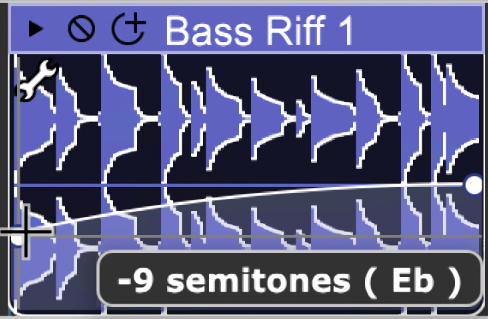
To apply a pitch envelope to a clip, click the clip automation parameter pop-up menu at the top center of the Mixcraft window (by default, it will say Volume), and choose Pitch.
Now click on a clip’s automation line (located horizontally at the center of the clip by default) and set the automation points and curves as with any other automation type.
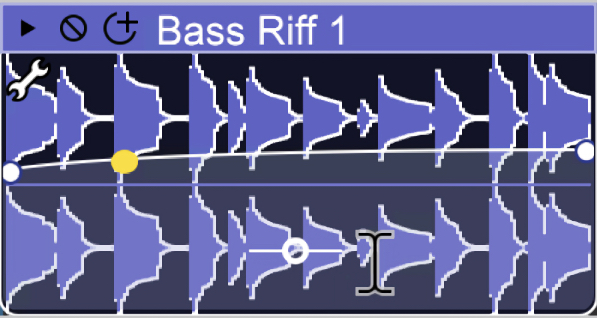
AUTOMATION CURVES
In addition to the usual “straight line” automation, curves can also easily be adjusted for logarithmic and exponential response. Amongst other uses, these are especially useful for accurately creating “record-style” fade-ins and fade-outs.
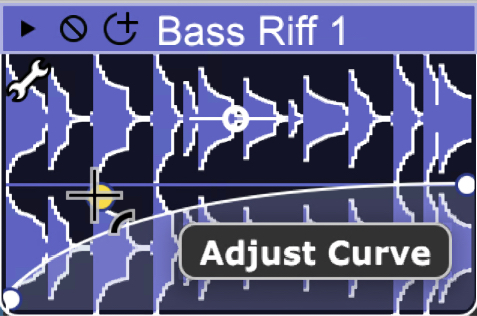
To adjust an automation line’s response curve, hover the mouse pointer over an automation line. A yellow dot appears toward the middle of the automation line. Click and drag the yellow dot up or down to “bend” the line toward a logarithmic or exponential curve. Curves can also be biased toward the beginning or end of the automation section by dragging the yellow dot left or right.
ADJUSTING MULTIPLE AUTOMATION POINTS WITH THE LINE ADJUSTER TOOL

The Line Adjuster tool lets us do a couple of more convenient tricks.
When the cursor is hovering between two automation points, you’ll notice that the Line Adjuster appears above or below the automation line. Clicking and dragging it up or down moves the closest automation points to its left and right.
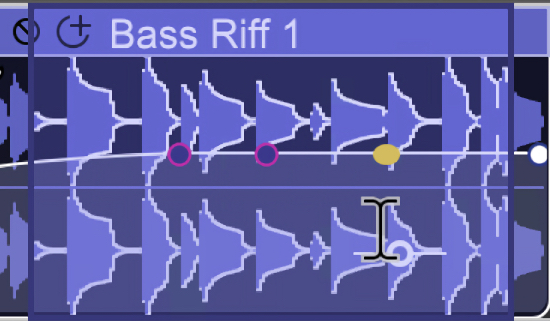
To move more than two automation points simultaneously, click and drag a purple highlight square over multiple automation points. Highlighted points will show a magenta circle around them. Moving the Line Adjuster tool up and down moves all of the highlighted automation points.
KEYBOARD RIGHT-CLICK MODIFIERS
• Move Line: Hold the [SHIFT] key down and click down on an automation line to move the line up or down.
• Delete Points: Hold the [ALT] key down and click points to remove them or right-click a point and select Delete Point.
• Edit Exact Value: Precise values can be entered by right-clicking on the point and choosing Edit Exact Value...