Novation LAUNCHKEY 49 & 61 MK3
Mixcraft 10 has a custom controller script made for the Novation LAUNCHKEY 49 MK3, which will work for the LAUNCHKEY 61 MK3 as well. From here on in, we will just refer to the controller as your LAUNCHKEY controller with the understanding that you are using one of the two supported controllers mentioned above.
To load the controller script, open File > Preferences and select Control Surfaces from the left-hand side. In the Control Surfaces window, select LaunchKey49-MK3 as the Type, MIDIIN2 (LKMK3 MIDI) as the Input, and MIDIOUT2 (LKMK3 MIDI) as the Output. Once those have been set, click OK.
Note, this particular unit requires the DAW controller to connect to MIDI2, so if it doesn't seem to be working double-check that you have the correct MIDI input and output set.
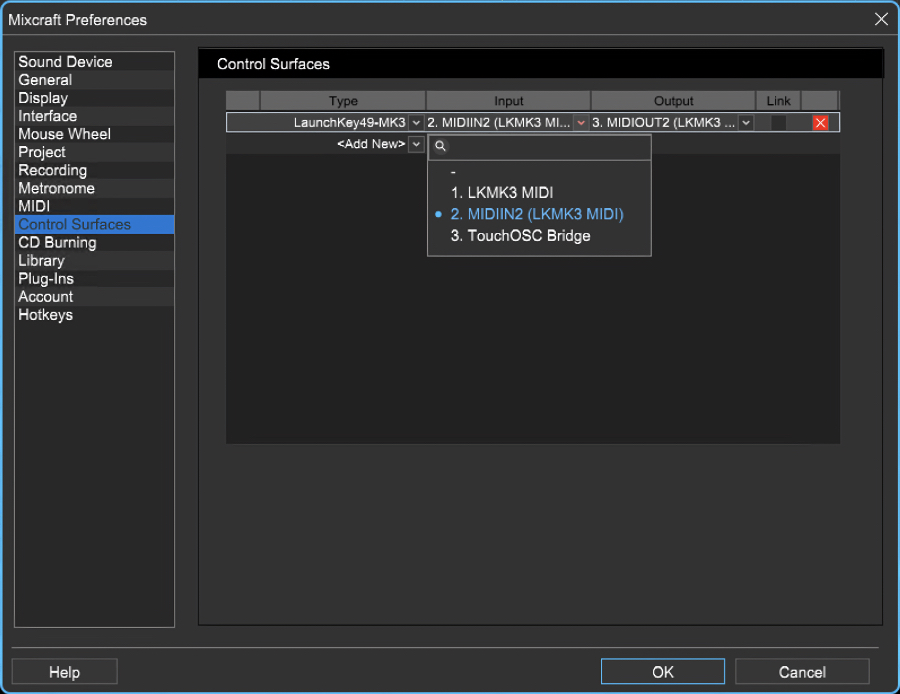
Also, ensure that you have the MIDIIN2 (LKMK3 MIDI) set as Active in the MIDI section of Mixcraft Preferences. If you are planning on using your keyboard and drum pads in Mixcraft, you'll want to have the LKMK3 MIDI option enabled as well.
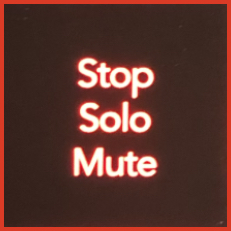
After clicking OK, the Stop Solo Mute button will turn red. This button will dictate the mode of the buttons found below the faders of your LAUNCHKEY controller. The next section will cover those fader buttons and their modes.
Faders, Their Buttons, and Their Modes
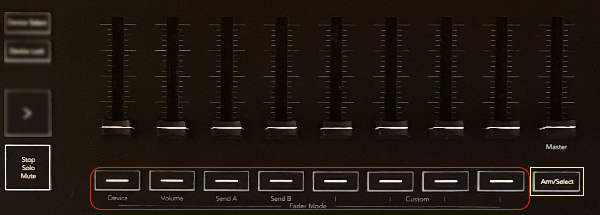
Below each fader, you'll find a button. These buttons will always correspond with the track in Mixcraft that the fader is presently mapped to. Depending on the mode you are in, they will either ARM, MUTE, or SOLO the mapped track.
The Master fader will always be mapped to the Master fader in Mixcraft and the Arm/Select button below it is a multi-function toggle button.
The fader button mode is determined by the color of the Stop Solo Mute button:
When RED the mode is ARM
When BLUE the mode is MUTE
When GREEN the mode is SOLO
When any of the buttons below a fader are pressed in that mode, it performs that action on the mapped fader and sets the LED on the button to match the state in Mixcraft.
When the Arm/Select button is pressed (and held) in ARM mode, the Stop Solo Mute button will turn WHITE and this means you can select a track to apply the focus on. This is handy if you want to adjust the EQ, compression, drive, or sends of that particular track. We will get into that later, but for now, understand that Arm/Select allows you to select a track while in ARM mode.
When the Arm/Select button is pressed in MUTE or SOLO modes, it toggles to the opposite mode (i.e., SOLO becomes MUTE and visa-versa).
When the Arm/Select button is pressed in ARM mode, it will toggle to SELECT mode.
Fader Modes and Their Pots
We have covered the fader buttons and the different modes they have, now let's cover how to change the fader mode and how each differs from one another. With this script, the fader modes don't actually change what the faders do; those are best left mapped to your track volumes. When you change the fader mode, you are changing what the pots (knobs) above the pads do, as well as changing the fader button functions.
Changing the fader mode is achieved using the Shift button, which is found just below the blue LCD screen on your LAUNCHKEY controller. While pressing and holding the Shift button, press the Fader Mode button that corresponds with the mode you want to use.
When you first load the LAUNCHKEY script, the controller defaults to the Volume fader mode. If you hold down the Shift key after loading the script, you'll notice that the Volume fader button is brighter than the others, which means that is the active fader mode. The same is true of the pads (Session mode) and pots (Pan mode).
There are three fader modes available:
Device Mode
Volume Mode (default)
Send A mode
Device Mode
In Device mode, the following controls are set:
Faders - control the mapped track volume.
Fader buttons - set to SELECT mode. This allows you to choose the track to focus on and tweak that track's controls as desired. If the Stop Solo Mute button is pressed, it will cycle through the other there fader button modes (ARM, MUTE, SOLO).
Pots (knobs):
Pot 1 - Channel EQ - Lo
Pot 2 - Channel EQ - Mid
Pot 3 - Channel EQ - Hi
Pot 4 - Channel Drive
Pot 5 - Channel Compressor
Volume Mode
In Volume mode, the following controls are set:
Faders - control the mapped track's volume.
Fader buttons - set to ARM mode. If the Stop Solo Mute button is pressed, it will cycle through the other there fader button modes (ARM, MUTE, SOLO).
Pots (knobs) - control the mapped track's pan.
Send A Mode
In Send A mode, the following controls are set:
Faders - control the mapped track's volume.
Fader buttons - set to SELECT mode. This allows you to choose the track to focus on and apply send levels as desired. If the Stop Solo Mute button is pressed, it will cycle through the other there fader button modes (ARM, MUTE, SOLO).
Pots (knobs) - control the selected track's Send levels. Depending on how many sends you have set up, the knobs will correspond with those sequentially. This is limited to 8 sends. If you have more than 8 sends in your project, this constraint isn't likely the biggest issue you are facing.
Transport Controls
This section is pretty straightforward, but in case there is anything unclear, we will explain it here.
Capture MIDI - this will be related to the MIDI Quantize features that are coming soon!
Quantize - this will be related to the MIDI Quantize features that are coming soon!
Click - this control toggles the metronome on or off. Keep in mind, if you have nothing selected in your metronome settings, this will appear to have no effect.
Undo - as advertised, this will undo the last operation exactly as ctrl + z or Edit > Undo.
Play (white triangle) - the play button will start playback in Mixcraft.
Stop (white square) - the stop button will stop playback in Mixcraft.
Record (red circle) - the record button will toggle recording in Mixcraft. This can have different behaviours depending on whether Mixcraft is playing or stopped and what you have set for count-in measures.
Loop (square with arrow ) - this will toggle the loop on or off, assuming you have set a loop region. Future script updates may include the ability to control the loop markers with the controller.
Navigation Controls

The navigation controls allow you to navigate the mixer and main window tracks, as well as the clips when in Performance mode.
The Track buttons pointing to the left and right allow you to jump one track at a time. If you want to navigate banks of 8 tracks at a time, hold the Shift button down while pressing the desired Track navigation button.
The up and down buttons that are part of the drum pad/clip launcher section are for navigating the clip grid when the Performance Panel is open. These controls are also particularly useful if you have a track with several lanes on it and want to get some lanes in focus that are not the first two lanes (as using the track navigation buttons will reset the clip grid selection to the track in focus.
Performance Controls
The script for the LAUNCHKEY controller sets the pads on the controller to be in Session mode, which is what will be used when the performance panel is open. If you want to use the pads as drum pads, you can set the Pad Mode to Drum by holding the Shift button and pressing the pad with the label Drum underneath it. To revert to Session mode, you hold Shift and press the pad with the Session label below it.
Note that the pads, when in drum mode, will send MIDI data over MIDI channel 10.
Using Pads to Launch Clips
When in performance mode, the Stop Solo Mute button will determine the behaviour of the pads on the grid. When blue, pushing a corresponding clip's button will stop the clip. When red or green, the button will play a clip if there is one, or record if empty.
Empty clip slots that are record ready, will flash red. Empty clip slots that are not record-ready will not be lit and will act as a stop button for the row it's present on.
The Scene Launch Button
The scene launch button, which is found above the Stop Solo Mute button, is also influenced by the state of the Stop Solo Mute button.
When the Stop Solo Mute button is blue, the scene launch button will stop all clips.
When the Stop Solo Mute button is green it will launch all clips in the active set (e.g., Set1, Set2, etc).
When the Stop Solo Mute button is red, the scene launch button will move through the available scenes 1-8. You'll notice that a pad on the top row will light up as white while the scene launch button is pressed, which indicates the active scene.
Please contact support if you have any feature requests or bug reports; we will update our control surface scripts as required to ensure you are getting the most out of your controller and Mixcraft 10!