MASTER TRACK
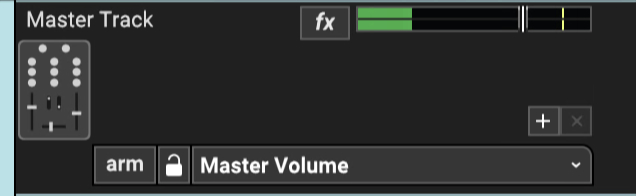
A project has one Master Track. Think of this as the stereo master output the entire mix gets routed through. Volume, panning, and effects can be added and automated for the entire project.
MASTER TRACK HEADER
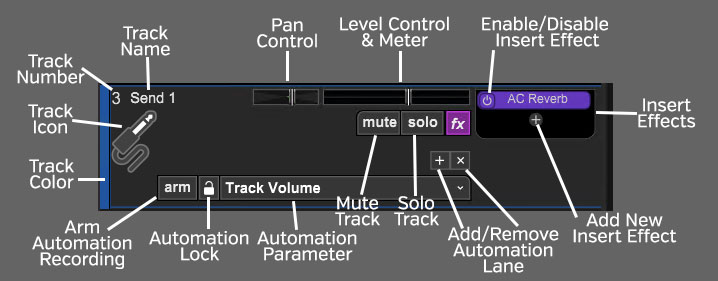
TRACK NUMBER
All tracks in a Mixcraft project are numbered, starting at 1 at the top track, and increasing up as tracks are added below. Note that track numbering always stays constant - that is, track numbers increment from 1 upward no matter how tracks are arranged or moved. (Track numbers aren't "attached" to specific tracks.)
TRACK NAME
Every track has a name. Unlike other track types, the master track cannot be renamed.
FX LIST
Click the fx button to open the Effect List window. Here effects can and presets can be selected.
LEVEL CONTROL & METER
Track volume is adjusted by the horizontal slider with a built-in level meter. Click down on the slider and move it left or right to decrease or increase volume. Volume can be set from 0% to 200% (-Inf dB to +6 dB).
To set an exact track volume, choose Track>Properties>Set Volume>Set Exact Value… from the Main Window drop-down menu and enter the desired volume. This can also be accessed by right-clicking on the track.
Tip: Hold down [ALT], [SHIFT], or [CTRL] and click-drag the slider for finer and more accurate adjustment.
The horizontal volume fader contains an integrated level meter which displays the output level as the track plays.
INSERT EFFECTS - ADD/ENABLE/DISABLE
The track effects slots make it easy to load and access effects without opening the Effects List window - effects can be added by simple clicking the + sign and choosing an effect. Effects can also be enabled and disabled by clicking the "power" switch on the left side of the button.
If you don't see the track effects slots, their visibility can be toggled by clicking Track>Show Effects On Tracks, right-clicking on the track header and choosing Show Effects On Tracks, or by hovering over the right edge of a track header - the mouse pointer will turn into double-horizontal arrows that can be dragged to the right.
For more information about using effects, check out the creatively named Using Effects section. \
ADD/REMOVE AUTOMATION LANE BUTTONS
The + button adds automation lanes beneath the send track, the X button will hide the closest automation lane the track. Keep in mind that clicking the X button does not delete automation data, it just hides the lane displaying it. For full information on using track automation, see the Automation and Controller Mapping section.
AUTOMATION PARAMETER POPUP MENU
Click this to select the current track/lane automation parameter.
AUTOMATION LOCK BUTTON
Synchronizes the movements of lane automation with onscreen displays of channel volume and pan. See the Automation and Controller Mapping section for a full explanation.
ARM AUTOMATION RECORDING
Allows recording of automation data either via the onscreen control associated with the lane’s automation parameter, or by using a hardware controller assigned to a parameter.
TRACK COLOR
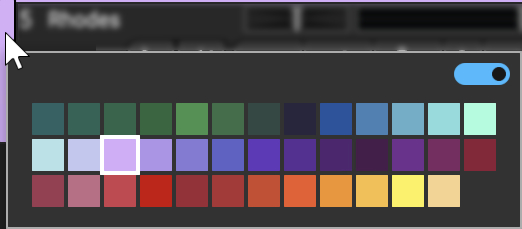
Track colors can be individually set by selecting Track>Properties>Track Color in the main window drop-down menus, by right-clicking a track and choosing from the color palette, or by clicking directly on the vertical color bar at the far left of the track. This affects the track’s highlight color and all clips on the track.
Mute and Solo Button [CTRL] + Click Shortcuts
If multiple tracks are soloed or muted, you can unsolo or unmute all tracks in project by [CTRL] + clicking on a solo or mute button. Multiple tracks cannot be Han Soloed.
TRACK IMAGE
Each track can have its own image beneath the track name for personalization as well as organization. Choose from Mixcraft’s included images or import your own.
To change the track image, double-click an existing track image or hover over the track image and click the pop-up button. You can also select Track>Properties>Choose Image… in the main window drop-down menus, or right-click on a track and select Properties>Choose Image...
The Choose A Track Image window opens:
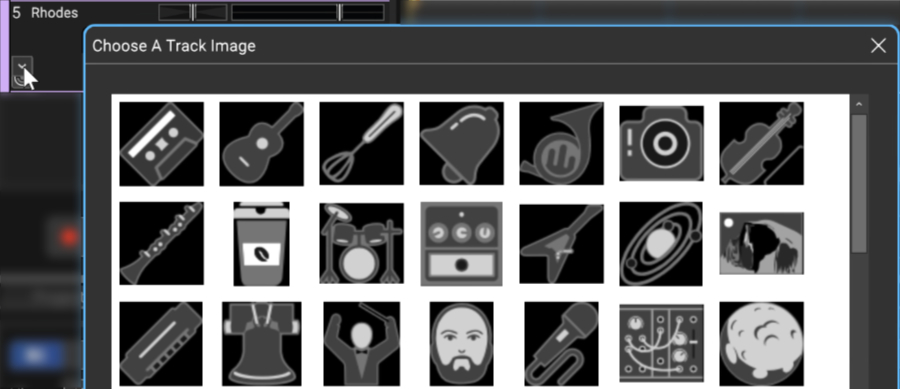
To use an existing image, select one and click OK. To use a custom image, click Add My Own Image File..., navigate to the image to be added, select the desired image, and click Open. The image replaces the existing track image and is added to the list of thumbnail images.
JPG, BMP, PNG, and GIF formats are supported, and custom images are permanently added to the track image library for use in future projects.
HIDING AND SHOWING THE MASTER TRACK

To toggle the Master Track view, click the Master button above the Track List. The button will turn blue and the Master Track will display at the top of the Track List. You can also click Track>Show Master Track in the main page drop-down menus.