PREFERENCES

Preferences are options that are changed infrequently and allow you to customize how the Mixcraft behaves. To open the Preferences, select File>Preferences from the Main Window menus, or click the gear button in the top toolbar. You can also access Preferences by pressing [CTRL]+[ALT]+P.
SOUND DEVICE
Choose settings for sound devices.
SETTINGS COMMON TO ALL SOUND DEVICES
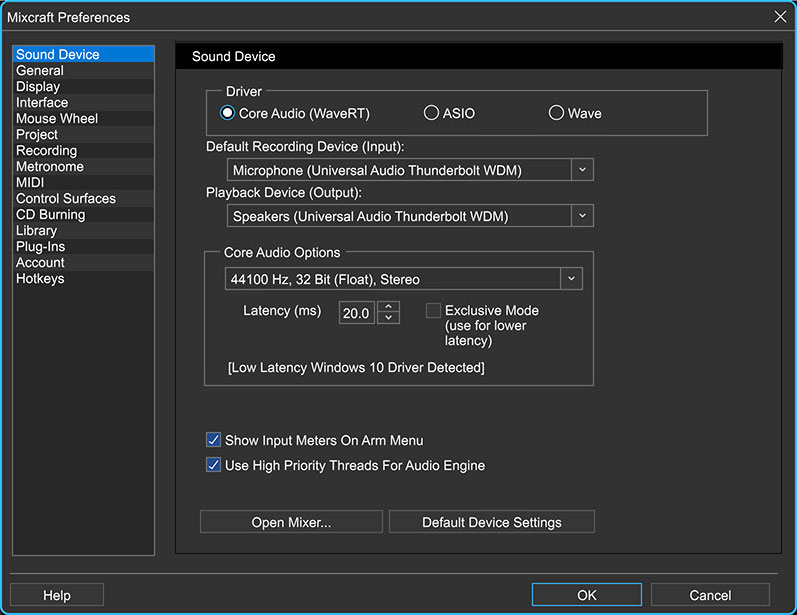
• Driver
Select Core Audio, ASIO, or Wave audio drivers. This setting affects other options on this page. The ASIO option will be unavailable if no ASIO drivers are found.
• Default Recording Device (Input)
Sets the hardware device that will be used for audio input (i.e., recording things).
• Playback Device (Output)
Sets the hardware device that will be used for audio playback.
(The middle of the screen will display Core Audio, ASIO, or Wave specific settings, depending on which you've selected.)
• Show Input Meters On Arm Menu
Toggling this shows or hides small input meters in the Arm Menu that appears on tracks (the menu that shows when you click the Arm button or the downward facing arrow beside it).
• Use High Priority Threads For Audio Engine
This will cause all audio mixing sound engine threads to mix at a high system priority. By default, Mixcraft uses high priority. (Sometimes I wear my "high-priority threads" when I'm headed out to the discotheque on a Saturday night, but I digress.)
• Open Mixer...
This opens the Windows or ASIO mixer control panel, allowing you to change some settings. This typically applies when using ASIO driver mode.
• Default Device Settings
This button will reset the drivers and settings to defaults. This changes settings to the Wave driver to 44100 Hz, stereo, 16-bit (8 buffers @ 16384 bytes).
CORE AUDIO (WAVE RT)-SPECIFIC SETTINGS
Adjust these settings when WaveRT mode is selected. WaveRT stands for “Wave Real Time” and is the preferred driver. Make sure you’ve downloaded the latest drivers for your sound device. Also, contact the sound device manufacturer to see if the drivers support WaveRT.
• Sample Rate/Bit Depth popup menu
Choose a sample rate supported by the device. Higher sample rates provide better audio quality but require more hard disk space and CPU resources. Make sure to set this guy to 192 kHz, then swear that YOU can hear the difference to anyone who will listen! (we kid, ok?)
It's a deep subject, but generally speaking, movie film makes a good analogy: sample rate sets how many "snapshots" are taken per-second, and bit depth roughly equates to the number of available colors in an image. More specifically, sample rate governs the highest frequency that can be accurately recorded (typically half of the sample rate setting), and bit depth affects the overall quiet-to-loud dynamic range.
• Latency
Adjust the latency in milliseconds. Lower settings result in better performance - you’ll hear less “slapback” delay when recording with software monitoring, and Virtual Instruments will be more responsive when played live. The downside is that lower latency settings increase the potential for audio gapping or non- continuous audio (a.k.a. obnoxious crackling noises).
• Exclusive Mode
Exclusive Mode takes exclusive control of the sound device and allows super-low latency settings down to three milliseconds! (You’ll also be welcome at ritzy L.A. clubs and red carpet events.)
When using Exclusive Mode, other programs will not have access to the sound device and will need to be restarted after Mixcraft is either shut down or out of Exclusive Mode.
ASIO-SPECIFIC PREFERENCES
Adjust these settings if ASIO mode is selected. ASIO is an alternative driver system that allows for lower latency and improved synchronization between playback and recording when using suitable audio hardware.
• ASIO Device
Choose the default ASIO Device to record from. ASIO only allows for one device at a time.
• Latency
Adjust the latency in milliseconds. Lower settings result in better performance - you’ll hear less “slapback” delay when recording with software monitoring, and Virtual Instruments will be more responsive when played live. The downside is that lower latency settings increase the potential for audio gapping or non- continuous audio (a.k.a. obnoxious crackling noises).
WAVE-SPECIFIC PREFERENCES
Adjust these settings when Wave mode is selected in the Sound Device Preferences. We only recommend using Wave mode if nothing else is available. (Wave mode, usually a bridesmaid, never a bride... )
• Sample Rate
Choose a sample rate for both recording and playback. The default CD-quality sample rate is 44.1 kHz. If your sound card (and hearing range!) supports it, Mixcraft supports sample rates up to 192 kHz. Sample rate defines how frequently “snapshots” of the current sound are captured; a good analogy would be the frame rate of a motion picture.
• Bit Depth
This is the number of bits per sample. 16-bit is the default for CD quality. Mixcraft supports bit depths up to 24-bit for ultra-high quality. Far more info exists on bit depth on the ol’ Intergoogle, but the thumbnail analogy is that bit depth represents how many different amplitude levels can be represented and a good analogy would be to compare it to the number of colors available in a digital photo.
Choose 8-bit audio only if you have no other option; 8-bit can be very noisy during quiet passages (But also can be surprisingly good if the overall audio level is loud, because it's "weighted" to prioritize the fidelity of louder passages).
• Number Of Buffers
This is the number of audio buffers to pre-mix before starting playback. The number of buffers determines audio latency. More buffers result in higher latency. Fewer buffers result in lower latency but possible audio gapping.
• Buffer Size
The size of the buffer also determines audio latency. Larger buffers result in higher latency. Smaller buffers result in lower latency but can cause audio gapping. Buffer settings may require some trial-and-error to achieve the best balance of latency vs. performance.
It’s All About The Drivers
Always make sure that you’ve downloaded the latest audio drivers for your sound device or audio system. Not only are audio hardware makers constantly fixing janky improving driver performance, audio issues are frequently solved with a simple driver update, so head on over to the manufacturer’s website to check for updates!
GENERAL
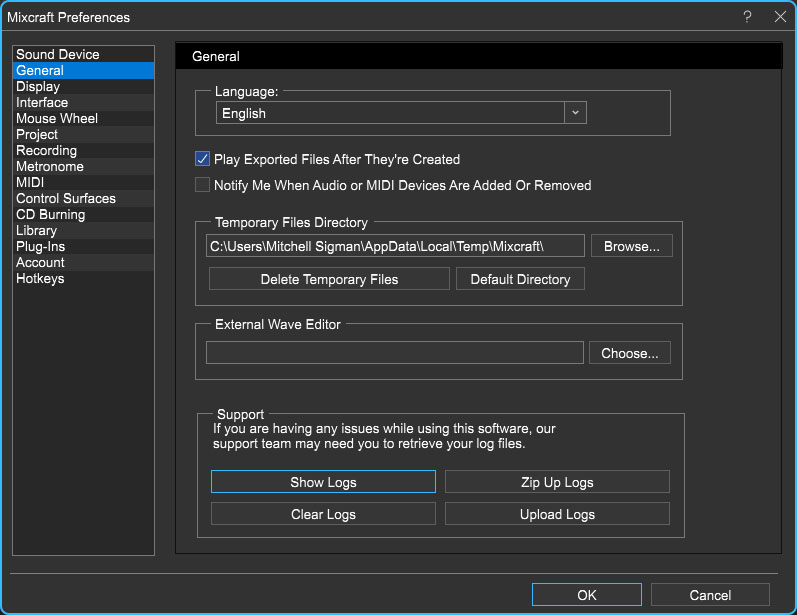
LANGUAGE
Choose a language to view Mixcraft in. You’ll need to restart Mixcraft for newly selected languages to take effect.
PLAY EXPORTED FILES AFTER THEY’RE CREATED
After mixing down to an audio file, this option launches the associated player and begins playback.
NOTIFY ME WHEN AUDIO OR MIDI DEVICES ARE ADDED OR REMOVED
Checking this enables alerts that will pop up if a MIDI/USB controller or audio device goes on the fritz (or you plug in something new).
TEMPORARY FILES DIRECTORY
Choose a directory to store any temporary files used by Mixcraft, such as peak data, beat map data and other data Mixcraft temporarily stores while performing operations.
Browse
Opens Windows Explorer to set a new temporary files directory location.Delete Temporary Files
This deletes all temporary files and folders from the Temporary Files Directory above. This includes all .tmp, .isk, .beatmap .isk, and .ipk files used in Mixcraft.Default Directory
Resets the temporary files to the default location which is:
c:\Users\<your name here, bucko>\AppData\Local\Temp\Mixcraft\
EXTERNAL WAVE EDITOR
Click the Choose button to set an external wave editing application to launch when Edit In External Editor is used.
SUPPORT - SHOW LOGS
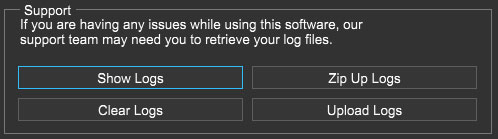
This opens the directory containing Mixcraft log files, which our tech support chaps will likely ask for should you contact them. In order to pacify those surly bastards help our support staff to more efficiently assist you, there are a couple of options to streamline the experience:
Show Logs
Opens the Windows Explorer folder where Mixcraft Log files are saved.Clear Logs
Deletes all Mixcraft Log files.Zip Up Logs
Gathers all log files and saves them into a compressed zip file (support may request this). Zip Up Logs! may or may not have been a toy from my childhood.Upload Logs
Automatically sends all Mixcraft log files to our support staff, like magic.
DISPLAY

DRAW AUDIO AND MIDI DATA ON CLIPS
Determines if an audio wave or MIDI note data is displayed on the clips. Turning this off could speed up your computer (but likely only if you have a really slow computer).
DRAW NOTE TEXT ON PIANO ROLL NOTES
Displays the text note on a note for easier recognition. For example, if the note is an A, it will display an A on it.
CHANGE NOTE COLOR FOR PLAYING NOTES
This option makes it easier to see what notes are currently audibly playing.
TINT MIXER TRACKS WITH TRACK COLOR
Enabling this gently tints the mixer channel strip in the same color chosen for the track (Right-click on a track>Color).
ENABLE LOGGING FOR TROUBLESHOOTING
Logging can slow down some computers. However, this option should be left on for support troubleshooting.
Enable Logging During Playback
This does exactly what it says, but can also impact performance. It’s best to leave it off and only enable if you’re trying to track down a specific issue (or if you're in the Pacific Northwest area trying to fell an enormous tree).
LIMIT DRAWING DURING PLAYBACK TO
Allows limiting the maximum frame rate Mixcraft draws the screen at in order to reduce CPU usage. By default, the screen will not draw more than 30 frames/second.
AUTO-SCALE DETAILS PANES WHEN CHANGING MONITORS
Enabling this forces Mixcraft to retain the relative scale of undocked Details panes. If, for example, you're using a large display with a smaller secondary display, this prevents windows from potentially appearing too large for the secondary display's resolution. This feature only works in Windows 10, version 1607 or newer (released August of 2016); the Auto-Scale Details Panes When Changing Monitors preference will be hidden (or so our programmers tell me!).
SHOW CLIP BUTTONS
Unchecking this hides the Play, Mute, and Duplicate buttons at the top of all clips.
INVERT CLIP BACKGROUND AND DATA COLOR
Reverses the color arrangement of clip waveform/notes in relation to the clip background.
DISABLE PER-MONITOR DPI AWARENESS
Affects how Mixcraft looks on monitor scaled to sizes other than 100%. By default, DPI awareness is enabled, which means that Mixcraft scales itself internally to whatever the monitor's scale setting is. If you disable DPI awareness, Mixcraft ignores the monitor's scale setting and allow the operating system to scale the window to match the monitor's scale setting instead. This has a tendency to make details look a bit fuzzy, since the operating system sees the Mixcraft window as a big bitmap that all gets scaled up as a unit instead of as a collection of vector graphics that can scale to virtually any size without losing resolution (as would be the case if you leave DPI awareness on and let Mixcraft handle the scaling).
However, all versions of Mixcraft prior to Mixcraft 10 have DPI awareness permanently disabled, so if you prefer the way Mixcraft 9 handled scaled monitors, you can check this setting. The primary difference, aside from the graphics looking worse, is that plug-in windows will automatically scale up or down to match the monitor's scale, with an accompanying loss of sharpness, when DPI awareness is disabled. With DPI awareness enabled, plug-in windows will remain scaled at 100% regardless of monitor scale setting, so they'll look smaller on a monitor that's scaled to say, 150%, than they will with earlier versions of Mixcraft, unless the plug-in has its own zoom settings you can use to resize it. Alternatively, you can leave Mixcraft DPI awareness enabled but disable DPI awareness for individual plug-ins from the Plug-in Manager dialog by right-clicking on the plug-in and checking the Auto-Scale to Match Monitor Scale menu option.
(Note that some plug-ins won't display correctly with DPI awareness enabled for Mixcraft globally but disabled for that particular plug-in.)
DEFAULT TRACK COLORS
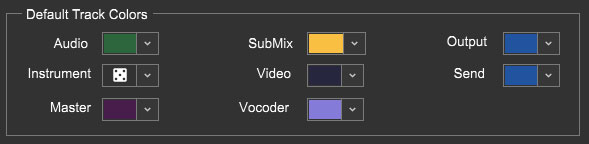
This allows individual customization of default track and clip colors for each type of track. There's also a nifty random color choice, indicated by the dice icon at bottom right in the popup menu (We've selected the random setting for Instrument in the image above).
DISPLAY VOLUME AS
Choose between Decibels or Percentage. This affects track volume sliders and editing of volume envelope points on clips.
SCALE
Allows the entire Mixcraft user interface to be resized up to 200%. This is super useful if you're using one of them newfangled big ol' displays. This can also be set in the main screen top menus in View> Scale.
VISUAL THEME
Choose between dark or light. Default is dark theme.
INTERFACE
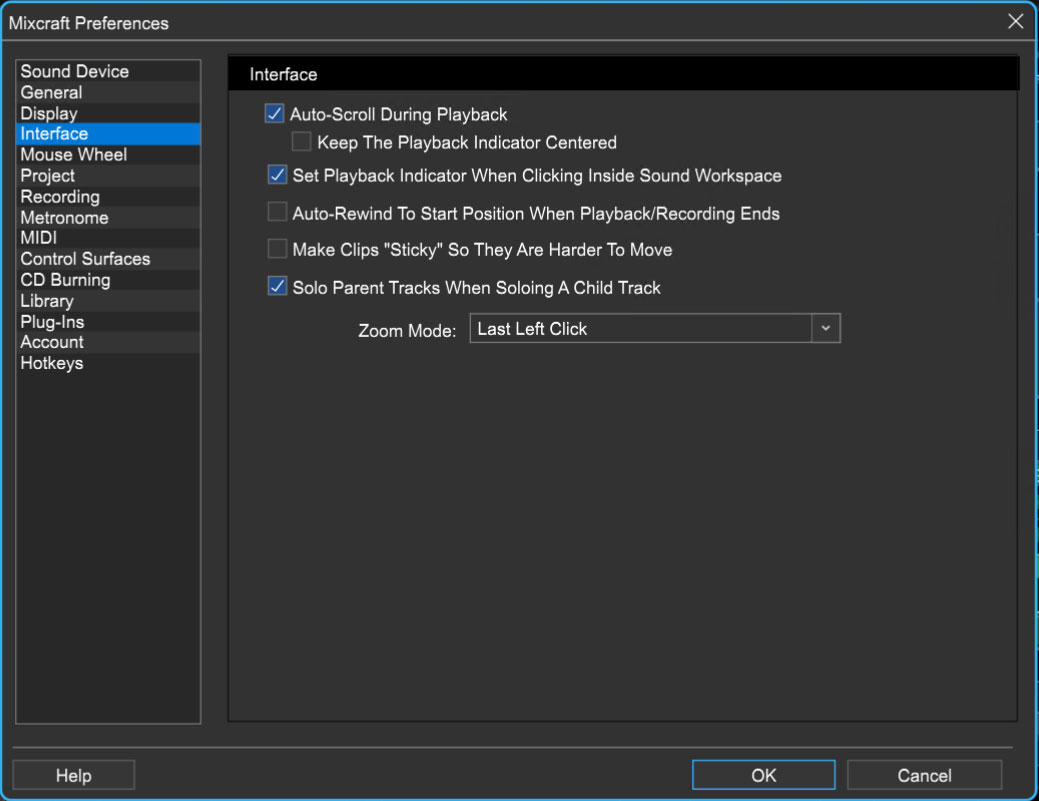
AUTO-SCROLL DURING PLAYBACK
This makes the Main Clip Grid scroll to automatically follow the Playhead.
Keep The Playback Indicator Centered
If Auto-Scroll During Playback is checked, this keeps the playback indicator to be centered during playback. This auto-scrolls the project instead of moving the playback indicator.
SET PLAYBACK INDICATOR WHEN CLICKING INSIDE SOUND WORKSPACE
This makes the Playhead jump to any position the mouse is clicked in the Main Clip Grid. Also restarts playback from this location if the project is playing back.
AUTO-REWIND TO START POSITION WHEN PLAYBACK/RECORDING ENDS
After recording or playing, the Playhead rewinds to where it was prior to record or play.
MAKE CLIPS “STICKY” SO THAT THEY ARE HARDER TO MOVE
This helps to maintain the exact offset of notes or clips when dragging up or down. For example, if you are zoomed way out and move a clip to a different track, it may change the time offset ever so slightly causing the sound to go out of sync.
SOLO PARENT TRACKS WHEN SOLOING A CHILD TRACK
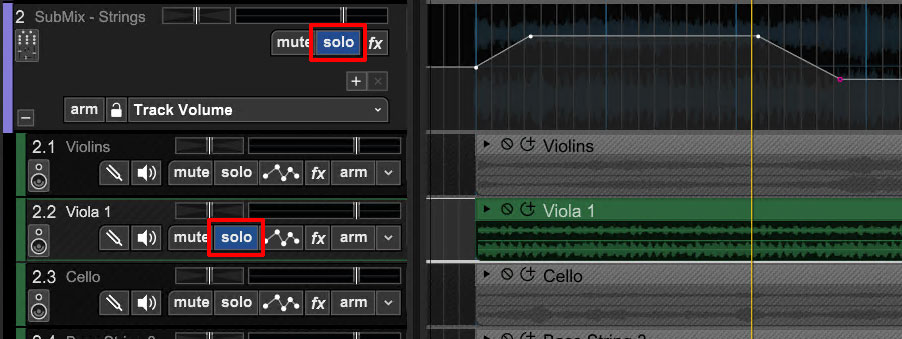
This one sounds like a parenting self-help book, but it’s not. With this option checked, soloing a track nested within a SubMix track automatically solos the parent SubMix track. If the checkbox is disabled, only the tracks within the SubMix group will be muted (i.e., the rest of a project’s tracks still play). Generally speaking, you’ll probably want to keep this box checked.
ZOOM MODE
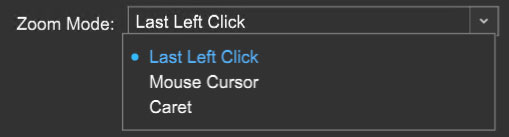
This customizes zoom behavior.
Last Left Click & Caret
The center point of zoom in and out is the most recent left-click in the in the Main Clip grid.Mouse Cursor
The center point of zoom in and out is the current mouse position.Caret
The center point of zoom in and out is the current caret position.
MOUSE WHEEL
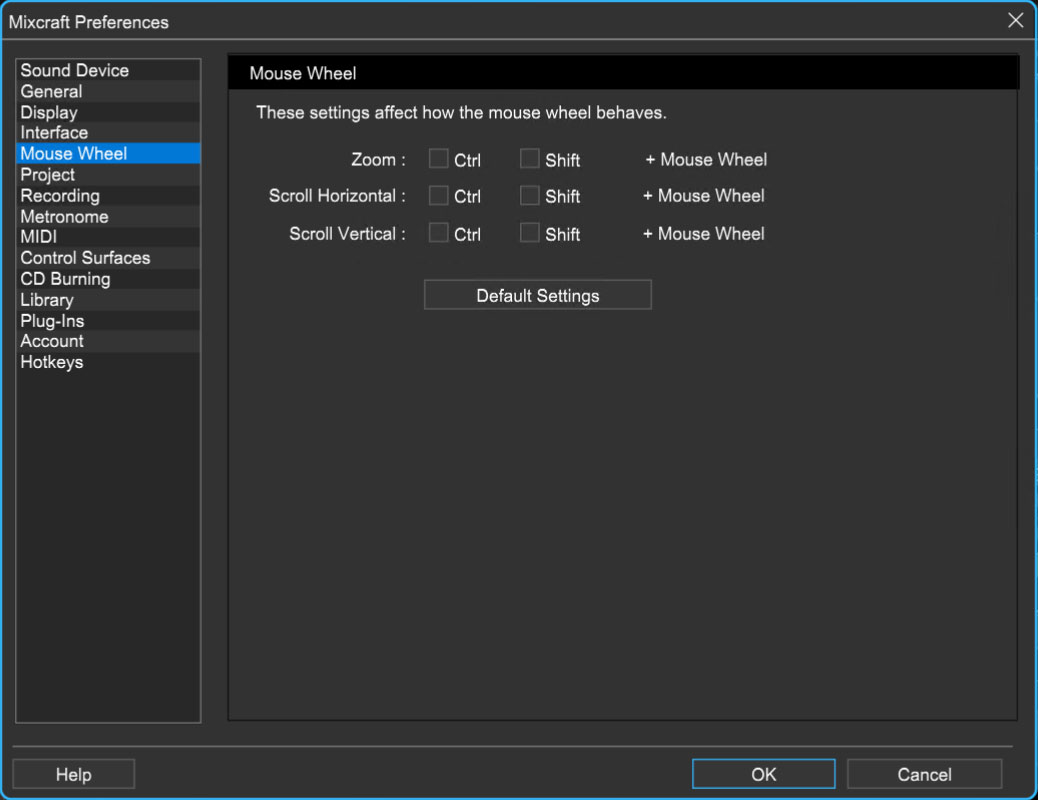
These settings affect how the mouse wheel controls zooming and scrolling. Choose combinations to customize mouse wheel behavior.
The default settings are:
Mouse wheel = Zoom
[CTRL] + Mouse wheel = Scroll Horizontal
[SHIFT] + Mouse wheel = Scroll Vertical
DEFAULT SETTINGS
Resets the Mouse Wheel settings to default settings above.
PROJECT
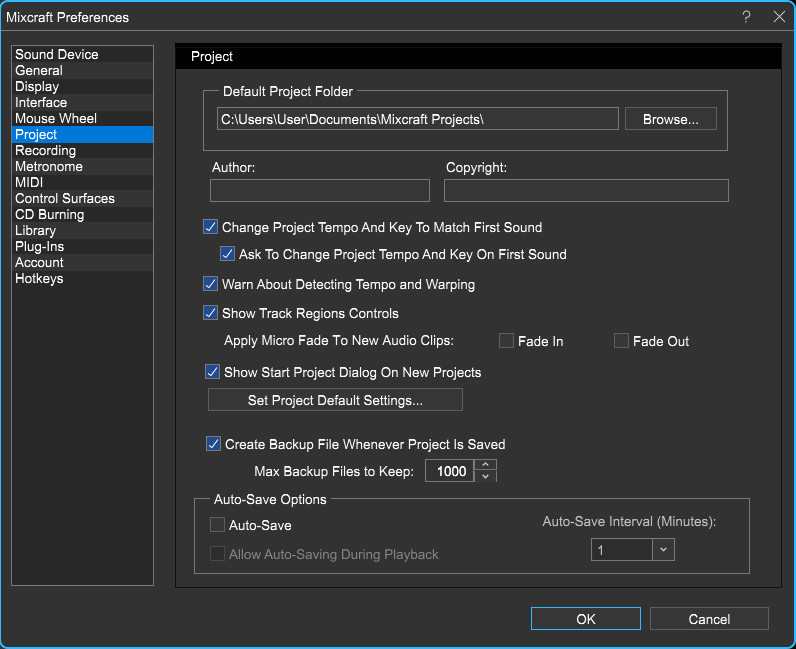
DEFAULT PROJECT FOLDER
Choose a directory to store Mixcraft Projects. The default project location is c:\Users\<your name here>\Documents\Mixcraft Projects\
Browse
Opens Windows Explorer to set a new default project location.
AUTHOR
The default author will be filled into each new project’s author information.
COPYRIGHT
The default copyright information will automatically be filled into each new project’s copyright information.
CHANGE PROJECT TEMPO AND KEY TO MATCH FIRST SOUND
When adding loops or sounds with a known key or tempo, the software will change the master tempo and/or key so that it sounds good. For example, if a sound was normally at 68 bpm and you tried to play it at 120 bpm, it would sound terrible. Time stretching works best when the tempos are no more than 10 to 30% different. This option conveniently sets the tempo or key of the project to match the sound’s tempo or key signature.
ASK TO CHANGE PROJECT TEMPO AND KEY ON FIRST SOUND
This option causes the software to ask if you want to change the tempo or key for the Change Project Tempo And Key To Match First Sound option above.
SHOW TRACK REGIONS CONTROLS (MIXCRAFT PRO STUDIO ONLY)
Hides or shows the horizontal track regions boxes directly beneath the ruler at the top of the main clip grid. Please see the Track Regions section for more info.
CREATE BACKUP FILE WHENEVER PROJECT IS SAVED
Every time you save, Mixcraft creates a backup file located in the project folder in a sub folder called backup. mx9 backup file’s contain the date and time they are saved.
APPLY MICRO FADE TO NEW AUDIO CLIPS (FADE IN/FADE OUT)
Automatically adds a 5 ms fade the beginning and/or end of audio clips. This eliminates pops and clicks at audio clip borders, but can potentially remove some of the attack phase of transient sounds (i.e., drums).
SHOW START PROJECT DIALOG ON NEW PROJECTS
Checking this displays the fabulous Mixcraft 10 Start Project window when a new project is initiated. This pref can also be enabled and disabled in the Start Project window itself. See the Loading and Saving Projects section for more info.
SET PROJECT DEFAULT SETTINGS...
Opens the New Project Window where default projects settings can be set, such as number each track type, tempo, key signature, etc. For more info, please see the Loading and Saving Projects section.
AUTO-SAVE OPTIONS
Starting in Mixcraft 10.5, you can have Mixcraft automatically save at regular intervals. Enable Auto-Save and choose the interval in minutes between saves. Optionally, choose Allow Auto-Saving During Playback for the extra cautious. (Note that this option might cause a short interruption of audio depending on what plugins and/or audio device settings are being used.)
RECORDING

DELETE UNUSED RECORDINGS DURING SAVE OR ON EXIT
If this option is checked, Mixcraft deletes any recordings made that are not currently on any tracks during a project save or when the exiting the software. If recordings appear to be disappearing from the recording folder, it may be because they weren’t part of the project. To prevent these recordings from being deleted, uncheck this.
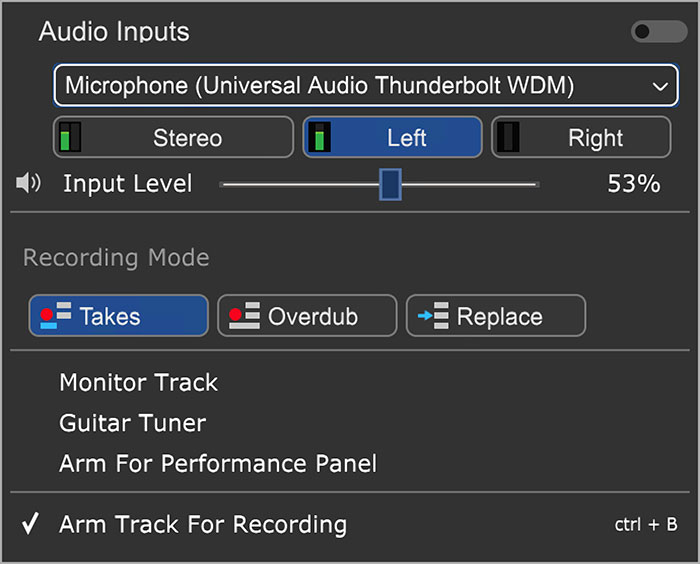
Audio Track Default Recording Mode
Choose from Takes, Overdub, or Replace mode.Instrument Track Default Recording Mode
Choose from Takes, Overdub, or Replace mode.For more information on Takes, Overdub, and Replace modes when recording MIDI clips, see the Recording Mode section in Recording MIDI Tracks; for information about recording modes with audio clips, see the Recording Mode section in Recording Audio Tracks.
WHEN RECORDING INPUT IS USED ON MORE THAN ONE TRACK
This instructs the software on how to handle two different tracks set to use the same recording input. The default is Do Not Allow Duplicate Recording Inputs. This routes the selected input to the newly armed track and disarms previously armed tracks.
Allow Duplicate Recording Inputs allows any number of tracks to be armed; it’s possible to accidentally record numerous independent tracks of the same thing, so be careful if this option is chosen.
RECORDING FILE TYPE
• Uncompressed WAV File (.WAV)
WAV is the most common uncompressed Windows audio format. Because no file compression occurs, it will have the best audio quality, but it also requires the most hard disk space.
• Compressed OGG Vorbis File (.OGG)
OGG is very high quality compressed audio format. It’s a “lossy” format, that is, it does get rid of some audio data in order to create smaller file sizes, but don’t let that scare you; we’ve found OGG audio quality to be excellent, so we recommend using it in most situations (that’s why we choose it as Mixcraft’s default audio format).
OGG audio quality can be adjusted with the slider (lower quality = smaller file sizes, higher quality = larger file sizes).
• Lossless FLAC File (.FLAC)
FLAC is another high-quality compressed audio format. It’s what’s referred to as a “lossless” format because it doesn’t discard any audio data. This results in larger file sizes than OGG (but smaller than uncompressed WAV).
Golden- ear types love to argue about which format sounds better, and we’ve got better things to do than bicker with those folks, but FLAC does sounds great in our opinion. FLAC audio quality can be adjusted with the slider (lower quality = smaller file sizes, higher quality = larger file sizes).
METRONOME
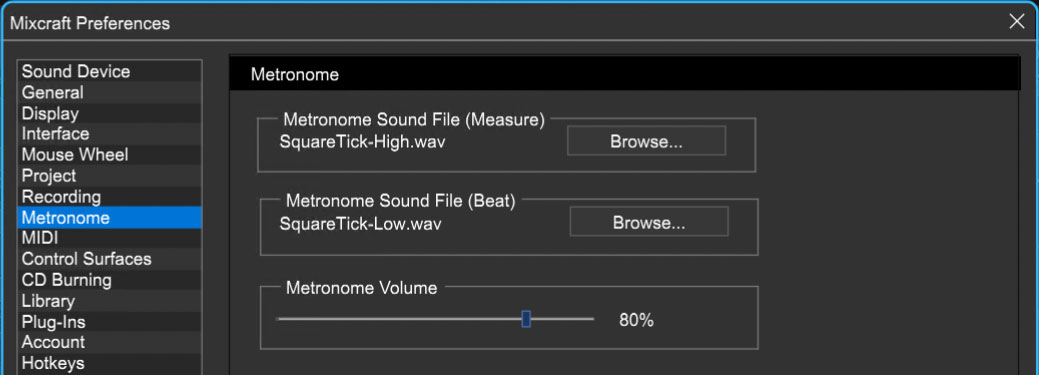
Clicking the Browse buttons allows customization of metronome sounds at the beginning of each measure and for individual beat clicks respectively. Default and user metronome sounds reside in the Program Files>Mixcraft folder.
METRONOME SOUND FILE (MEASURE)
The default measure tone is HighTone.wav. Click Browse to replace this with a custom user sound.
METRONOME SOUND FILE (BEAT)
The default measure tone is LowTone.wav. Click Browse to replace this with a custom user sound.
METRONOME VOLUME
Adjust the metronome volume to the desired level with the horizontal slider.
MIDI
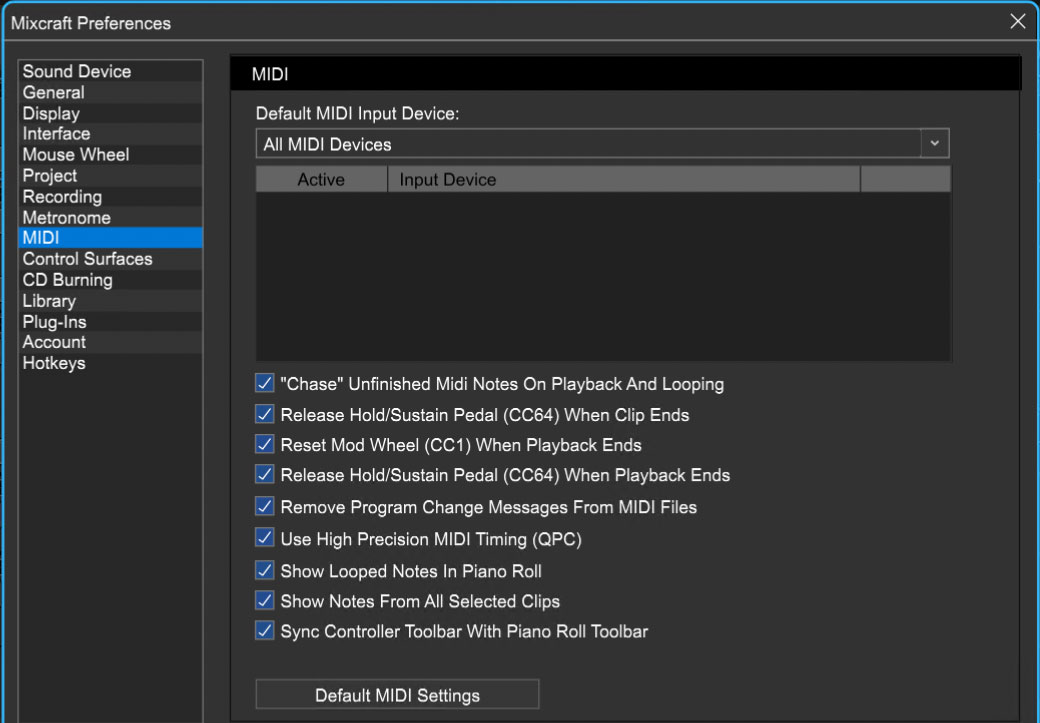
DEFAULT MIDI INPUT DEVICE
If you have MIDI interfaces or MIDI keyboards, choose the interface that you’d like to play and record from. The default is All MIDI Devices.
“CHASE” UNFINISHED MIDI NOTES ON PLAYBACK AND LOOPING
MIDI is not actual sound, it’s a series of commands instructing the computer play (or shut off) notes. With that in mind, what happens if you initiate playback in the middle of a note? The Chase option tells Mixcraft to send a “note on” message even if the playback start point is after the beginning of a note. This might not be significant if the song contains quick, percussive sounds (like clavinet, or wood blocks), but if the song has very long sustained pads, it’s likely that large musical elements will be missing if playback isn’t started in the correct location. Chase helps alleviate this possibility.
RELEASE HOLD / SUSTAIN PEDAL (CC64) WHEN CLIP ENDS
Like the Chase situation above, this is another potential MIDI problem you might consider until it occurs. If a sustain pedal isn’t released at the end of recording a clip (or you trim the clip’s right edge so the sustain pedal off message no longer gets transmitted), it’s possible to end up with notes that sustain forever and that’s a mighty long time, but I’m here to tell you, there’s something else: Release Hold/Sustain Pedal (CC64) When Clip Ends. This automatically sends a CC64 (the MIDI controller number for a sustain pedal) message of 0 to prevent possible “forever” notes.
RESET MOD WHEEL (CC1) WHEN PLAYBACK ENDS
Resets mod wheel controller to zero when playback is stopped. This prevents unwanted mod-related madness when playback is initiated - we recommend leaving this on.
RELEASE HOLD / SUSTAIN PEDAL (CC64) WHEN PLAYBACK ENDS
This performs the exact same function as Release Hold / Sustain Pedal (CC64) When Clip Ends described above, but does so when playback is stopped.
REMOVE PROGRAM CHANGE MESSAGES FROM MIDI FILES
Embedded program changes in imported MIDI files (usually of the downloaded or purchased General MIDI file variety) can cause things to go haywire with undesired program changes. Remove Program Change Messages From MIDI Files strips the annoying program changes from MusicBob’s standard MIDI file of “Total Eclipse of the Heart.”
USE HIGH PRECISION MIDI TIMING (QPC)
High Precision MIDI Timing allows extremely accurate timing for MIDI recordings, by using a highly accurate clock to precisely record notes. When High Precision MIDI Timing is disabled, the timing resolution of MIDI events is approximately +/- 1 millisecond; enabling it increases timing accuracy an order of magnitude to approximately +/- 0.1 milliseconds (100 microseconds).
It’s possible (but unlikely) that some CPU’s will not support High Precision MIDI Timing, so if you experience any major timing glitches (besides your own jazzy- fingers), try disabling it.
SHOW LOOPED NOTES IN PIANO ROLL
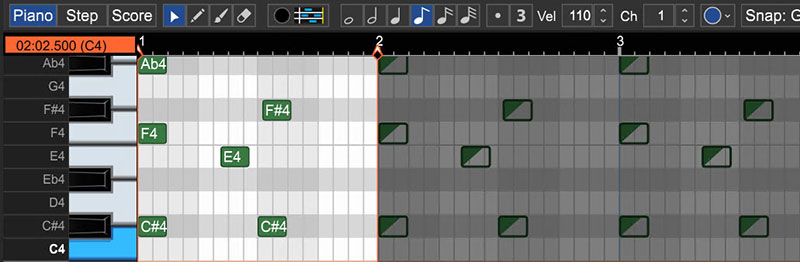
Selects whether notes in looped clip copies are displayed in the Piano Roll editor. In the image above, looped copy notes are visible in the darkened section on the right.
SHOW NOTES FROM ALL SELECTED CLIPS IN PIANO ROLL
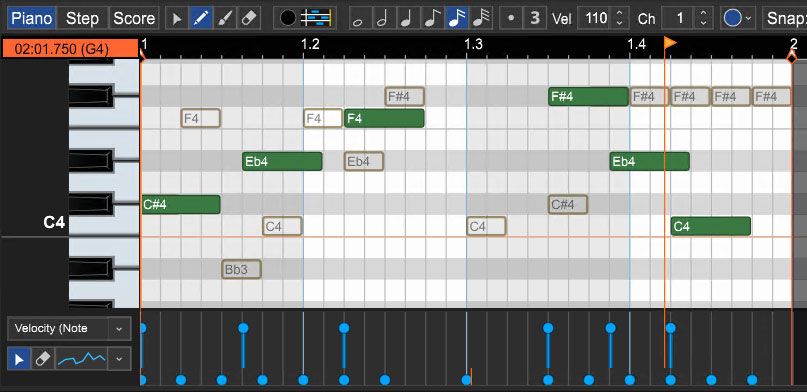
When enabled, notes from all currently selected clips will be visible in the Piano Roll editor. Notes from the clip currently being edited are solid-colored; notes from any other clips will appear as transparent. The currently edited clip will have a small wrench icon in its upper-left corner.
SYNC CONTROLLER TOOLBAR WITH PIANO ROLL TOOLBAR
When enabled, arrow, eraser, and pencil tool selection in the Sound Tab Piano Roll and Step Editor windows is synced. In the case of the pencil tool, it locks up with the "repeating waveforms" tool.
DEFAULT MIDI SETTINGS
Reverts all settings on this page back to default settings.
CONTROL SURFACES

Natively supported control surfaces include the Novation Launchpad, Mackie Control (aka MCU, and previously, Logic Control) and compatibles, and Acoustica’s own Mixcraft Remote app for Android and iOS mobile devices.
Note: For more information on configuring control surfaces, see Using Natively Supported Hardware Controllers.
TYPE
For Mixcraft to recognize any of these devices, plug in the device (or in the case of Mixcraft Remote, makes sure your computer and mobile device are on the same wireless network), click <Add New> and select the appropriate device. If you’re using an older Emagic Logic Control, be sure to choose it (instead of Mackie Control) in the Type list, otherwise all functions won’t work correctly.
INPUT
Specifies the input for the Control Surface. If it’s a MIDI device, choose the appropriate MIDI interface. If it’s plugged into a USB port, choose the name of the Control Surface.
OUTPUT
This is specifies the MIDI or USB output for the device and is set just like the input setting. If it’s a MIDI device, choose the appropriate MIDI interface. If it’s plugged into a USB port, choose the name of the Control Surface.
Note: The Mixcraft Remote mobile app does not require any Input or Output settings.
LINK
Linking two or more control surfaces (e.g. Mackie control surfaces), will cause them to act as one large single control surface.
UP/DOWN ARROWS
If you’re using more than one of the same fader controller, these let you move devices up and down in the list. This effectively lets you change the fader order of cascaded units to align with their physical placement in your workspace.
X BUTTON
This deletes the currently selected Control Surface.
CD BURNING

BURNING ENGINE
Choose between Primo or IMAPI. Primo is the default and recommended CD burning engine. It burns audio CD’s without gaps between tracks and supports CD-Text burning.
IMAPI is Windows default audio CD burning method. The drawback is that when burning more than one track, it inserts a two-second gap between tracks and automatically converts to WAV prior to burning.
LIBRARY
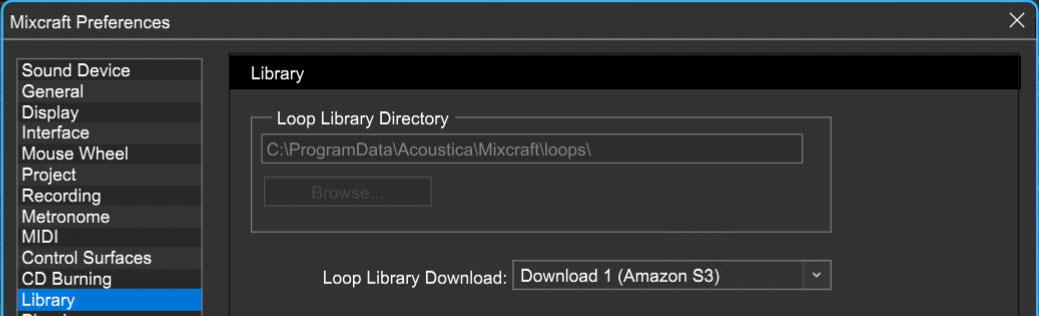
These are Mixcraft’s included sound library settings.
LOOP LIBRARY DIRECTORY
The folder where the loop library is stored. When new loops are downloaded, they are saved in this directory. This folder is shared for all users on this computer.
If you’re using Mixcraft in Administrator mode, you can change this folder location. To run Mixcraft in Administrator mode, browse to the Acoustica Mixcraft folder, right- click Mixcraft9.exe and choose Run As Administrator...
Type in a new folder path or click Browse... to select a new folder.Schools or labs can set the folder to reside on a server in order to save space on individual workstations.
LOOP LIBRARY DOWNLOAD
Select a Loop Library download site from the drop-down. If you experience problems downloading sounds, please go to the Troubleshooting section.
PLUG-INS
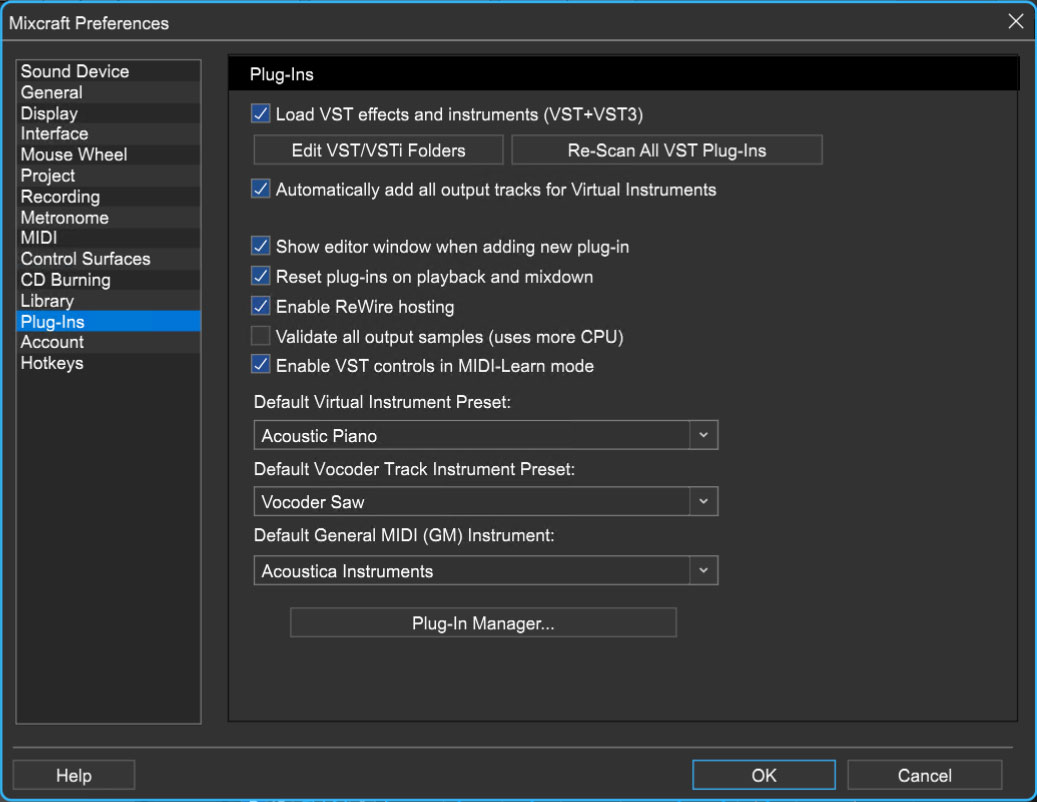
LOAD VST EFFECTS AND INSTRUMENTS (VST+VST3)
Mixcraft loads VST effects and virtual instruments upon launch if this box is checked.
EDIT VST/VSTI FOLDERS
Click this button to add, edit, or delete folders Mixcraft scans to locate VST Plug-Ins.
RE-SCAN ALL VST PLUG-INS
Scans VST folders for new plug-ins. This is useful when installing new VST Plug-Ins. (And also helps to thwart the dreaded, “lookin’ for plugs in all the wrong places.”)
AUTOMATICALLY ADD ALL OUTPUT TRACKS FOR VIRTUAL INSTRUMENTS
This will add a child output channel track for each output channel in the VSTi. This is
only important for instrument plug-ins with multiple output channels. If this is off and the instrument has multiple output channels, a single output track is created.
SHOW EDITOR WINDOW WHEN ADDING NEW PLUG-IN
When adding instruments or effects, this automatically opens its editor window. This is on by default and you’ll most likely want to leave it on.
Note that most of the “stock” Mixcraft instruments don’t have an editor window, so this checkbox won’t apply to them.
RESET PLUG-INS ON PLAYBACK AND MIX DOWN
If playback is stopped before a delay or reverb effect has faded out, the remaining decay can get stuck in the audio buffers; this “stuck” audio can be heard the next time playback is initiated. Checking Reset Plug-Ins On Playback And Mix Down automatically clears Mixcraft’s audio buffers the next time play is pressed or when the Mix Down To Audio File command is used, eliminating these annoying audio artifacts.
ENABLE REWIRE HOSTING
Toggle this option to enable or disable ReWire hosting. You’ll need to restart Mixcraft to use newly added ReWire clients.
VALIDATE ALL OUTPUT SAMPLES (USES MORE CPU)
Provides protection against bad values being output by a plug-in, but uses more CPU. Sometimes a bad or buggy plug-in may output invalid values, causing additional calculations to fail, and breaking all further plug-ins down the line. Unless you’re experiencing problems with a specific plug-in, we recommend leaving this off.
ENABLE VST CONTROLS IN MIDI-LEARN MODE
Allows controls of VST instruments and effects plugins to learn external hardware assignments.
DEFAULT VIRTUAL INSTRUMENT PRESET
Here you can define the instrument assigned to newly created Virtual Instrument tracks. By default this is a piano sound, but it can be changed to whatever you like.
DEFAULT VOCODER TRACK INSTRUMENT PRESET
Here you can define the instrument that gets added when creating new Vocoder Tracks. This defaults to the Mixcraft Instruments Synth Strings 1 patch, which works well for de facto vocoder robot voice effects.
DEFAULT GENERAL MIDI (GM) INSTRUMENT
Here you can define the General MIDI sound set assigned to newly created General MIDI files. This is set to Acoustica Instruments by default.
PLUG-IN MANAGER...
A shortcut to the Manage Plug-Ins window (also accessible via File>Manage Plug-Ins). This where plug-ins can be enabled and disabled from showing in the list of effects shown in Mixcraft, and also where you can edit instrument and effects Collections (see Plug-In Manager for the full scoop).
ACCOUNT
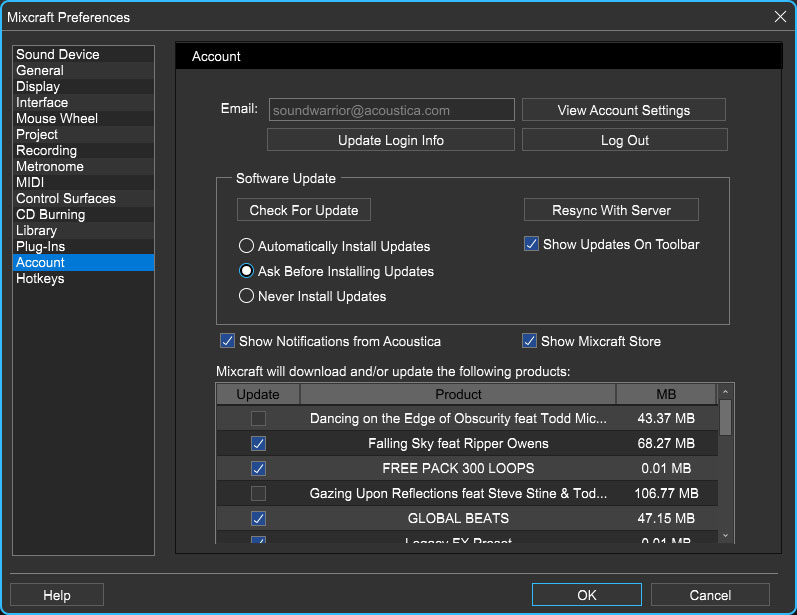
Settings for your personal login information and account.
Email
Displays the email address of the current login.Update Login Info
Clicking this opens the same email and password login screen you’ll see when initially launching Mixcraft and allows changes to be made.View Account Settings- This opens your personal account page on the Acoustica Store website containing information about purchases and more.
Logout
Clicking this logs out of your Acoustica account.
SOFTWARE UPDATE
We often fix bugs and make improvements; below are options defining how Mixcraft handles updates.
Check For Update
Click this to see if an updated version of Mixcraft is available.Resync With Server
Checks the Acoustica servers and brings Mixcraft+additional Mixcraft software packages to current ownership status as selected in the table at the bottom of the window.Show Updates On Toolbar- Checking this will display an icon in the toolbar next to the logo letting you know there's an update available.
Automatically Install Updates- Updates are automatically downloaded and installed.
Ask Before Installing Updates- By default, Mixcraft automatically downloads new versions of modules when available. Checking this box defeats automatic updates and will ask if you’d like to install updates when they become available.
Never Install Updates- Mixcraft never automatically installs updates.
SHOW NOTIFICATIONS FROM ACOUSTICA
We occasionally will fire off in-app advertisements; disabling this checkbox will hide them. We hate repetitive, annoying ads as much as you, so we won't use this feature too often. When we do, it'll be for something super cool (like a killer sale), so we recommend leaving it on.
SHOW MIXCRAFT STORE
Enables or disables view of the Acoustica Store details tab at the bottom of the main window.
MIXCRAFT WILL DOWNLOAD AND/OR UPDATE THE FOLLOWING PRODUCTS
Use the checkboxes in this table to specify which Mixcraft-related products will update.
HOTKEYS
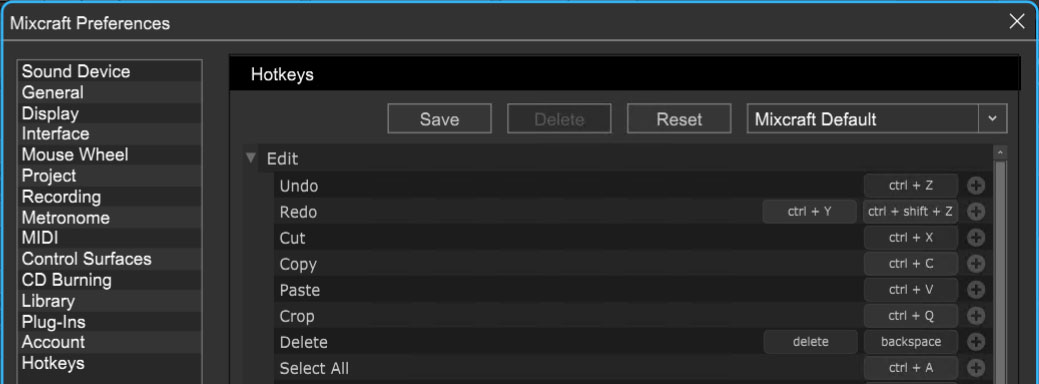
Mixcraft's key shortcuts can be edited and custom hotkeys can assigned here. For full information, please see the Hotkeys section.