LOADING AND SAVING PROJECTS
NEW PROJECT WINDOW

The New Project window is Mixcraft's "launch control" area. It combines a number of handy functions used when starting a new song project. The New Project Settings window is displayed when Mixcraft is launched. It lets you specify preset settings for new projects, or open a default project file.
By default, the New Project Window opens when Mixcraft is launched, or when File>New Project is selected. It can be disabled by unclicking the Show This Window For New Projects checkbox, or in preferences at File>Preferences>Project>Show Start Project Dialog On New Projects.
• Document Icons
New
Creates a new project with properties defined by New Projects Defaults settings.Open
Opens a File Explorer window where an existing project can be opened.Defaults
Opens the New Projects Defaults dialog (see below).
• Video Tutorials
Automatically launches your default web browser and directs to acoustica/mixcraft/videos. Here you can view helpful Mixcraft-related tutorial and tips videos.
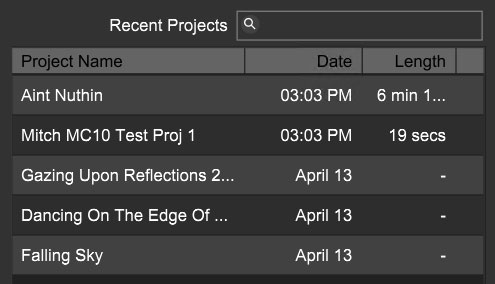
• Recent Projects Search
The Recent Projects dialog allows easy searching for projects - just type the name (or part of it) and projects will appear below.
• Recent Projects List
Displays most recent projects. To open a project, simply click on it.
Project list display order can be sorted by name, date last opened, or length by clicking on the column headers.
• News
The right side of the New Project window contains Acoustica- and Mixcraft-related news, including sales and new videos. These launch in the default internet browser when clicked.
PROJECT DEFAULT SETTINGS
Closely related to the New Project window, the Project Default Settings window is where all initial project settings, such as tempo, key, number of specific track types and more can be defined. This "personalized project template" makes song creation even easier.
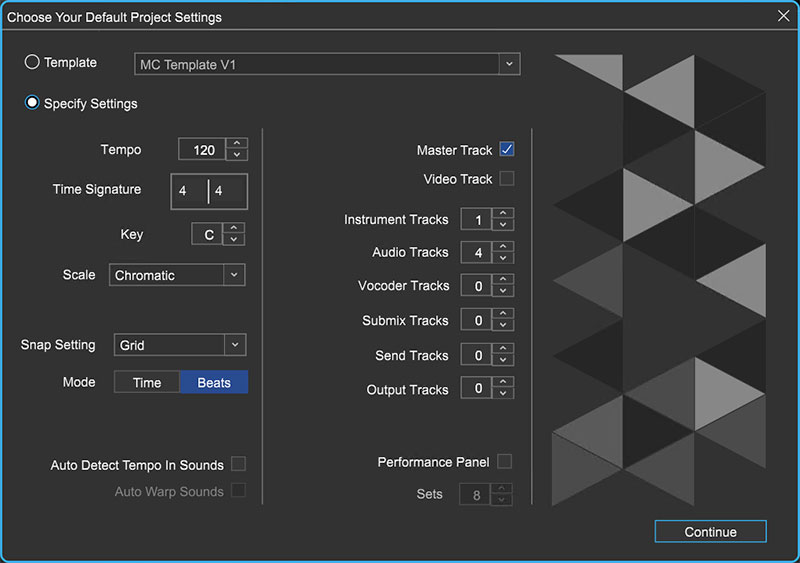
All parameters in the Project Default Settings window remember their current setting, even when new projects are initiated. If you make a change to one of the settings, Mixcraft remembers it the next time the Project Default Settings window is opened.
TEMPLATE
If the Template radio button is selected, an existing Mixcraft template file is used to specify initial project settings.
The template file can be selected using the popup menu to the right. Either click in the field and select a template or click Browse… andnavigate Windows Explorer to the location of a Mixcraft template file, then double-click the template file to open it.
SPECIFY SETTINGS
When the Specify Settings radio button is selected, you’re able to quickly and easily set parameters when beginning a new project.
• Tempo
Specifies the tempo of the new project. Either click the tempo number and enter a number on the keyboard, or use the up/down arrows to specify the tempo.
• Time Signature
Click on the numerator or denominator and enter the desired numbers to specify the time signature.
• Key
Click the letter C to change the key signature or use the up/down arrows to specify the project key.
• Scale
Allows selection of a predetermined scale for MIDI clips to conform to.
• Snap Setting
This sets the Snap setting in the new project.
• Mode
Selects between Time and Beats mode in the timeline ruler and position displays.
• Auto Detect Tempo In Sounds
Tempo of clips containing audio content will be tempo-locked to the project.
Auto Warp Sounds
Checking this box will automatically autowarp imported audio content over 30 seconds in length. (Auto Detect Tempo In Sounds must be enabled.)
• Master Track
Checking this box enables the master track at the top of the track list.
• Video Track
With this box checked, the first track in a project will be a video track (a project can only have one video track).
• Instrument Tracks
Defines the number of virtual instrument tracks automatically created by Mixcraft. Either click the number and enter a number on the keyboard, or use the up/down arrows to specify a number.
• Audio Tracks
Defines the number of audio tracks automatically created. Either click and enter a number on the keyboard, or specify a number with the up/down arrows.
• Vocoder Tracks
Defines the number of vocoder tracks automatically created by Mixcraft. Either click the number and enter a number on the keyboard, or use the up/ down arrows to specify a number. Note that a vocoder track is actually a submix track containing an audio track (for vocoder control input) and an instrument track (containing a string synth instrument and an Acoustica Vocoder plug-in).
• Submix Tracks
Defines the number of submix tracks automatically created. Either click and enter a number on the keyboard, or specify a number with the up/down arrows.
• Send Tracks
Defines the number of send tracks automatically created. Either click and enter a number on the keyboard, or specify a number with the up/down arrows.
• Output Tracks
Defines the number of output tracks automatically created. Either click and enter a number on the keyboard, or specify a number with the up/down arrows.
• Performance Panel
Checking this box opens the Performance Panel in the new project. Use the Sets box to define the number of empty Performance Panel sets.
• Continue
The Continue button opens a new project with the currently defined Project Default Settings.
SAVING A PROJECT
Select Save or Save As… from the File menu, navigate to the folder where you’d like the current project’s folder to reside, type in a name, and click the Save button. Mixcraft automatically creates a folder with the name you typed. The Mixcraft project file and all associated audio files will save to the project folder.
If the project has already been saved in an earlier version, the Save command will simply overwrite the existing project file with the same file name. If you’d like to save different iterations of a project, we recommend adding numbers or dates at the end of the project file name.
Projects can also be saved by clicking the Save button on the top toolbar - it’s the icon that looks like a floppy disk. (If you still have a box of floppy discs in the closet, stop what you’re doing and throw them away right now - whatever gadget you still have that took them doesn't work any more anyway.)
Save your work often. You never know when the power might shut off!
MIXING DOWN A PROJECT INTO AN AUDIO FILE
MIX DOWN TO STEMS
To save the project as an MP3, WAV, OGG or WMA file, use the File>Mix Down To command in the Main Window menus. Tracks can also be saved en masse as individual audio files using the File>Mix Down To Stems function. For more information, see Mixing Down To Audio And Video Files.
SAVING AS A MIDI FILE
If you want to export a project’s MIDI content to a Standard MIDI file, select File> Save As MIDI File… from the Main Window menus. Alternatively, you can choose File>Save As…., click the Type field and select MIDI File Type 1.
Audio tracks will be skipped, as they do not contain MIDI data.
BACKING UP PROJECTS
A backup of the project is made each time it is saved. Backup files are automatically saved in the backup sub-folder located in the project folder.
Saving Projects With Templates
If a new project is started by loading a template and you hit the Save button (or the File menu equivalent), Mixcraft will save the file as a new project - it won’t overwrite the template file.
PROJECT TEMPLATES
A template is a special project that stores track names, track images, volume settings, armed states, and other track settings. Project templates can be a big time saver because they let you set initial project parameters to your liking.

To save a project template, select File>Save As… in the Main Window menus, then select Mixcraft Template from the Save as type: drop-down menu. Type in a file name, select a destination folder and click Save. Mixcraft project templates are stored as .mx10template files.
COPY PROJECT FILES TO
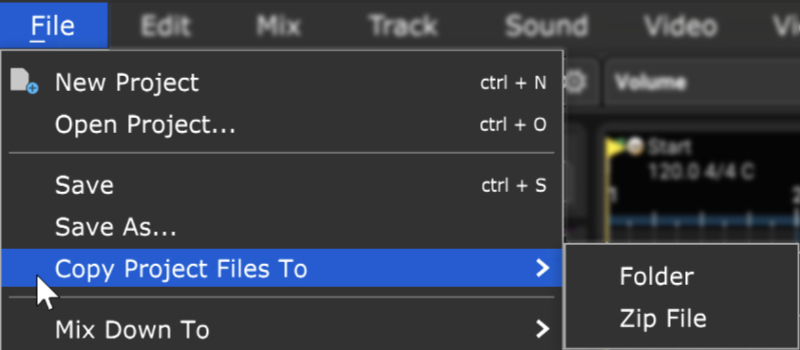
A project and all sounds, videos and/or recordings used within it can be easily saved to a single folder or zip file. This is handy for organizing projects and backups as well as sharing with other Mixcraft users.
To copy the project and its sounds, save the project, then click File>Copy Project Files To in the Main Window menus, followed by clicking Folder or Zip File.
COPY TO A FOLDER
Pick a folder to copy the project and files to and click OK. You can optionally create a new folder by clicking the (you guessed it) New Folder button.
COPY TO A ZIP FILE
Enter a name for the zip file and click Save. All project files will be automatically added to the compressed zip file. Audio and video files do not necessarily compress well (i.e. they won’t be corrupted, but their file size won’t shrink much), but this is still a great way to quickly create a single file archive for sharing/emailing/uploading.