TRACK RIGHT-CLICK COMMANDS - OUTPUT BUS TRACK
• Insert Track
These commands add a new Audio, Instrument, Video, Send, SubMix, Output, or Vocoder track directly above the current track.
• Delete Track
Removes the current track.
• Color
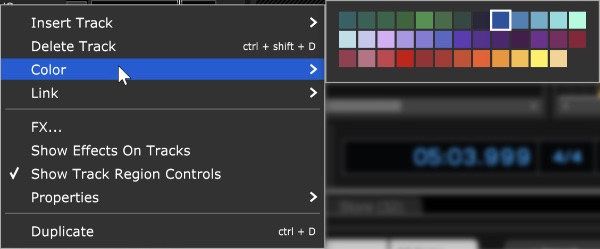
Changes the color of the track.
• Link
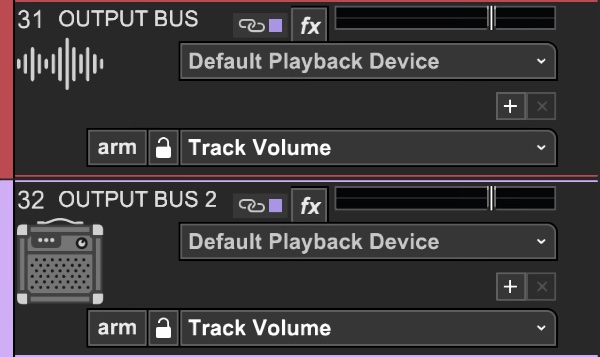
Multiple tracks can also be linked together; this gangs up the volume, pan, mute, solo and send controls. It’s particularly useful if you have a group of similar tracks (like drums, or multiple backing vocals). You may have as many separate groups of tracks linked as you like. Linked tracks will display uniquely colored “chain” icons beneath the track name.
To link two or more tracks, select tracks as detailed in the previous section then choose from the following Link options:
Link Selected Tracks- Select two more tracks, then right-click Link>Link Selected Tracks
Unlink All- Unlike Fleetwood Mac, you can always break the chain (always break the chain...). Unlink All disables linking for alltracks in the current Link group (one track within the group must currently be selected before unlinking).
Unlink- This disables linking for only the selected track in the current Link group. Use this to remove a single track from the Link group.
Note: Track linking is overridden for volume, pan, or send if automation locks are enabled for these parameters.
• FX...
Opens the Effects List window for the track where effects can be added and edited. This is the same as clicking the track fx button (next to the Arm button).
• Show Effects On Tracks
Globally shows or hides insert effects next to the track list. Unless you're short on screen real estate (i.e., laptop), we recommend leaving this on.
• Show Regions Controls On Tracks- Globally shows or hides Track Regions bars for Master and SubMix tracks. (MC 10 Pro Studio only)
• Properties
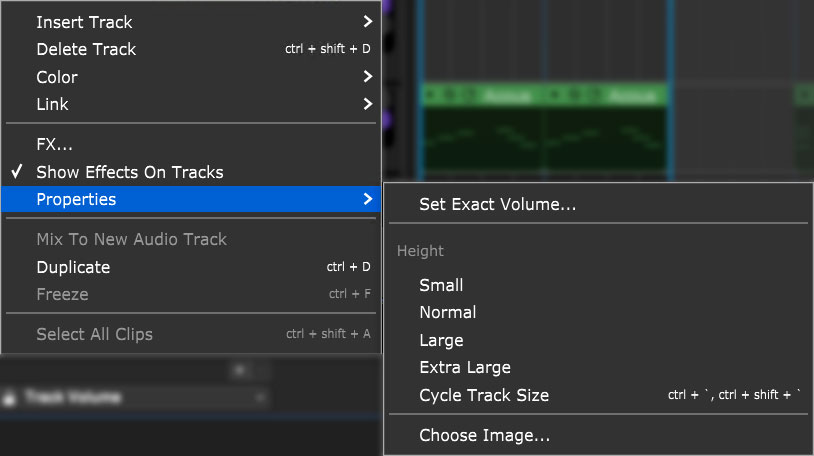
Set Exact Volume...
Opens a window where the track volume slider can be set precisely, either by slider control or by entering a numeric value.Height
Allows individual track heights to be adjusted to Small, Normal, Large, or Extra Large size.Cycle Track Size
Moves through Small, Normal, Large, or Extra Large track heights. (This one makes more sense when track height is selected via the [CTRL] + ' and [CTRL] + [SHIFT] + ' key shortcuts).Choose Image...
Each track can have its own image beneath the track name for personalization as well as organization. Choose from Mixcraft’s included images or import your own.To change the track image, double-click an existing track image or hover over the track image and click the pop-up button. You can also select Track>Properties>Choose Image… in the main window drop-down menus, or right-click on a track and select Properties>Choose Image...
The Choose A Track Image window opens:
To use an existing image, select one and click OK. To use a custom image, click Add My Own Image File..., navigate to the image to be added, select the desired image, and click Open. The image replaces the existing track image and is added to the list of thumbnail images.
JPG, BMP, PNG, and GIF formats are supported, and custom images are permanently added to the track image library for use in future projects.
• Mix To New Audio Track
Mixes virtual instrument or audio clips on the selected track to a single, continuous audio clip and places it on a newly created track beneath the current track. This has a couple of practical uses:
Convert MIDI Virtual Instrument To An Audio Wave -This is useful if you're running an older computer and a high-CPU instrument plugin is slowing down your computer; in this way, you can "print" the audio and shut off the plugin.
It's also useful if you’re handing off files tosome chumpanother user who doesn’t have virtual instruments you’ve used in a project.Permanently Embed Insert Effects Or Instruments In An Audio File Again- This is useful if you’re handing off a project to another user who doesn’t have effects plug-ins you’ve used.
Long-Term Archiving- Instrument or effects plug-ins can become obsolete or incompatible with current operating systems/format changes, etc. Converting to “pure” audio files can act as insurance to guarantee projects remain playable for years to come.
• Duplicate- Creates a copy of the track and all of its clips. This is a time-saver if you want to add a second part using the same instrument, add a vocal double with the same plug-in setup, etc. Also useful if you’d like to try some wild edits and want to retain an unadulterated version.
• Freeze- Freeze is similar to Mix To New Audio Track; it creates a new audio file with instruments or effects “burned in” to the file. Unlike Mix To New Audio Track, it does not make a new track; the audio is created in the background and plays back on the existing track. Because instruments and effects are part of the newly created audio file, Mixcraft disables instrument and effects plugs upon playback, thus freeing up computer processor resources. If you’re using an older or underpowered computer, Freeze can be tremendously helpful (check out the CPU percentage meter while playing back projects for reference). Conversely, if you’re using a fast, modern computer, you probably won’t need Freeze.

Frozen tracks turn blue with diagonal lines; this makes it easy to keep track of which tracks are frozen. Frozen tracks can be unfrozen, that is, converted back to standard tracks with instrument and plug-ins active, by reselecting the Freeze command (which will say Unfreeze).
• Select All Clips- This selects all clips on the track, with one minor detail you should know about if you're using the Performance Panel: Select All Clips selects all of a track's clips in either the main clip grid or in the Performance Panel, depending on which was clicked most recently.
• Select All Linked Tracks- If Link to other tracks is currently enabled for the track, this selects the current track and all other tracks currently linked.