RECORDING AN AUDIO TRACK
Select a blank audio track in the Track List at the left side of the screen. Existing blank audio tracks will already be named Audio Track and have a loudspeaker icon beneath the name. If there aren’t any blank audio tracks in the Track List, create new ones by clicking the +Track button at the top of the Track List and selecting Insert Audio Track.
Click on the audio track you’d like to record on; the track will highlight. Now choose the recording input source by clicking the down arrow to the right of the Arm button. Depending on your audio hardware, this list may appear differently, but the idea is to select the hardware input you’ll be plugging a mic or instrument into. In the example below, we’ve chosen the left channel (i.e. input 1) of a two-channel audio device.
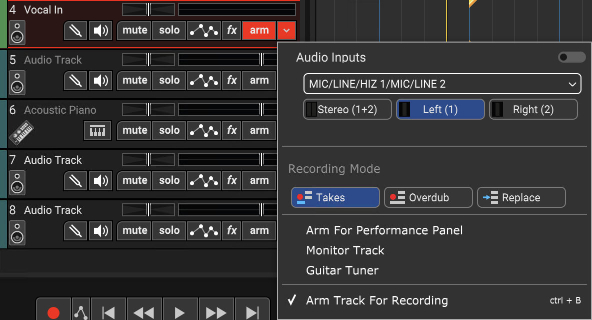
If you’re recording a mono signal, click the sound device followed by Left or Right depending on where you’ve plugged into the audio device. If you’re recording in stereo with simultaneous left and right inputs, select Stereo. Pay close attention to this setting, because it’s easy to accidentally record mono input sources (e.g., lead vocals, bass guitar, etc.) as a stereo file if you’ve set this incorrectly. It won’t hurt anything, but you’ll unnecessarily waste hard drive space.
After selecting the input, click the track’s Arm button. The Arm button will turn red, letting you know Mixcraft is ready to record. Now send some audio through the input to verify that the correct input was chosen. You should see the meters moving on- screen on the recording track.

When a track is armed, the volume slider turns into a red recording input level adjuster. Move the slider to adjust the recording input level. If peaks send the meter into the red, back off the level. Ideally, the input signal should nominally sit in the green-to-yellow area.
Important Note: If you’re using an audio device with an ASIO driver (you can check in File>Preferences>Sound Device), the volume slider disappears when the track is armed for recording. This is because ASIO recording drivers do not support input level adjustment in software. To set the proper recording input level, you’ll need to use either the input level on your audio hardware, or if it doesn’t have one, you should be able to set the recording level using the output level control on an external preamp or channel strip.
In order to record in time with a project’s tempo, you’ll most likely want to record with a metronome. To turn on the metronome, click the metronome button in the middle of the transport. It looks like, well, a metronome.
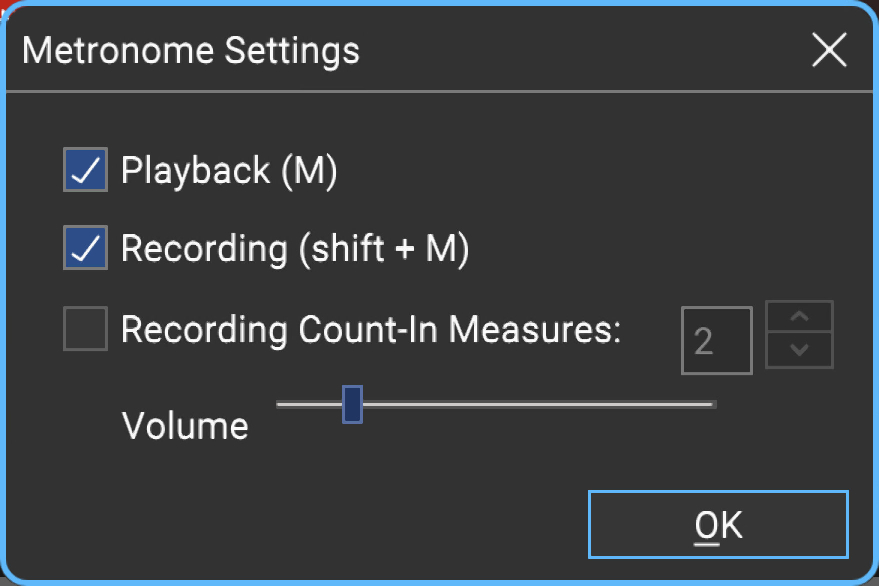
Check the Recording box. This means the metronome will click during recording. Checking the Playback box makes it click during playback, but we can leave this off for now. If it’s not already checked, check the Recording Count-In Measures box. Upon pressing the Record button, this gives a “countdown” before recording begins. The number selector lets you choose the length of the countdown - 1 bar usually provides enough time. Hit OK when you’re done. Once you’ve configured the metronome, you can quickly toggle it on and off by pressing the M key on the computer keyboard.
Almost there! Let Mixcraft know where to begin recording by positioning the Caret in the grid. This can be done by either clicking on the timeline at the top of the main window or by clicking anywhere in the Main Grid. We recommend positioning the Caret on an exact number in the timeline (e.g., 1, 2, 3). Setting the Snap setting at the top of the screen to Snap To Grid will simplify positioning the Caret.
Now it’s time to grab that microphone or guitar and let it rip. If you want to monitor the recording source during recording, click the little speaker icon (directly to the left of the Mute button).
Here we go. Click the red Record button in the transport (the one with the red dot), wait four clicks for the recording to begin, and record something! When you’re done, click the Record button again to stop (you’ll notice the red circle turns into a square while recording), or just press the space bar. It should look something like this:

Congratulations, you’ve made your first Mixcraft audio recording!