USING NATIVELY SUPPORTED HARDWARE CONTROLLERS
Mixcraft 10 features native support for numerous external hardware devices including the Mackie Control Universal (formerly known as “Logic Control”), Frontier Design Group Tranzport, and Novation Launchpad, as well as Acoustica’s own Mixcraft Remote mobile app for smart phones and tablets (see Configuring the Mixcraft Remote Mobile App at the bottom of this section).This means Mixcraft already “knows” how to interact with the knobs, sliders, and switches for these hardware controllers. Once they’re plugged in and enabled, no further assignment or MIDI mapping is needed. Hooray!
For a full list of supported devices, see Appendix 6: Natively Supported Hardware Controllers.
CONFIGURING NATIVELY SUPPORTED USB AND MIDI CONTROLLERS
No special drivers are necessary to set up a Mackie Control Universal, Tranzport, Launchpad, or the Mixcraft Remote mobile app to work in Mixcraft. Here’s how to add them.
• Plug it in. If you’re using a newer Mackie Control Universal, Tranzport, or Launchpad, plug a USB cable into the control device on one side, and an open USB port on the other. If you’re using an older Mackie Control with MIDI ports, plug these into either a dedicated MIDI port on a USB MIDI interface, or use the MIDI in/out jacks on your audio interface.
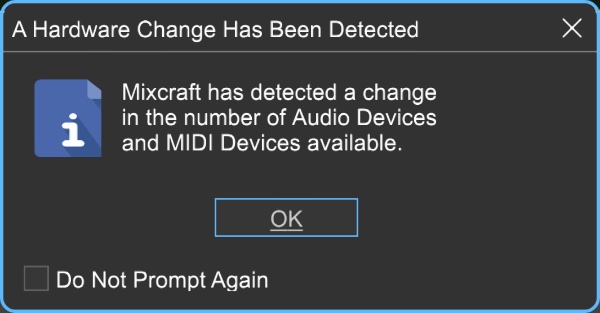
• Upon plugging in the controller device, Depending on your preference settings, you may see the dialog above acknowledging that you’ve plugged in a new piece of hardware. Click OK.
• In the upper left corner, click File>Preferences, then select Control Surfaces. In the Type column at the left, click on Add New. When you see the device in the drop-down menu, click to select it.
• If it’s a USB device, select it in the Input and Output columns to the right. If the device is MIDI, select the name of the MIDI interface in the Input and Output columns. If you’re using the MIDI I/O on your audio interface, select it by name in the Input and Output columns.
• Click OK at the bottom of the Preferences window and you’re set!
USING MACKIE CONTROL UNIVERSAL WITH MIXCRAFT
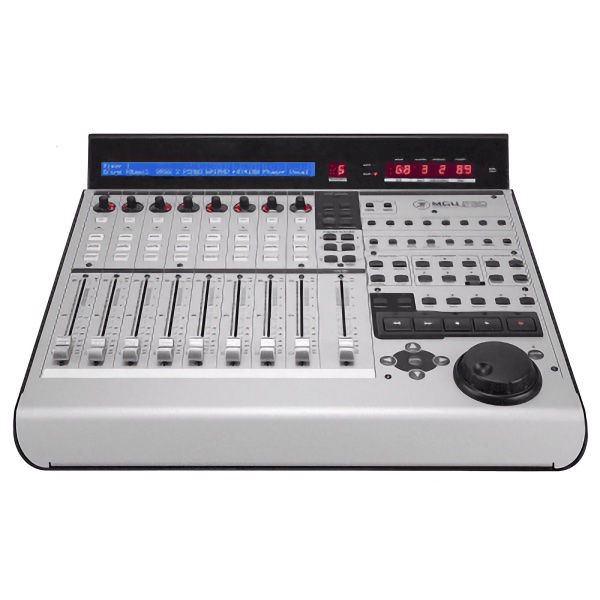
The Mackie Control Universal (aka MCU) is a full-featured mixer-style control surface with channel strip and transport controls, a jog wheel, and numerous other controls. Because it’s designed to work with numerous DAW programs, all of its controls may not apply to Mixcraft, but we’ve implemented as many controls as possible in order to best take advantage of MCU’s control interface. Following is a list of the currently implemented controls:
MCU Control | Function |
|---|---|
Rewind Transport Control | moves playhead back by 4x snap value |
Fast-forward transport control | moves playhead forward by 4x snap value |
Stop transport control | stops playback or recording |
Play transport control | initiates playback |
Record transport control | initiates recording |
Master fader | sets master volume |
Jog wheel | moves playhead forward or back by snap value |
Flip button | reverses V-Pot pan and vol fader controls |
Channel fader | sets track volume |
V-Pot rotate (channel strip) | above channel strips, sets pan |
V-Pot push (channel strip) | resets panning to center |
Rec/Ready (channel strip) | arms channel recording |
Solo (channel strip) | solos the track |
Mute (channel strip) | mutes the track |
SELECTING THE CORRECT MACKIE CONTROL PROFILE
There are a couple of different Mackie Control variants. You’ll need to choose the correct profile in File>Preferences>Control Surfaces for it to work correctly.
If you’re using an older Mackie Control and the large fluorescent display doesn’t work properly, please choose Logic Control in the Type column; otherwise, select Mackie Control (this usually applies to units that say Logic Control on them).
If you’re using an original Mackie Control XT or a newer silver MCU Pro XT “extender,” choose the appropriate XT version in preferences. For MCU Pro setups, plug the main unit in with a USB cable, use a set of MIDI in/out jacks to connect the extender unit, and choose the appropriate USB and MIDI connections in the Control Surfaces preferences panel. Make sure to check the Link check boxes for all units if you’re using one or more MCU extenders (this makes them behave as one big unit, as opposed to multiple units controlling the same eight channels). The physical order of units can be rearranged by grabbing the three lines at the left of the Preferences box and moving them up and down. This ensures that faders on multiple units will be in the correct order in relation to the onscreen mixer.
MACKIE CONTROL DISPLAY
LINK HERE
The Mackie Control display shows the following information for each of the current tracks:
• Track panning percentage, left or right
• Track number
• Track name (abbreviated to four characters)
OVERWRITE AND TOUCH FADER AUTOMATION MODES
When used in conjunction with a Mackie Control Universal, automation data can be written in real time by moving the faders. There are two write modes regulating how Mixcraft interprets fader movements and position. These can be set either in Mix>Automation Recording Mode in the Main Window menus, or on the MCU in the Automation section with the Write and Touch buttons.
OVERWRITE MODE
When a lane’s automation is armed and recording, Mixcraft continuously writes the current fader or V-Pot position for the duration of the recording. As a fader or V-Pot is moved during recording, the current position is what gets written to Mixcraft. Bear in mind that if you have automation already written, Mixcraft erases previous automation and overwrites it as it moves along.
TOUCH MODE
Mackie Control Universal and other MCU-compatible devices feature touch-sensitive faders - they literally know if you’re touching them. This gives Mixcraft the ability to write automation only while a fader is being touched. When an automation lane is armed and recording, Mixcraft only writes (or overwrites) automation if a finger is
touching the fader. Mixcraft immediately stops writing as soon as the finger is released. Next to all the faders automatically scurrying up and down on power-up, this is the MCU’s most impressive party trick!
CONFIGURING THE MIXCRAFT REMOTE MOBILE APP
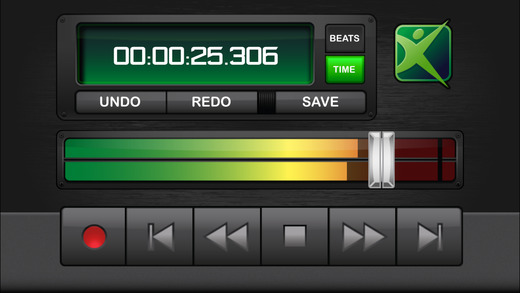
Mixcraft Remote is a free mobile app for iOS and Android that lets you control the transport and other functions wirelessly using an iPhone, iPad, or Android phones and tablets. Android versions are downloadable via Google Play Store; iOS versions are downloadable via the Apple App store. Here’s how to use it.
• Download and install the Mixcraft Remote mobile app in your mobile device.
• In your computer’s upper-left corner, click File>Preferences, then select Control Surfaces. In the Type column at the left, click on Add New. Select Mixcraft Remote in the dropdown menu. (Unlike other external hardware controllers, you won’t need to set the Input and Output drop-down menus.)
• Click OK at the bottom of the Preferences window and you’re all set!
Launch Mixcraft Remote on the mobile device; it will automatically locate and pair to your computer.
USING THE MIXCRAFT REMOTE MOBILE APP
The following functions are controllable with the Mixcraft Remote app.
Mixcraft Remote Control | Function |
|---|---|
Record transport Control | initiates recording |
Return to beginning control | moves playhead to start of project |
Rewind transport control | moves playhead back by 4x snap value |
Play transport control | initiates playback |
Fast-forward transport control | moves playhead forward by 4x snap value |
Fast-forward to end transport control | moves playhead to end of project |
Undo | cancels last action |
Redo | restores last action |
Save | saves the current project |
Master volume slider | adjusts project volume |
Song position | touch the Beats/Time display, then slide the pop-up bar to move the playhead to any position in the current project |