USING EFFECTS
Mixcraft includes a large suite of real-time audio effects that can be applied to audio clips or virtual instruments. These are usually referred to as “plug-ins.” Mixcraft also supports user-installed third-party plug-ins in VST and VST3 formats.
64-BIT vs. 32-BIT EFFECTS
Mixcraft 10 is a native 64-bit application, so you'll want to use 64-bit plugin effects whenever possible. Mixcraft can still run older 32-bit plugins - these will automatically load in a shell and operate like any other plugins.
With recent advances in processor technology, all new PC's feature 64-bit processors. It's a little confusing, but the number of processor bits is totally separate from the bit-depth of audio files. Unlike higher bit-rate audio, there is no difference in the sound quality of 32-bit plugins vs. 64-bit. It isn't necessary to understand all the technical nitty-gritty, but the important takeaway is that a 64-bit system is capable of moving far more data, far more quickly than a 32-bit system. In regard to audio plugins and instruments, this means they'll run more efficiently and will be able to address much more system RAM if needed (e.g., if you're using large sample library-based instruments).
Older 32-bit plugins will still run in Mixcraft, but you may encounter stability issues. If possible, we strongly recommend updating to 64-bit versions if available.
ADDING EFFECTS
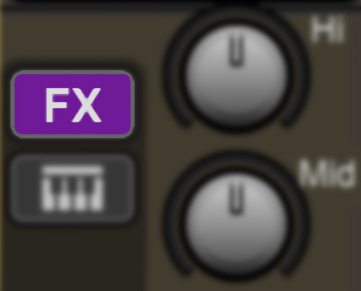
To open an effect on any Audio or Virtual Instrument Track, click the FX button in the track list or in the appropriate Mixer channel. To the left is the audio track FX button. Below is the FX button in the Mixer.
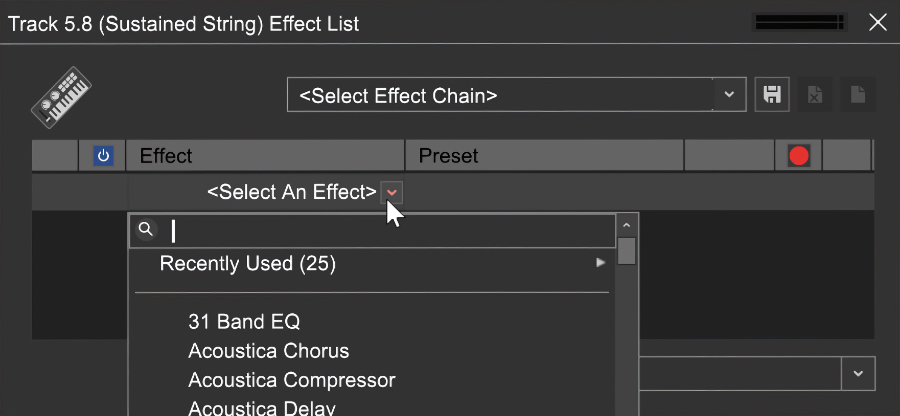
Either button opens the Effect List window:

Now click the <Select An Effect> drop-down menu and choose an effect. Once you’ve selected an effect, the Effect List should look something like this:
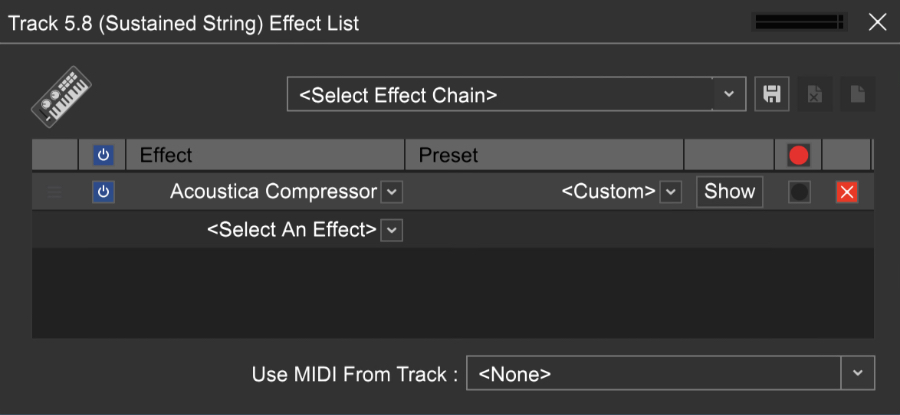
• Move Handle
The three little horizontal lines at the very left let you drag effects vertically to rearrange their order if there are multiple effects in the list.
• Active/Off Icon
Effects can be toggled on or off by clicking the green check mark to the left of the effect name. The blue “power button” icon next to Effect toggles all effects on and off. (See Effects Chains below.) This allows auditioning of effects without losing settings.
• Effect (Name)
Click <Select An Effect> to add new effects, or click an existing effects name to replace an effect with a different one.
• Preset
The Preset drop-down menu lets you select from included presets. These are very handy for speedy mix setups (or if you’re not sure how to operate a particular effect).
• Show/Hide
The Show and Hide buttons open and close the effect’s user interface for individual parameter tweaking.
• R (Record Effect) (Mixcraft Pro Studio only)
This crafty feature allows effects to become their own Mixcraft recording input sources.
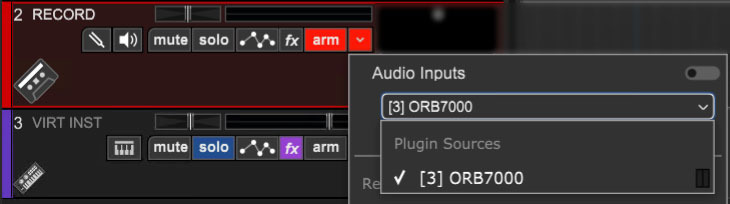
When the R box is checked, a red dot appears, and the effect will appear in the track record arm dialog as a recording source.
• X
Removes an effect and returns its slot to the <Select An Effect> dialog.
• Use MIDI From Track
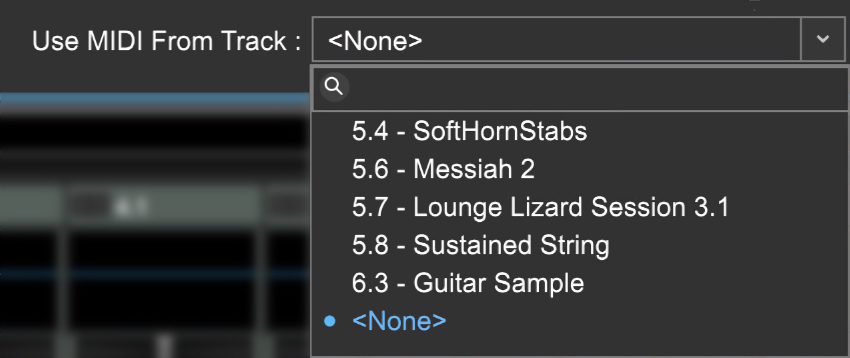
The Use MIDI From Track pop-up menu lets you route the playback of MIDI note data to a VST effect. This is most commonly used in conjunction with vocal tuning plug-ins (like Mixcraft’s GSnap Pitch Correction) or vocoder plug-ins.
To choose a MIDI source track, click the pop-up menu and select the desired MIDI track. The Use MIDI From Track setting applies to all effects in the track’s effect chain, but plug-ins that don’t make use of MIDI data will simply ignore it.
DIRECTLY ADDING EFFECTS TO THE TRACK LIST OR MIXER
Effects can be added directly to tracks and mixer channels without opening the Effects List window first. As with the Effects List, effects may be added in the Track List, or from the Mixer.

The Track List effects slots are hidden by default; to view them, select Track>Show Effects On Tracks from the Main Window menus or right-click on the track header. You can also position the mouse cursor over the right edge of a track and slide the left/right arrows to reveal or hide effects slots. Clicking +fx opens a pop-up menu where you’ll be able to choose effects.
Effects in the Track List effects area can be enabled and disabled by clicking on the small "power" button at the left.
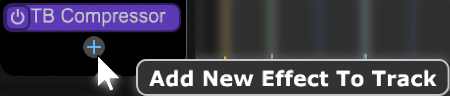
Effects can be added by clicking the +fx button in the Track List or the Mixer and selecting from the pop-up window.
If more than two effects are added, the track’s vertical height increases to accommodate additional effects (you can optionally reduce the track’s height, but effects slots may become hidden).
Display Virtual Instruments and Effects, Right Now!
Right-clicking a channel’s FX button instantly displays the user interface for all effects on a channel, skipping the Effects List Window. This is really handy if you’ve already decided on which effects are to be used and just want to tweak their parameters. This works exactly the same for Virtual Instruments by right- clicking a track’s Virtual Instrument button. To hide all effects or Virtual Instruments for a channel, press [CTRL] + right-click on the “fx” button.
EFFECTS SLOT RIGHT-CLICK FUNCTIONS
Oh, how we love to stash commands beneath the right-click button! These menus are the same for the Mixer and Track List effects slots.
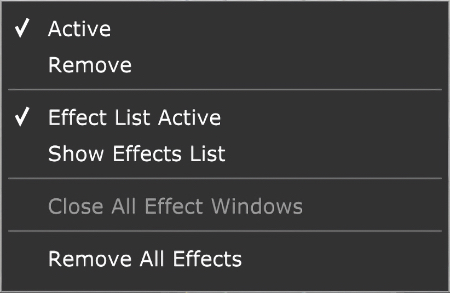
• Active
Use the check mark to bypass or engage an effect. Useful for A/B’ing purposes.
• Remove
Deletes the current effect from the list.
• Effect List Is Active
Just like the Active command, but this bypasses or engages all effects slots for the current track.
• Edit Effects List...
Opens the track’s Effects List. Exactly the same as clicking the fx button in the track header or mixer.
• Remove All Effects
Deletes all effects for the current track in one fell swoop.
EDITING EFFECTS
To edit an effect’s individual parameters, click the Show button to the right of the effect name.

Every effect has a unique user interface and controls, but the top section will be the same for all effects in Mixcraft. Let’s go over these:

• Level Meter
In the top-right corner of every VST Effect and Virtual Instrument is a stereo VU meter. This is helpful when adjusting input and output levels, and in those inevitable “what the heck?@#?” moments, it’ll let you know signal is present.

• Active/Off Button
Exactly the same as the Active/Off button in the Effect List window, just replicated in the effect interface for convenience.

• Show/Hide MIDI Controllers/Audio Control/MIDI Control Bar
This reveals the header section where MIDI controllers, Audio Control, and MIDI Control functions are assigned. (See “Plug-In and Virtual Instrument Controller Modules” for info on this super cool feature.)

• Add MIDI, Audio Control, and MIDI Controller
Creates a new MIDI controller assignment, or an Audio or MIDI Control object in the header.

• Select Preset
Allows selection of Mixcraft and user presets. This is the same as the preset selection menu in the Effect List window.

• Load VST Preset File (VSTi Plug-Ins only)
Some VST effect and instrument manufacturers distribute additional sound banks in the form of .fxb files, replacing current presets with new presets.

• Save A New Preset
Saves the current plug-in settings to a new preset. You’ll be prompted to enter a preset name. The preset will then appear in the preset list.

• Remove A Selected Preset
Permanently removes the currently selected preset. Factory presets cannot be deleted.

Note: If a track is frozen, its effects will not be editable until the track is unfrozen. Objects in mirror are behind you.
EFFECTS CHAINS
A series of effects can be configured in the Effect List window by adding effects using the <Select An Effect> dialog.
REARRANGE EFFECTS ORDER
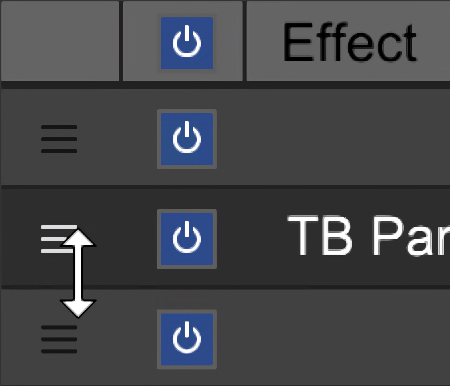
To rearrange the order of effects in a chain, simply click on an effect anywhere in the list and drag it to the desired location in the chain. It’s easiest to do on the left side as the cursor will turn into up/down arrows, and you won’t risk accidentally clicking something else.
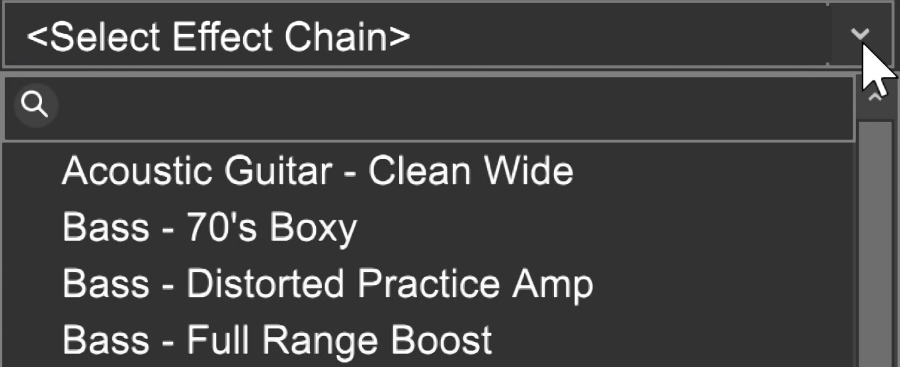
Mixcraft includes many useful effects chains optimized for common applications. To load an effects chain, click on the Effects Chain drop-down menu at the top of the Effect List window. To search for effects chains with a particular term (“drums” for example), simply type in a keyword next to the magnifying glass icon. You can add as many effects as desired to an Effects Chain.
The icons to the right of the Effects Chain drop-down menu perform the following operations:
• Save A New Preset

Saves the current Effects Chain setup to a new preset. You’ll be prompted to enter a preset name. The presets will then appear in the Effects Chain presets.
• Remove A Selected Preset

Permanently removes the currently selected preset. Careful with this guy! (You’ll get an, “Are you sure?” prompt.)
• New Preset

This clears all current effects if you’d like to start with a clean slate.
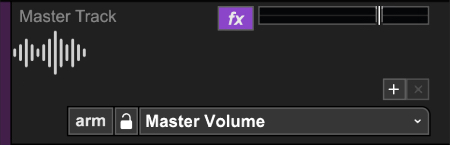
MASTER EFFECTS

This is the effect insert on the Main Mix bus. Use this for adding master effects to be applied to the entire mix such as bus compression, EQ, volume maximizers, etc.

Master Effects can be added either by clicking the FX button next to the Master output slider in the Main Window, by clicking the Main Mix FX button in the Main Mix channel, or by clicking the FX button in the Master Track in the track list (if it’s currently displayed).
ADDING THIRD-PARTY VST EFFECTS
Mixcraft supports standard Windows VST as well as VST3 effects plug-ins. If you’ve installed a third-party VST effect and you’re not seeing it in Mixcraft’s effects menu, you’ll need to add the VST effect folder. There are two ways to accomplish this.
The super-duper easy way is to simply drag-and-drop its DLL file into Mixcraft’s main window. Mixcraft automatically installs the file in the correct location and adds it to the VST search path list (in other words, it’ll just work!). The alternative method is to “manually” add VST effects to Mixcraft’s VST/VSTi folders.

Select Preferences>Plug-Ins and click the Edit VST/VSTi Folders button.
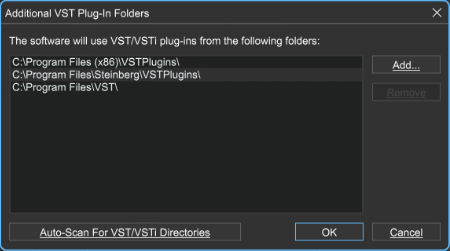
Click the Add... button, navigate to the VST effect in Windows Explorer, and click OK. If you’re not sure where the new VST plug-in is, click the Auto-Scan For VST/VSTi Directories button for assistance finding VST plug-ins.