MARKERS
Markers serve a variety of purposes. They can be used simply for adding notes such as “Chorus Here!” or “fix the guitar effects at mix time,” or they can perform functions such as changing the project tempo, key, or time signature. Markers are really easy to use, so we encourage you to use them!
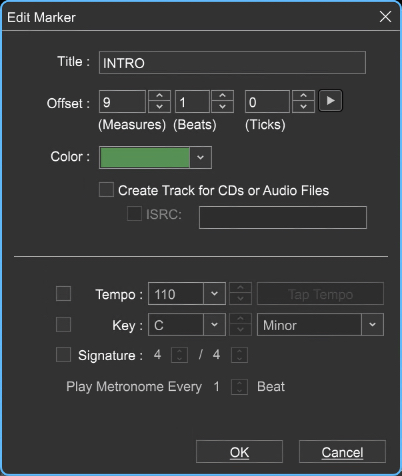
EDIT MARKER
To insert a Marker into the Timeline at the current Caret position, double-click in the Timeline or right-click and select Add Marker. Markers can also be added by selecting Mix>Markers>Add Marker or Mix>Markers>Add Tempo/Key Change from the Main Screen menus. You can also add a Marker at the current Caret location with the shortcut [CTRL]+ /... (that’s Control plus the slash key). Using the key shortcut is especially handy, because markers can be added “on-the-fly” during playback.
If Snap is on, Marker placement will conform to the current Snap setting. (Remember this if the Marker doesn’t seem to be landing where you want it.) Markers set to alter the current time signature always snap to a measure, otherwise adding a time signature change in the middle of a measure would wreak havoc with the project’s timing!
• Title
The Marker name. Use this for notes in the Timeline.
• Offset
Defines the exact position of the Marker in the Timeline. Markers can be repositioned by altering these numbers, either by clicking in the fields and entering a number or by using the up/down arrows to change the numbers.
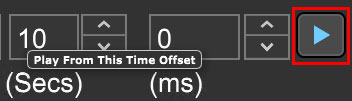
• Marker Play Arrow
Clicking the Marker Play Arrow (highlighted in red above) begins playback of the project from the location of the Marker. Clicking again stops playback and returns the playhead to the Marker location.
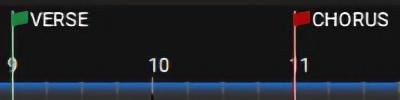
• Color
This drop-down menu can be used to select a color for the Marker “flag.” One useful application would be to use different colors to indicate song sections, such as green for verses, red for choruses, etc.
• Create Track For CDs or Audio Files
Creates track numbers if the project is to be burned to an audio CD using Mixcraft’s Burn Audio CD function. A CD icon will appear on the timeline.
ISRC
The International Standard Recording Code (ISRC) is an international standard code for uniquely identifying sound recordings and music video recordings. If you have an ISRC number for a CD track, check the box and add it here. (This is only important if you intend to mass-produce a CD.)
• Tempo
Check this box to change tempos in a project. Tempo changes will affect the metronome and cause any sounds set to Adjust To Project Tempo mode to follow the new tempo.
The Tap Tempo button lets you set a new tempo by clicking quarter notes with the mouse.(Tempo checkbox must be checked.)
• Key
Check this box to change the project key signature. Any sounds set to Adjust To Project Key mode will switch to the new key.
Scale Popup
When the Key checkbox is enabled a scale can be selected for notes to conform to.
• Signature
Check this box to change the project time signature. The numerator and denominator can be set using the up/down arrows.
Time signature changes will affect the metronome. This will also force the time signature to have a tempo change, even if it’s the same tempo as the previous tempo change.
Markers’ Effect On Tempo, Key, and Time Signature
Keep in mind that using Markers to set tempo, key, and time signature always overrides any settings made by clicking these controls in the transport display window. If the tempo, key, or time signature remains constant for the entire project, this won’t matter, but if you’re using markers to change the project tempo, key, or time signature, setting them in the transport display window effectively only functions from the first (permanent) Marker at the beginning of the project until the location of the second “user-added” Marker.
• Play Metronome Every X Beat
This lets you alter which beats sound the metronome click. When using common time signatures such as 3/4 or 4/4, it’s usually desirable to hear a click for every beat, but for time signatures with a large numerator (like 12/8, for example), the incessant clicking might drive you mad (or sound like one of those silly “Exotica Percussion” lounge records from the 60’s). Play Metronome Every X Beat instructs Mixcraft to click on fewer beats. Set this using the up/ down arrows.
MOVING MARKERS

To move a marker, position the mouse over the Marker’s flag and click and drag horizontally. You’ll see the cursor turn into a left/right arrow when the mouse is in position. Markers can also be moved by double-clicking the flag and entering a position with the number dialog in the Edit Marker window.
DELETING A MARKER
To delete a Marker, right-click a Marker flag and select Delete.
Note: You cannot delete the first marker and may only edit it.
DELETE ALL MARKERS
Select Mix>Markers>Delete All Markers in the Main Window menus. This deletes all Markers except the first one.
MARKER LIST

The Marker List window lets you conveniently view and edit all markers in a project in one place, as well as allowing a couple of nifty and useful tricks. To open the Marker List, click the View menu at the top of Mixcraft and select Marker List. To hide the Marker List, you can reselect it in the View menu but it’s easiest to just click the X in the upper-right corner.
You can set most of the same marker parameters as when clicking on individual marker setting windows, but the Marker List window allows configuring markers for an entire project with far less mouse clicking. Here are the available parameters for markers in the Marker List window moving left to right, and top to bottom.
• Marker Play
Clicking the Marker Play arrow begins playback of the project from the location of the Marker. Clicking again stops playback and returns the playhead to the Marker location.
• Color
This drop-down menu can be used to select a color for the Marker “flag.” One useful application is to use different colors to indicate song sections, such as green for verse, red for choruses, red, yellow, and green stripes for reggae, etc.
• Black Flag
Opens the parameter window for individual markers, in case you need to adjust parameters not present in the Marker List. Will not make your music sound like an angry 80’s punk rock band with Henry Rollins (you knew we’d make that joke).
• Title
The Marker name. Use this for notes in the Timeline.
• Offset
Defines the exact position of the Marker in the Timeline. Markers can be repositioned by altering these numbers, either by clicking in the fields and entering a number or by using the up/down arrows to change the numbers.
• Tempo
Check this box to change tempos in a project. Tempo changes will affect the metronome and cause any sounds set to Adjust To Project Tempo mode to follow the new tempo.
• Key
Check this box to change the project key signature. Any sounds set to Adjust To Project Key mode will switch to the new key.
• Signature
Click these boxes to change the project time signature. The numerator and denominator can be set using the up/down arrows. Note that time signature changes can affect metronome clicking. This also forces a tempo change, even if it’s the same tempo as the previous tempo change.
• X Button
Click X to delete the marker.
MIDI Control Tricks With the Marker List
As you may already know, Mixcraft lets you assign a huge number of its functions using external MIDI hardware devices with knobs, buttons, and sliders. One not-so-obvious use is to assign MIDI buttons or keyboard keys to the Marker Play arrow buttons in the Marker List. This is great for looping beats or song sections in a live setting. If you have Loop Mode engaged, Mixcraft automatically loops playback between the selected marker and the following marker. Along with the Marker List’s tempo and time signature settings, this effectively puts an infinite number of beats and tempos immediately under your fingers.
Another use for Marker Play button controller assignment would be for live playback of stereo mixes of entire songs or backing tracks, effectively turning your computer into a very fast and easy-to-control iPod. Simply import all songs for a live set, create markers, then assign playback for each to a MIDI key or button control.
Here’s how to assign controllers to the Marker List. With the Marker List window open, click the MIDI button in Mixcraft’s task bar.

All assignable parameters will turn purple. Click on a Marker Play arrow in the Marker List, then press a button on your MIDI controller. The button is now assigned to trigger the Marker Play arrow. To assign multiple buttons or keys, simply leave Mixcraft in MIDI Learn mode. When you’re done assigning buttons or keys, click the MIDI button in the task bar again. To reassign to a different hardware button or key, click the MIDI task bar button, reselect the desired Marker Play arrow, and hit a different hardware controller button or key.
AUTOMATIC TRACK MARKER WIZARD
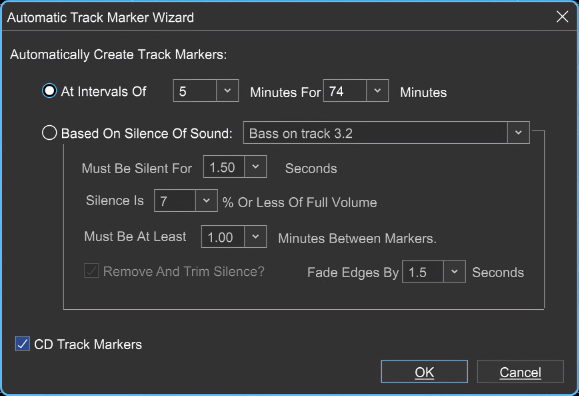
The automatic track marker wizard is a handy way to quickly add multiple track markers. Markers may be added at specific time intervals, or in areas of silence - you can even remove silence! This can be handy for breaking up the tracks of entire albums recorded as a continuous audio file.
To use the Automatic Track Marker Wizard, select Mix>Markers>Automatic Marker Wizard in the Main Window Menus.
• Automatically Create Track Markers: At Intervals Of
This creates Markers at the specified intervals. Select the number of minutes between intervals with the At Intervals Of drop-down menu, and the total duration over which Markers will be added with the For box drop-down menu.
• Automatically Create Track Markers: Based On Silence Of Sound
Choose Based On Silence Of Sound to create markers based on silent gaps in a recording. (Or choose Based On The Sounds of Silence if you want markers arranged to sound like Simon & Garfunkel - we know, too easy.)
• Based On Silence Of Sound
This drop-down menu lets you choose from all audio clips in a Project.
• Must Be Silent For
Specifies the length of silence that must elapse before a new Marker is created.
• Silence is X% Or Less Of Full Volume
This lets you choose how low the volume of audio content must fall to be considered “silence,” expressed in percentage (0% is full silence, 100% would be full-scale volume). The default silence setting is 7% of full volume.
• Must Be At Least X Minutes Between Markers
Set the minimum time between markers using the Must Be At Least X Minutes Between Markers drop-down menu. This parameter helps prevent ending up with an excessive number of markers.
• Remove and Trim Silence
This automatically cuts out silences between audio content. It’s good for getting rid of long pauses in continuous recordings.
• Fade Edges By X Seconds
This adds a gentle fade-in and fade-out at the beginning and end of audio sections when using the Remove and Trim Silence features.
• CD Track Markers
Adds CD Track Markers at each Marker. This is useful when converting existing audio content to be burned to a CD with individual tracks. (Unless you want to be like Prince’s “Black Album,” which was notoriously mastered as one really long purpley song.)