SEND TRACK
Send Tracks are tracks containing an effect, or a chain of effects, and track automation. Unlike inserting an effect into a standard audio channel, multiple audio channels can be “sent” to a send track effect using the channel send knobs in the Mixer tab. A Send Track is also often referred to as an Aux Bus.
Benefits of using Send Tracks:
• Share effects over multiple tracks.
• Fine degree of control over dry vs. effect level and placement of dry vs. effects in the stereo field.
• Use effects on a specific portion or section of a track (via automation).
• Brag to friends that you're a professional mixer-ing engineer.
If you’re not super clear on when or why to use Send Tracks, grab yourself a 64 oz jug of coffee, and read the following section:
To Insert or To Send Effects, That Is The Question
There are two ways to use effects in a mix environment: insert effects and send (aka, bus) effects. Both methods can be used somewhat interchangeably, but each has its own advantages, largely dependent upon the type of effect, its intended use, and in the virtual DAW environment, the use of computer resources.
Insert Effects
When an effect is added to a track by clicking the fx button, you’re using it as a channel insert. You can think of an insert effect as being a part of an individual channel strip. It also means that the wet-to-dry signal balance is adjusted using the controls in the effect itself. Although you can insert any type of effect, it’s best suited to gain and dynamics effects such as compressors, limiters, EQs, distortion, etc., because their mix is typically set “fully wet.”
In other words, you don’t usually use a partial amount of a compressed or distorted signal (although some crafty engineers have been known to break this rule). Conversely, time-domain effects such as chorus, delay, and reverb are almost always mixed together with the dry signal. In other words, the dry signal is always at full blast and some proportion of the effected signal is mixed in.
Send Track (Bus) Effects
One good way to think of a send effect is as one or more channels being mixed together and then being sent to a standalone effects unit. The dry mix remains unaffected, and the effect gets added to the final mix. Because of this, the wet/dry mix control of a send effect should always be set to 100% wet, otherwise, you’d end up with the dry signal from the main mix plus some dry signal from the effect itself, making it confusing to mix. Perhaps the biggest benefit of send effects is the conservation of computer processing resources. If you’re using a reverb plug-in that demands a great deal of computer overhead, send tracks to allow you to send many mix channels to just one instance.
Additionally, if you’re using an effect to process multiple channels of one “instrument” (a drum kit with multiple channels, for example), a send effect lets you add different amounts of the effect for each channel by simply adjusting the amount of each track’s send knob. Send tracks also offer tremendous flexibility with regard to stereoization. For example, a dry track could be panned to one side of the stereo image, with the effected side panned to the other, or anything in between.
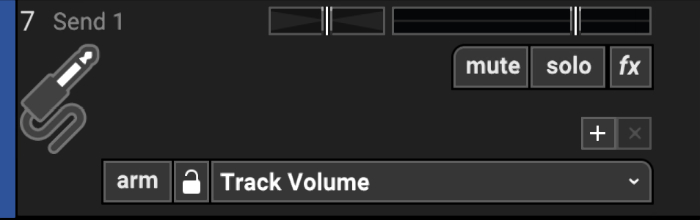
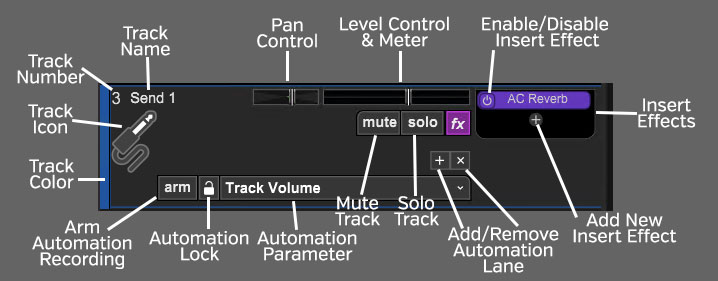
SEND TRACK HEADER
TRACK NUMBER
All tracks in a Mixcraft project are numbered, starting at 1 at the top track, and increasing up as tracks are added below. Note that track numbering always stays constant - that is, track numbers increment from 1 upward no matter how tracks are arranged or moved. (Track numbers aren't "attached" to specific tracks.)
TRACK NAME
Every track has a name. Default names are generally the type of track (Send Track, Video Track, etc.). Tracks can be renamed at any time by double-clicking and typing a new name, and either clicking outside the naming field, or clicking the [RETURN] or [ENTER] key.
PAN
The send track’s pan control is the small horizontal slider to the left of the track volume control. Adjust the pan control by clicking and dragging it to the left or right. Pan is adjustable from 100% left to 100% right. The pan controls default to the center position - this means that the sound is equally balanced between the left and right channels. Track panning can also be set in the main window drop-down menu Track>Properties>Set Pan>Set Exact Value … This menu is also accessible by right-clicking a track.
Tip: For finer and more accurate pan adjustment, hold down [ALT], [SHIFT], or [CTRL] while dragging the pan slider.
LEVEL CONTROL & METER
Track volume is adjusted by the horizontal slider with a built-in level meter. Click down on the slider and move it left or right to decrease or increase volume. Volume can be set from 0% to 200% (-Inf dB to +6 dB).
To set an exact track volume, choose Track>Properties>Set Volume>Set Exact Value… from the Main Window drop-down menu and enter the desired volume. This can also be accessed by right-clicking on the track.
Tip: Hold down [ALT], [SHIFT], or [CTRL] and click-drag the slider for finer and more accurate adjustment.
The horizontal volume fader contains an integrated level meter. In standard playback mode, this displays the output level as the track plays. If the track is in record arm mode (The arm button will be red), the meter functions as an input level meter.
INSERT EFFECTS - ADD/ENABLE/DISABLE
The track effects slots make it easy to load and access effects without opening the Effects List window - effects can be added by simple clicking the + sign and choosing an effect. Effects can also be enabled and disabled by clicking the "power" switch on the left side of the button. In the case of a Send track, this is where you'll add the effects that you're sending the signal to. If it's a time-domain effect (chorus, reverb, delay, you'll want to set its wet level to 100%.
If you don't see the track effects slots, their visibility can be toggled by clicking Track>Show Effects On Tracks, right-clicking on the track header and choosing Show Effects On Tracks, or by hovering over the right edge of a track header - the mouse pointer will turn into double-horizontal arrows that can be dragged to the right.
For more information about using effects, check out the cleverly named Using Effects section.
FX LIST
Click the fx button to open the Effect List window. Here effects can and presets can be selected.
ADD/REMOVE AUTOMATION LANE BUTTONS
The + button adds automation lanes beneath the send track, the X button will hide the closest automation lane the track. Keep in mind that clicking the X button does not delete automation data, it just hides the lane displaying it. For full information on using track automation, see the Automation and Controller Mapping section.
SOLO TRACK
To hear a single track’s audio, click the Solo button. Multiple tracks may be soloed. For example, to hear how the bass and guitar sound together without drums, solo the bass and guitar tracks. Once soloed, the track’s solo button turns blue and all other tracks turn gray with diagonal lines. If multiple tracks are selected, all selected tracks are soloed simultaneously.

The currently selected track can also be soloed using the shortcut [CTRL]+L, or by right-clicking the track and selecting Properties>Solo.
If multiple tracks are soloed, [CTRL]-clicking a non-soloed track disables solo on all other tracks and soloes the clicked track. If multiple tracks are soloed and one of them is [CTRL]-clicked, solo is disabled for all tracks.
MUTE TRACK

Tracks can be temporarily silenced by clicking the track Mute button. Once muted, the solo button turns blue, and all clips on the track turn gray with diagonal lines. Tracks may also be muted using the shortcut [CTRL]+M, or by right-clicking the track and selecting Properties>Mute. If multiple tracks are selected, all selected tracks are muted simultaneously.
If multiple tracks are muted, [CTRL]-clicking an unmuted track unmutes all others and mutes the clicked track (sort of a mute “solo” function). If multiple tracks are muted and one of them is [CTRL]-clicked, all are unmuted.
AUTOMATION PARAMETER POPUP MENU
Click this to select the current track/lane automation parameter.
LOCK BUTTON
Synchronizes the movements of lane automation with onscreen displays of channel volume and pan. See the Automation and Controller Mapping section for a full explanation.
ARM AUTOMATION RECORDING
Allows recording of automation data either via the onscreen control associated with the lane’s automation parameter, or by using a hardware controller assigned to a parameter. See Recording Real-Time Automation below.
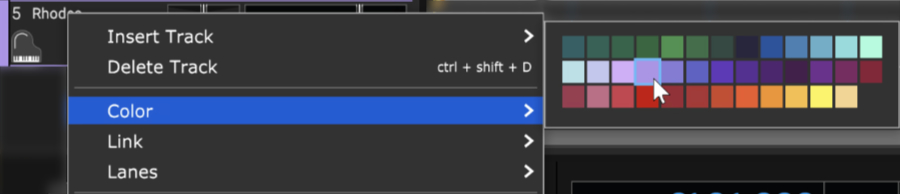
TRACK COLOR
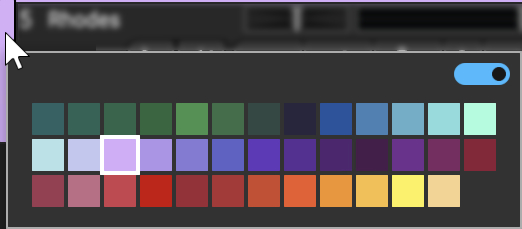
Track colors can be individually set by selecting Track>Properties>Track Color in the main window drop-down menus, by right-clicking a track and choosing from the color palette, or by clicking directly on the vertical color bar at the far left of the track. This affects the track’s highlight color and all clips on the track.
Mute and Solo Button [CTRL] + Click Shortcuts
If multiple tracks are soloed or muted, you can unsolo or unmute all tracks in project by [CTRL] + clicking on a solo or mute button. Multiple tracks cannot be Han Soloed.
TRACK IMAGE
Each track can have its own image beneath the track name for personalization as well as organization. Choose from Mixcraft’s included images or import your own.
To change the track image, double-click an existing track image or hover over the track image and click the pop-up button. You can also select Track>Properties>Choose Image… in the main window drop-down menus, or right-click on a track and select Properties>Choose Image...
The Choose A Track Image window opens:
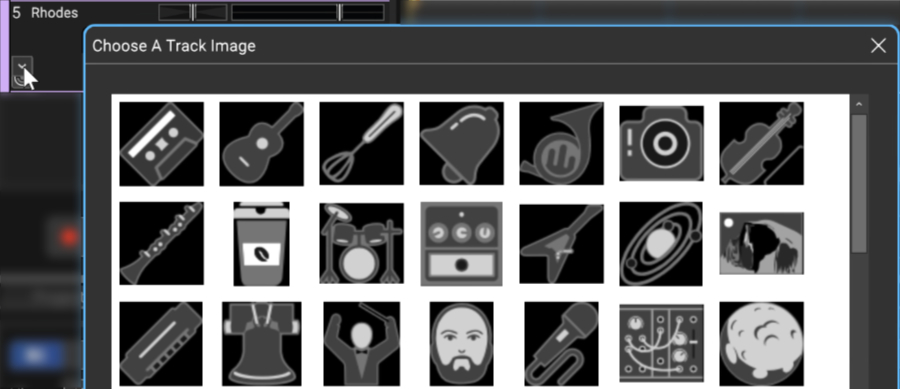
To use an existing image, select one and click OK. To use a custom image, click Add My Own Image File..., navigate to the image to be added, select the desired image, and click Open. The image replaces the existing track image and is added to the list of thumbnail images.
JPG, BMP, PNG, and GIF formats are supported, and custom images are permanently added to the track image library for use in future projects.
USING SEND TRACKS
Add a Send Track to the project by clicking the +Track button and selecting Add Send Track. You can also click Track>Add Track>Send Track in the main window menus.
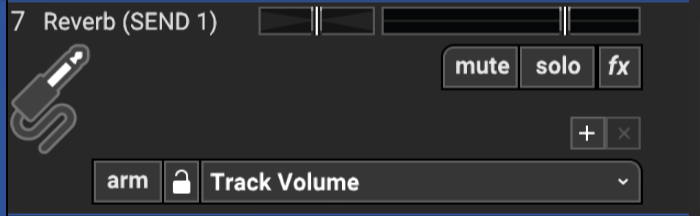
In this example, we’ve renamed the Send Track, “Reverb (SEND 1).”

Click on the track you’d like to add reverb to. Display its track automation by clicking the Automation button.
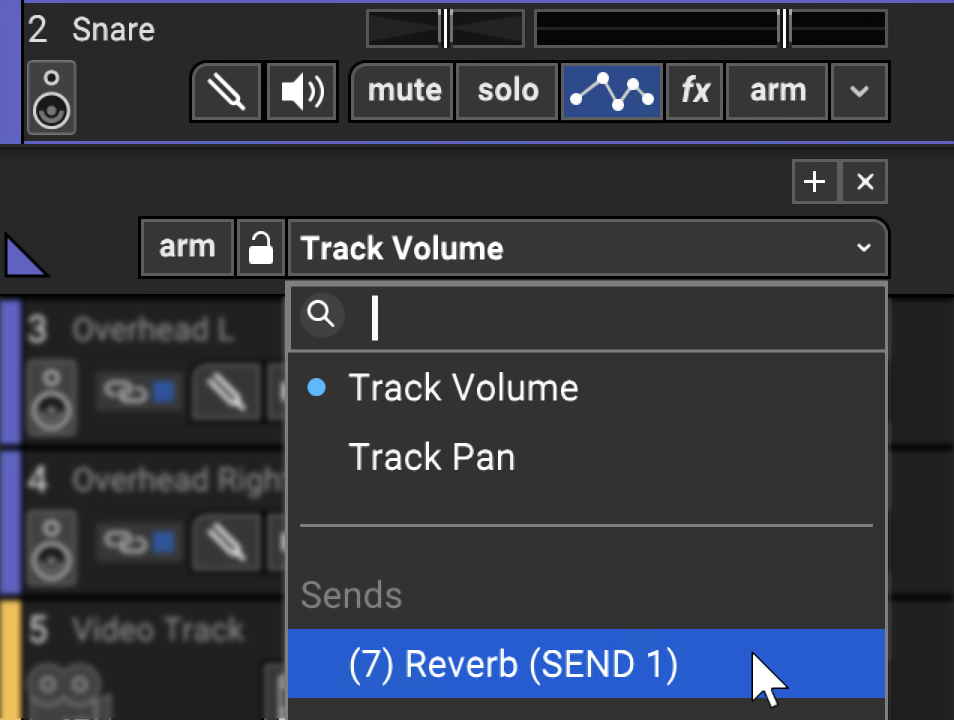
Click the Automation Type drop-down menu (by default it will say Track Volume), then click beneath Sends to select the Send Track effect. In this example, the number 11 is the track number of the Send Track, and Reverb (SEND) is the Send Track’s name.
Once the Send Track is selected, a knob appears. This sets the amount of signal sent to the Send Track.
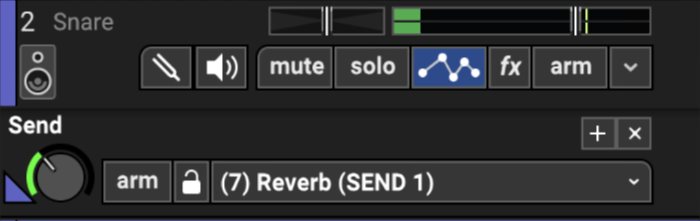
The send level can be set by clicking and dragging the knob up and down - the mouse cursor turns into up and down arrows. You can also set a channel’s Send Track level by clicking the Mixer tab at the bottom of the screen and rotating the channel’s Send knob, but we’ll talk about the mixer later on. Keep in mind that numerous tracks can be sent to the same Send Track. The amount of the track’s audio sent to the Send Track can also be adjusted via track automation. (For more information, see “Automation and Controller Mapping.”) LINK HERE
Wait A Minute Mr. Post Send
Mixcraft Send Tracks default to Post-Fader volume adjustment. This is a sensible choice for most mix situations because it means reducing the volume of a track fader proportionally reduces the volume of the
Send Track. There are situations where this behavior isn’t optimal. For example, if you’d like a dry instrument to be very quiet, but you’d like the reverbed signal very loud, Pre-Fader adjustment is a better choice.
SEND VOLUME TYPE
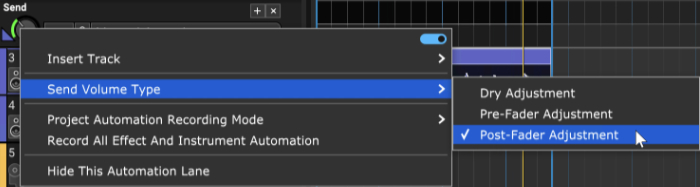
This lets you choose the point in the signal flow of a channel where audio is tapped to be sent to the Send Track. To change the Send Volume Type, right-click on the channel’s Send knob in the Mixer or on the Send knob displayed when track automation is visible.
• Dry Adjustment
Audio is sent to the Send Track before the channel’s insert effects or volume fader. Thus the signal sent to Send Track will have no channel insert effects applied and the volume fader has no effect on the signal level sent to the Send Track. You’ll see the word Dry appear next to the track Send knob as a reminder. (i.e. “My channel faders are all down... why do I still hear these wacky effects?!?”)
• Pre-Fader Adjustment
The track’s audio is sent to the Send Track before the volume fader, thus the volume fader has no effect on the signal level sent to the Send Track. You’ll see the word Pre appear next to the track Send knob as a reminder.
• Post-Fader Adjustment
The track’s audio is sent to the Send Track after the channel volume fader. This the default setting, and the desired setting in most cases. To find out why, see the sidebar, “Wait A Minute Mr. Post Send.”
Using Presets Optimized For Send Track Effects
When adding an effect to a Send Track, we recommend using a preset designed for a Send Track. (They’ll have the word Send in the title.) These presets will already have the wet/dry mix set to 100% wet in order to avoid the problem of having the dry signal’s volume controlled by the channel fader and the effect’s dry signal balance. If the clean volume appears to behave strangely (“Why can’t I turn this darn channel down!%^&?”), click fx in the Send Track, then the Edit button next to the effect. Now adjust the dry mix down to 0% and the wet mix up to 100%.