PLAYING AND RECORDING WITH PERFORMANCE PANEL CLIPS
PLAYING AUDIO AND MIDI SOUND CLIPS WITH THE PERFORMANCE PANEL
To use to the Performance Panel, simply drag clips into individual grid locations. You can drag in loops from the Mixcraft loop library (click the Library tab at the bottom of the screen to view and audition loops), the main playback grid, or even directly from the Windows File Explorer. Loops from the Mixcraft loop library contain information about the tempo and key of the sound embedded into the file - this means clips will play back in perfect time with project tempo. (see sidebar: Embedded Tempo and Key Information)
Once you’ve dragged loops into the Performance Panel set, initiate playback by clicking the playback arrow to the immediate left of the set number (i.e. Set 1, Set 2, etc.). You’ll notice small playback heads - these move at different speeds dependent upon the length of the loops. Though loops in a set do not need to be the same length, we strongly recommend using even loops lengths in units of two or four. Mixcraft will play back loops of any length in time, but repeat and cycles may become difficult to keep track of.
(Actually, If a clip is a really odd size, Mixcraft rounds its length to the nearest quarter-note and tacks a little silence on the end before looping back around. This happens transparently, but trust us, unless you want your music to sound like a bag of rocks poured down a steel slide, this “rounding off” helps to keep things sounding musical.)
You can switch which set of loops is playing by simply clicking another set or loop’s play button while the current set or loops is playing. Dependent upon the Cue setting, the Performance Panel will transition to the next set or loop either immediately, or wait until the Cue setting note value elapses. Clips can be stopped by pressing a row’s dedicated stop button located at the far left of the Performance Panel, or by pressing the stop button in an empty cell in the same row. You can stop all clip playback either by pressing the master stop button in the Performance Panel’s upper-left corner, or by pressing the stop button in Mixcraft’s transport controls (or by pressing the space bar).
RECORDING AUDIO AND MIDI SOUND CLIPS TO THE PERFORMANCE PANEL

In addition to just dragging existing clips into the Performance Panel grid, new clips can be recorded directly to the Performance Panel. In other words, it’s not necessary to record to the Main Clip grid first. This is super useful for instantly creating layered live loop performances, initially made famous by English chanteuse, Imogen Heap (check out her YouTube vids of “Just For Now” for a mindblowing demo).
Recording can be initiated when the Performance Panel is stopped, or “on-the-fly” while a Performance Panel set is playing.
RECORDING CLIPS WITH THE PERFORMANCE PANEL STOPPED

1. Open the Performance Panel by clicking the Performance Panel button, or by pressing P on your computer’s keyboard.
2. Click the metronome button and check that Recording and Recording Count-In Measures are enabled; you may want to change the number of count-in measures while you’re here (you can skip this step if you already have the metronome configured to your liking).
3. Select a track in the track list for recording by clicking on it. If you need to set the Recording Mode, enable or disable Auto Quantization, or MIDI input settings, click the down arrow next to the track’s Arm button.

4. Unlike standard recording, you’ll need to set the clip length prior to recording. Use the record pop-up menu above the Performance Panel to select a recording length.

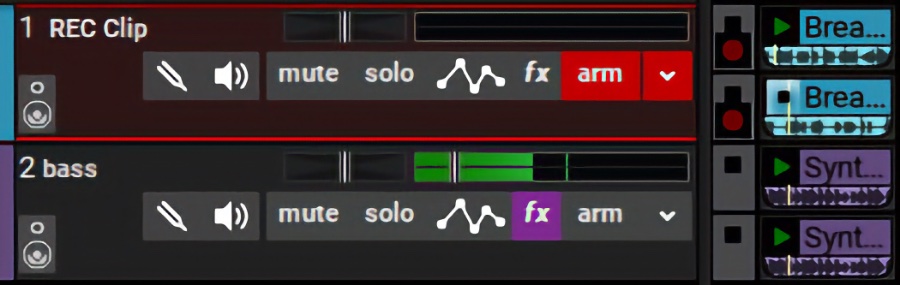
5. Click the track’s Arm button to ready it for recording. If you’re recording audio, now is a good time to check that you’re getting a solid input signal on the track input meter.

6. Click the Performance Panel’s Mini Arm button. It’s the gray square at the bottom of the column; it turns red to show the row is armed for recording. The small Record buttons in the Performance Panel grid locations turn red as well.
Important: If the Mini Arm button is enabled on a track, standard recording for that track (i.e. in the Main Clip Grid, not the Performance Panel) is disabled.

7. To begin recording, click a Record button in the same row as the record-enabled track. Mixcraft counts in according to the selected value of the Metronome Count-In Measures.
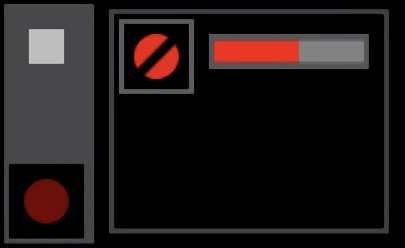
A progress bar moves across the top of the grid location as the count-in measures go by; when the progress bar gets all the way to the right, recording begins.

Once recording, a clip appears in the grid, and a progress bar makes its way across the bottom of the clip, showing the duration of the recording.
When the progress bar arrives at the right of the clip, Mixcraft stops recording. The newly created clip continues to loop, playing back the recorded passage.
RECORDING CLIPS WHILE THE PERFORMANCE PANEL IS PLAYING
Here’s where things start getting wild. Mixcraft lets you easily record new clips while the Performance Panel is playing. This opens up myriad possibilities for improvised (or semi-improvised) live performances. Because recording automatically disengages at the end of the selected recording length, newly recorded clips can rapidly be muted and unmuted, moved or copied between sets, and more. Add in Performance Panel Lane recording, and the possibilities rapidly get crazy!
Recording MIDI and audio clips during Performance Panel playback works almost exactly as with the Performance Panel stopped, as described in the preceding section, with one major difference:
If the Performance Panel is currently playing and a Record button is clicked, Mixcraft ignores the Count-In Measures setting altogether and instead waits for the duration of the Performance Panel Cue setting before recording begins. This makes sense because there’s no way to know what point in the loops’ cycles the user is going to whack a Record button.
The “countdown to record” progress bar discussed in step 7 on the previous page is displayed at the top of the selected grid location. This let you know when recording will begin.
Note: Mixcraft does its best to intelligently determine the musician’s intentions, but setting Cue to Instant can have some squirrely results, in terms of clip recording start and end points. Though you won’t hurt anything, we recommend sticking with Cue settings of standard note values for more predictable recording results.
LANE PLAYBACK AND RECORDING WITH THE PERFORMANCE PANEL
Multiple Lanes are available when playing and recording clips in the Performance Panel as with the Main Clip Grid. Besides the added flexibility of playing back multiple clips within a single track, using Lanes speeds up recording clips because the Mini Arm button is global for each track. In other words, clicking the Mini Arm button for a track will arm recording for all Lanes in the track simultaneously.
• Adding Lanes
Empty lanes can be added by right-clicking on the Track Header or an empty cell in the Performance Panel grid and selecting Lanes>Add (or with the shortcut [ALT]+L).
• Deleting Lanes
Lanes can be deleted by right-clicking on the Track Header or an empty cell in the Performance Panel grid and selecting Lanes>Delete. To delete unused lanes, right-click and select Lanes>Delete Empty Lanes (or with the shortcut [ALT]+K).
• Muting and Unmuting Lanes
All clips on any lane can be muted or unmuted by right-clicking on the Track Header or an empty cell in the Performance Panel grid and clicking Lanes>Mute All or Lanes>Unmute All.
RECORDING PERFORMANCE PANEL PERFORMANCES TO THE MAIN CLIP GRID
Performance Panel performances can be recorded directly to their corresponding tracks in the Main Clip Grid. This is a super nifty way to create entire songs, in real-time, really fast. It’s also very easy to do!
A few things you should know before you let it rip:
- Clips will retain their format. In other words, MIDI clips won’t be converted to audio, they’ll remain MIDI instrument clips.
- Clips also retain their size. If a clip is two bars long in the Performance Panel, it will “record” to the Main Clip Grid as a two-bar clip and create additional copies as it loops in the Performance Panel. This makes it easier to edit the resulting “song” in the Main Clip Grid. (You can always merge the clips later if you’re into the large- continuous-clip thing.)
- All Audio and MIDI clip automation in Performance Panel clips will transfer to newly recorded clips in the Main Clip Grid. The effects of the Clip Automation will not be “burned-in” to the Main Clip Grid audio clips.
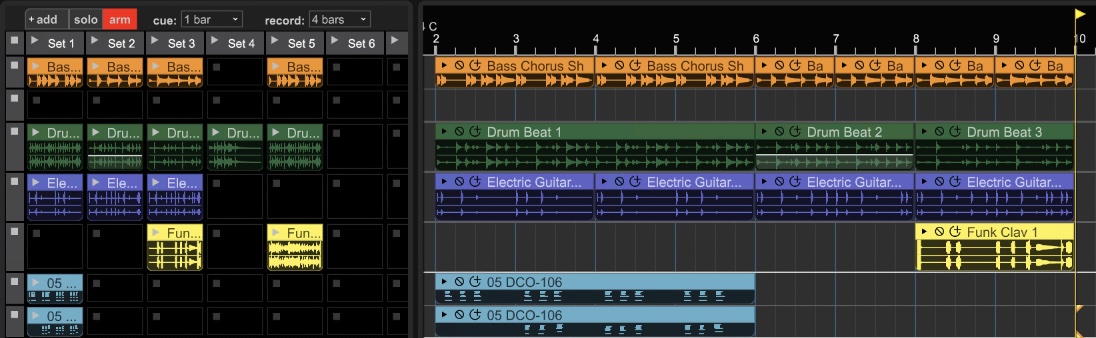
To record the Performance Panel to the Main Clip Grid, begin by positioning the song pointer line where you’d like the recording to start. Click the Record transport button (or press the R key). During the recording count-in, click one of the Set Play buttons in the Performance Panel. The Set will begin playing/recording exactly on the downbeat following the recording countdown. “Playing” the Performance Panel as normal will be recorded for as long as desired. When you’re done, click the Record button again or the Stop button to quit recording. Song done!
Note: If there are existing clips in the Main Clip Grid prior to recording, you’ll hear the existing clips playback during recording, and Mixcraft will happily overdub new clips “on top” of the existing ones. You won’t hurt anything, but it’ll kind of make a mess.
We can’t imagine a scenario where this would be desirable, so it’s a good idea to record only to empty sections of the Main Clip Grid.
Hey, Another Note: We recommend setting Metronome>Recording Count-In Measures to two or more measures prior to recording, that way you’ll have a little time to click the Set Play button in the Performance Panel. This can be set by clicking the metronome icon in the transport.