SUBMIX TRACK
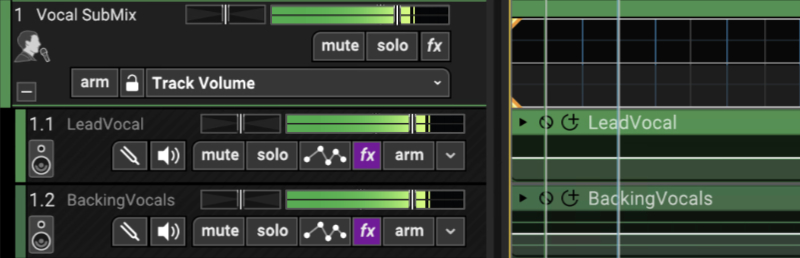
A SubMix track routes audio to an intermediate track before the Main Mix master volume. This is very useful as a master volume control for a group of related tracks such as a drum kit, or multiple tracks of backing vocals. SubMix tracks are also useful if you’d like to send a group of tracks to single channel insert effect. One common use would be to send drums or multi-tracked layered backing vocals through a single compressor instance to “glue” them together.
SUBMIX TRACK HEADER
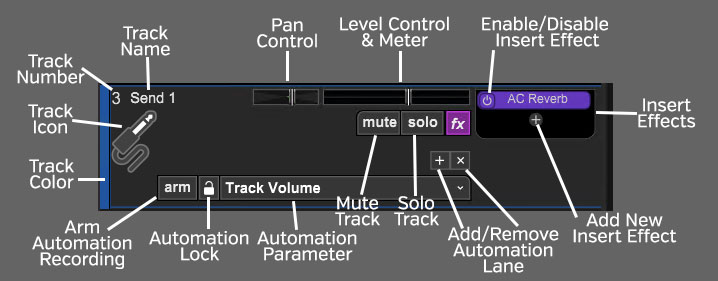
TRACK NUMBER
All tracks in a Mixcraft project are numbered, starting at 1 at the top track, and increasing up as tracks are added below. Note that track numbering always stays constant - that is, track numbers increment from 1 upward no matter how tracks are arranged or moved. (Track numbers aren't "attached" to specific tracks.)
TRACK NAME
Every track has a name. Default names are generally the type of track (SubMix, Video, etc.). Tracks can be renamed at any time by double-clicking and typing a new name, and either clicking outside the naming field, or clicking the [RETURN] or [ENTER] key.
PAN
The submix track’s pan control is the small horizontal slider to the left of the track volume control. Adjust the pan control by clicking and dragging it to the left or right. Pan is adjustable from 100% left to 100% right. The pan controls default to the center position - this means that the sound is equally balanced between the left and right channels. Track panning can also be set in the main window drop-down menu Track>Properties>Set Pan>Set Exact Value … This menu is also accessible by right-clicking a track.
Tip: For finer and more accurate pan adjustment, hold down [ALT], [SHIFT], or [CTRL] while dragging the pan slider.
LEVEL CONTROL & METER
Track volume is adjusted by the horizontal slider with a built-in level meter. Click down on the slider and move it left or right to decrease or increase volume. Volume can be set from 0% to 200% (-Inf dB to +6 dB).
To set an exact track volume, choose Track>Properties>Set Volume>Set Exact Value… from the Main Window drop-down menu and enter the desired volume. This can also be accessed by right-clicking on the track.
Tip: Hold down [ALT], [SHIFT], or [CTRL] and click-drag the slider for finer and more accurate adjustment.
The horizontal volume fader contains an integrated level meter which displays the output level as the track plays.
INSERT EFFECTS - ADD/ENABLE/DISABLE
The track effects slots make it easy to load and access effects without opening the Effects List window - effects can be added by simple clicking the + sign and choosing an effect. Effects can also be enabled and disabled by clicking the "power" switch on the left side of the button.
If you don't see the track effects slots, their visibility can be toggled by clicking Track>Show Effects On Tracks, right-clicking on the track header and choosing Show Effects On Tracks, or by hovering over the right edge of a track header - the mouse pointer will turn into double-horizontal arrows that can be dragged to the right.
For more information about using effects, check out the creatively named Using Effects section.
FX LIST
Click the fx button to open the Effect List window. Here effects can and presets can be selected.
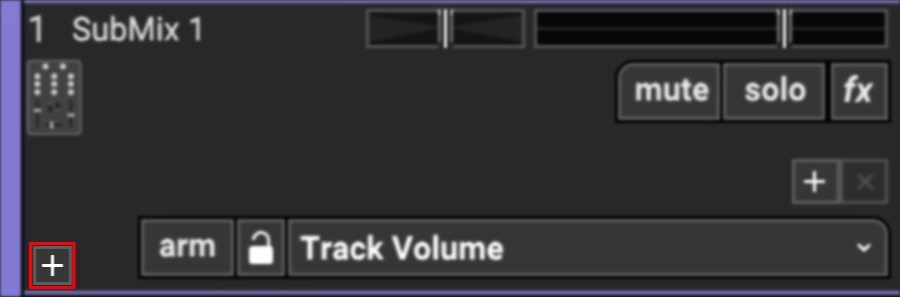
ADD/REMOVE AUTOMATION LANE BUTTONS
The + button adds automation lanes beneath the send track, the X button will hide the closest automation lane the track. Keep in mind that clicking the X button does not delete automation data, it just hides the lane displaying it. For full information on using track automation, see the Automation and Controller Mapping section.
SOLO TRACK
To hear a single track’s audio, click the Solo button. Multiple tracks may be soloed. For example, to hear how the bass and guitar sound together without drums, solo the bass and guitar tracks. Once soloed, the track’s solo button turns blue and all other tracks turn gray with diagonal lines. If multiple tracks are selected, all selected tracks are soloed simultaneously.

The currently selected track can also be soloed using the shortcut [CTRL]+L, or by right-clicking the track and selecting Properties>Solo.
If multiple tracks are soloed, [CTRL]-clicking a non-soloed track disables solo on all other tracks and soloes the clicked track. If multiple tracks are soloed and one of them is [CTRL]-clicked, solo is disabled for all tracks.
MUTE TRACK

Tracks can be temporarily silenced by clicking the track Mute button. Once muted, the solo button turns blue, and all clips on the track turn gray with diagonal lines. Tracks may also be muted using the shortcut [CTRL]+M, or by right-clicking the track and selecting Properties>Mute. If multiple tracks are selected, all selected tracks are muted simultaneously.
If multiple tracks are muted, [CTRL]-clicking an unmuted track unmutes all others and mutes the clicked track (sort of a mute “solo” function). If multiple tracks are muted and one of them is [CTRL]-clicked, all are unmuted.
AUTOMATION PARAMETER POPUP MENU
Click this to select the current track/lane automation parameter.
LOCK BUTTON
Synchronizes the movements of lane automation with onscreen displays of channel volume and pan. See the Automation and Controller Mapping section for a full explanation.
ARM AUTOMATION RECORDING
Allows recording of automation data either via the onscreen control associated with the lane’s automation parameter or by using a hardware controller assigned to a parameter.
TRACK COLOR
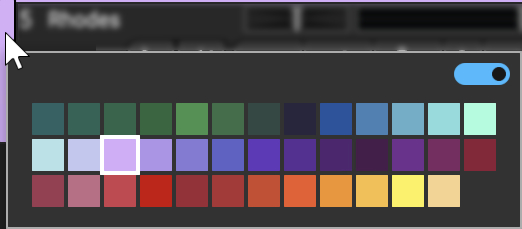
Track colors can be individually set by selecting Track>Properties>Track Color in the main window drop-down menus, by right-clicking a track and choosing from the color palette, or by clicking directly on the vertical color bar at the far left of the track. This affects the track’s highlight color and all clips on the track.
Mute and Solo Button [CTRL] + Click Shortcuts
If multiple tracks are soloed or muted, you can unsolo or unmute all tracks in the project by [CTRL] + clicking on a solo or mute button. Multiple tracks cannot be Han Soloed.
TRACK IMAGE
Each track can have its own image beneath the track name for personalization as well as organization. Choose from Mixcraft’s included images or import your own.
To change the track image, double-click an existing track image or hover over the track image and click the pop-up button. You can also select Track>Properties>Choose Image… in the main window drop-down menus, or right-click on a track and select Properties>Choose Image...
The Choose A Track Image window opens:
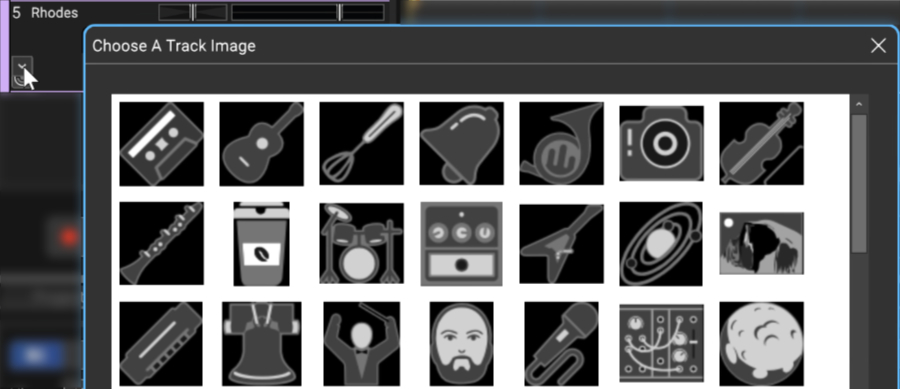
To use an existing image, select one and click OK. To use a custom image, click Add My Own Image File..., navigate to the image to be added, select the desired image, and click Open. The image replaces the existing track image and is added to the list of thumbnail images.
JPG, BMP, PNG, and GIF formats are supported, and custom images are permanently added to the track image library for use in future projects.
USING SUBMIX TRACKS
To create a SubMix Track, click the +Track button and select Add Submix Track. You can also click Track>Add Track>SubMix Track in the main window menu or right-click in the Track List area and use the Insert Track menu.
To add tracks to a SubMix Track, drag and drop the tracks onto the SubMix track. (Make sure to grab tracks in the track list, not clips in the grid; when you move a track, its clips move with it.) Once tracks are the child of a SubMix track, they can be freely moved up and down in the track list. Besides being directly beneath the SubMix track, child tracks will indent slightly with a small black region on the left side for ease of visibility. identification. If the SubMix Track is moved in the track list, all child tracks move with it. Child tracks may be shown or hidden by clicking the +/- sign at the far left side of the SubMix Track.
Regardless of the show or hide state of child tracks, you’ll see a “ghost” waveform approximating the sum of all the child track audio waveforms in the clip area next to the SubMix track. This is particularly handy when SubMix child tracks are hidden.
Volume, panning, solo, mute, insert effects, and automation remain independently adjustable for SubMix child tracks. Tracks may also be dragged and dropped out of the SubMix track - drag the track up or down to a location out of the SubMix track and the track becomes a standard track again.
NESTING SUBMIX TRACKS
SubMix tracks can be nested into other SubMix tracks. This is done exactly like dragging tracks into a SubMix track. Nested SubMix tracks let you subdivide and organize tracks with great precision. You could nested SubMix tracks for the toms of a SubMixed drum kit, or multi-tracked individual harmony lines in a large vocal production.
TRACK REGIONS (MIXCRAFT PRO STUDIO ONLY)
Track Regions is a Master Track and SubMix Track feature that makes light work of retooling song arrangements. For a step-by-step example of how to use Track Regions, please see the Track Regions section.
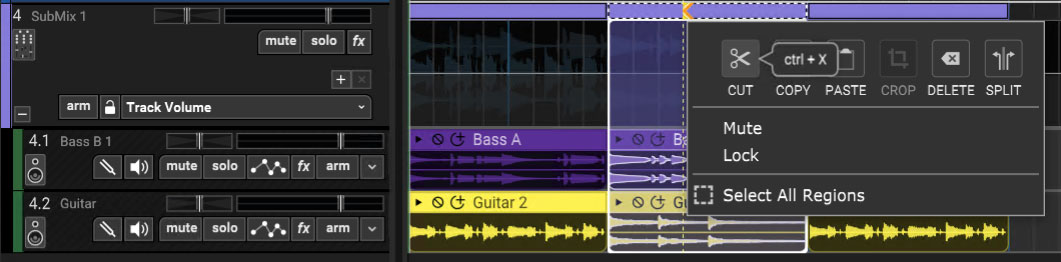
The basic idea is that instead of editing and moving individual clips, edits made to the purple horizontal bar at the top of the SubMix Track affect all clips in the SubMix Track.
Note that Track Region edits made in the Master Track affect ALL clips below, including SubMix tracks, whereas SubMix Track Region edits affect only clips within the SubMix Track.